
I made a custom table style using MS Word 2007. I set the font to be Arial 10pt and to apply to the whole table. The font changed to Arial, but the font size of my table did not change. When I go to Modify Table Style again the drop-down for the font size is blank (i.e. no size is selected). Attempting to change the font size via the drop-down or Format->Font button has no effect. Is this a bug, or am I doing something wrong? Thanks.
asked Mar 22, 2011 at 17:01
![]()
Jim FellJim Fell
5,76615 gold badges54 silver badges76 bronze badges
2
I experienced the same problem and generalized the explanations in that question.
For that specific question, it comes from the fact that the Internal Root Style (IRS) is TNR, 10 pts. If the Paragraph style applied to the text in the table differs from that, it will override whatever you set in the Table style.
The solution is then to set the Normal Style to 10 pts, which will avoid him to override the IRS. Then you’ll have to deal with it and create your own styles if you don’t want to use 10 pts Font in your text body. My advise would be to create a «My Normal» style, and make every styles which previously inherits from the Normal style inherit from «My Normal» style. Note that the paragraph style applied to the table must also be 10 pts.
answered Aug 16, 2017 at 14:18
![]()
math3006math3006
3262 silver badges11 bronze badges
This is apparently a bug that Microsoft isn’t going to fix.
answered Apr 6, 2011 at 19:08
![]()
Jim FellJim Fell
5,76615 gold badges54 silver badges76 bronze badges
The quick way to handle this is before inserting the new table, change the paragraph style to Table Body. What happens is Word uses the style for the current paragraph to assign the fonts and spacing. By changing the style to the Table style (hopefully you’ve adjusted the specs on that style), Word will
answered Jan 5, 2021 at 18:09
![]()
Create, Modify and Apply Table Styles in Word Documents
by Avantix Learning Team | Updated August 21, 2022
Applies to: Microsoft® Word® 2013, 2016, 2019, 2021 or 365 (Windows)
You can apply table styles to your Word tables to format them quickly and consistently. Word is shipped with several built-in table styles or you can create your own. You can edit table styles by modifying borders, shading, character formatting, paragraph formatting and table properties. If your document includes multiple tables, table styles can save a lot of time.
Note: Buttons and Ribbon tabs may display in a different way (with or without text) depending on your version of Word, the size of your screen and your Control Panel settings. For newer versionns of Word, Ribbon tabs may appear with different names. For example, the Table Tools Design tab may appear as Table Design.
Recommended article: How to Keep a Microsoft Word Table Together on One Page
Do you want to learn more about Microsoft Word? Check out our virtual classroom or live classroom Word courses >
Table styles and themes
Every Word document uses a document theme which includes a font theme and color theme. The colors used in table styles are based on the color theme.
You can select document themes, color themes and font themes using the Themes, Colors or Fonts drop-down menus on the Design tab in the Ribbon:

You can also create your own custom color themes so your tables can be formatted using your organization’s colors.
Display gridlines
When you are working with tables, it’s a good idea to turn gridlines on. Borders, which are a format, will print. Gridlines do not print.
To display gridlines:
- Click in a table.
- Click the Table Tools Layout or Table Layout tab.
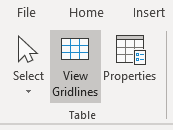
- Click View Gridlines. Gridlines will stay on for all Word documents.
View Gridlines appears on the Table Tools Layout or Table Layout tab when you click in a table:
Apply a table style
If your Word document contains multiple tables that you want to format in a consistent way, it’s best to use table styles rather than applying manual or direct formatting to each table.
To apply a table style to a table:
- Click in the table.
- Click the Table Tools Design or Table Design tab in the Ribbon.
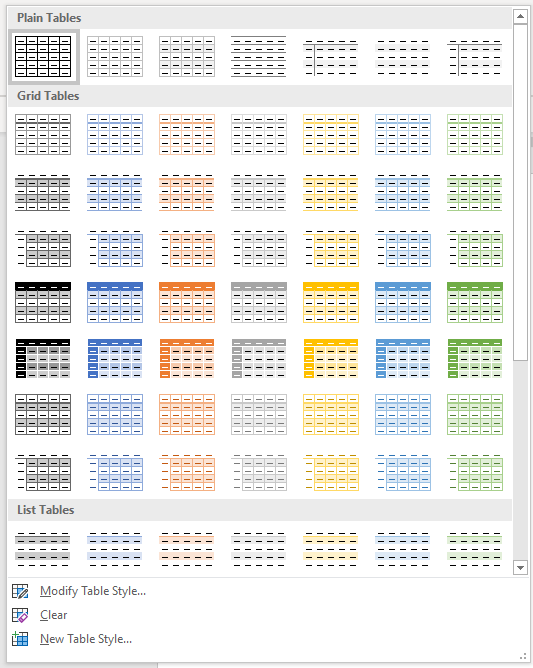
- Click the More down arrow on the bottom right in the Table Styles gallery. A drop-down menu appears.
- Hover over the various table styles. The table formatting will change as you move over different table styles in the gallery.
- Click the table style you want to apply.
Below is the Table Styles gallery (the current theme is the Office theme):
Note: Table styles do not include row height, column width or custom cell formatting for individual cells. If a user applies manual or direct formatting to a table (such as fills and borders) on the Table Tools Design or Table Design tab, this formatting will override the table style.
Apply Table Style Options
Once you have selected a table style, you can select or check different Table Style Options (which are affected by the formats in the selected table style).
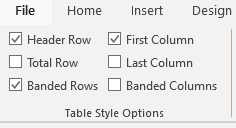
The six Table Style Options that you can apply are: Header Row, Total Row, Banded Rows, First Column, Last Column and Banded Columns. If you have selected a plain table style, you may not notice any changes in the table formatting if you select different Table Style Options.
Table Style Options appear on the Table Tools Design or Table Design tab as follows when you click in a table:
To select Table Style Options:
- Click in the table.
- Click the Table Tools Design or Table Design tab in the Ribbon.
- In Table Style Options, check or uncheck Header Row. If this option is checked, the header row will be formatted differently from the body rows.
- In Table Style Options, check or uncheck Total Row. If this option is checked, the last row will be formatted differently from the body rows.
- In Table Style Options, check or uncheck Banded Rows or Banded Columns for alternate row or column shading.
- In Table Style Options, check First Column or Last Column if you want the first or last column formatted differently from the other columns.
In the following table, Header Row and Banded Rows are checked in Table Style Options:

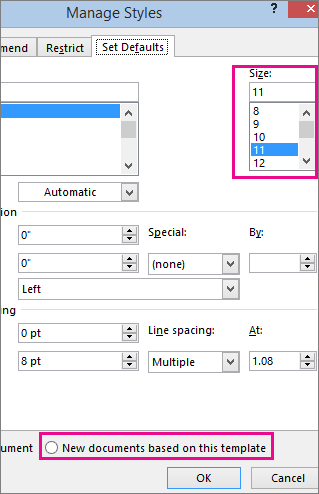
Modify a table style
You can modify a table style in a Word document and all tables using that table style will change.
To modify a table style:
- Click in the table.
- Click the Table Tools Design or Table Design tab in the Ribbon.
- Click the More down arrow on the bottom right in the Table Styles gallery. A drop-down menu appears.
- Click Modify Table Style. A dialog box appears. You can also right-click a table style and select Modify.
- From the Apply Formatting to drop-down menu, select the element that you want to modify (such as Header row).
- Select the desired formatting such as font, font size, font color, fill and border.
- From the Apply Formatting to drop-down menu, select the next element that you want to modify.
- Select the desired formatting such as font, font size, font color, fill and border.
- Repeat for other elements.
- Select Only in this document or New documents based on this template. If you select Only in this document, the modified style will only be available for the current document. If you select New documents based on this template, then the table style will be modified for future documents based on the current template (usually the Normal template).
- Click OK.
Below is the Modify Style dialog box:
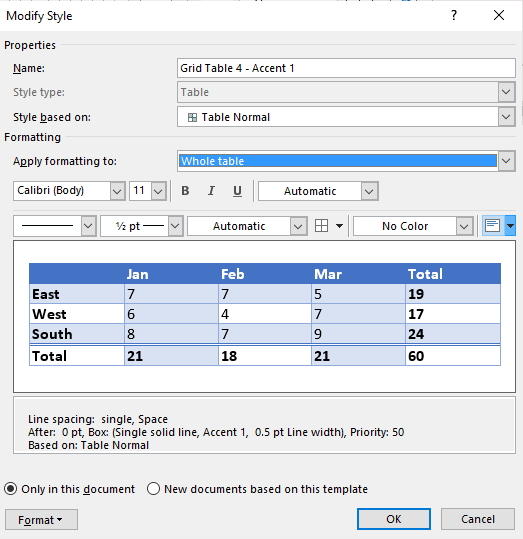
You can also click Format at the bottom of the dialog box and choose other options such as Font or Paragraph.
If you modify a table style and the tables using that style do not change, it’s likely that direct or manual formatting has been applied to the table which then overrides the table style. You may need to clear formatting in the table by selecting the table and clicking Clear Formatting on the Home tab in the Font group.
You can also modify Table Properties in a table style. Table properties include table alignment, row settings and cell margins.
To modify Table Properties in a table style:
- Click in the table.
- Click the Table Tools Design or Table Design tab in the Ribbon.
- Click the More down arrow on the bottom right in the Table Styles gallery. A drop-down menu appears.
- Click Modify Table Style. A dialog box appears. You can also right-click a table style and select Modify.
- Click Format on the bottom left of the dialog box. A drop-down menu appears.
- Click Table Properties. A dialog box appears.
- Click the Table tab and select an Alignment.
- Click the Row tab and select the desired options. For example, turn off Allow row to break across pages.
- Select any other formatting options you want to apply to the entire table.
- Click OK.
- Select Only in this document or New documents based on this template.
- Click OK.
Below is the Table Properties dialog box with the Table tab selected:

Create a new table style
You can also create a new or custom table style.
To create a custom table style:
- Click in the table.
- Click the Table Tools Design or Table Design tab in the Ribbon.
- Click the More down arrow on the bottom right in the Table Styles gallery. A drop-down menu appears.
- Click a table style to apply it as a base style.
- Click the More down arrow on the bottom right in the Table Styles gallery. A drop-down menu appears.
- Click New Table Style. A dialog box appears.
- Enter a name for the new table style in the Name box.
- Select the desired formatting.
- Select Only in this document or New documents based on this template.
- Click OK.
New Table Style appears at the bottom of the Table Styles gallery:
The new table style will appear in the Table Styles gallery under Custom (at the top of the gallery). If you want to delete it, right-click it in the gallery and select Delete Table Style.
Clear a table style
To clear a table style and remove formatting:
- Click in the table.
- Click the Table Tools Design or Table Design tab in the Ribbon.
- Click the More down arrow on the bottom right in the Table Styles gallery. A drop-down menu appears.
- Click Clear.
Clear appears at the bottom of the Table Styles gallery:
Set a default table style
You can also set a default table style for new tables in the current document or all new documents.
To set a default table style:
- Click in the table.
- Click the Table Tools Design or Table Design tab in the Ribbon.
- Click the More down arrow on the bottom right in the Table Styles gallery. A drop-down menu appears.
- Right-click the table style you want to use as the default style and select Set as Default from the drop-down menu. A dialog box appears.
- Select This document only or All documents based on the Normal.dotm template (the default template in Word is the Normal template).
- Click OK.
If you are working with documents with multiple tables, formatting with table styles can ensure that your tables are formatted consistently and save a lot of time.
Subscribe to get more articles like this one
Did you find this article helpful? If you would like to receive new articles, JOIN our email list.
More resources
4 Ways to Create a Table in Word
14 Shortcuts to Quickly Select Text in Microsoft Word
How to Create Headings in Word (Using Heading Styles)
How to Quickly Remove Hard Returns in Word Documents
10 Microsoft Word Tips, Tricks and Shortcuts for Selecting in Tables
Related courses
Microsoft Word: Intermediate / Advanced
Microsoft Excel: Intermediate / Advanced
Microsoft PowerPoint: Intermediate / Advanced
Microsoft Word: Long Documents Master Class
Microsoft Word: Styles, Templates and Tables of Contents
Microsoft Word: Designing Dynamic Word Documents Using Fields
VIEW MORE COURSES >
Our instructor-led courses are delivered in virtual classroom format or at our downtown Toronto location at 18 King Street East, Suite 1400, Toronto, Ontario, Canada (some in-person classroom courses may also be delivered at an alternate downtown Toronto location). Contact us at info@avantixlearning.ca if you’d like to arrange custom instructor-led virtual classroom or onsite training on a date that’s convenient for you.
Copyright 2023 Avantix® Learning
Microsoft, the Microsoft logo, Microsoft Office and related Microsoft applications and logos are registered trademarks of Microsoft Corporation in Canada, US and other countries. All other trademarks are the property of the registered owners.
Avantix Learning |18 King Street East, Suite 1400, Toronto, Ontario, Canada M5C 1C4 | Contact us at info@avantixlearning.ca
Excel for Microsoft 365 Word for Microsoft 365 PowerPoint for Microsoft 365 Excel 2021 Word 2021 PowerPoint 2021 Excel 2019 Word 2019 PowerPoint 2019 Excel 2016 Word 2016 PowerPoint 2016 Excel 2013 Word 2013 PowerPoint 2013 Excel 2010 Word 2010 PowerPoint 2010 More…Less
You can change the font size for all text or just selected text in desktop Excel, PowerPoint, or Word.
Change the default font size for all text
The way you change the default font size varies by app. Select your app below, and then follow the steps.
-
Click File > Options.
-
In the dialog box, click General.
-
Under When creating new workbooks, in the Font Size box, enter the font size you want.

Or, you can type in any size you want, between 1 and 409, in multiples of .5, such as 10.5 or 105.5. You can also choose a different default font style.
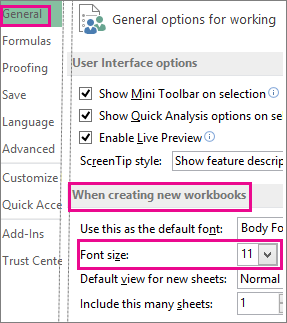
Note: To begin using the new default font size or font, you must restart Excel. The new default font and font size are used only in new workbooks created after you restart Excel; any existing workbooks are not affected. To use the new default font and size in existing workbooks, move worksheets from an existing workbook to a new workbook.
To change the font size for all slides, change it on the slide master. Every PowerPoint presentation contains a slide master with related slide layouts.
Note: If you want to change the theme, you should do that before changing the font, as a different theme may use different fonts.
-
On the View tab, click Slide Master.
In Slide Master View, the slide master is at the top of the thumbnail pane with the related layouts beneath it.
-
Click the slide master to change the font on all slides, or click any of the layouts to change the font size on just that layout.
-
On the slide master or layout, select the level of placeholder text for which you want to change the font size.
-
On the Home tab, click the font size you want in the Font Size box.
You can also type in any size you want in multiples of .1, such as 10.3 or 105.7.
The bullet automatically increases or decreases in size to match the font size changes.


-
Open a new blank document.
-
On the Home tab, in the Styles group, click the dialog box launcher
..Or press Ctrl+Alt+Shift+S.
-
Click the Manage Styles button (third from left at the bottom).
-
Click the Set Defaults tab and pick the size you want in the Size box.
You can also type in any size you want, between 1 and 1638, in multiples of .5, such as 10.5 or 105.5.
-
Click the New documents based on this template option.
-
Close and reopen Word. If you’re prompted to save the Normal template, say Yes.
Tip: You can also change the default font or font color on the Set Defaults tab.
 ..
..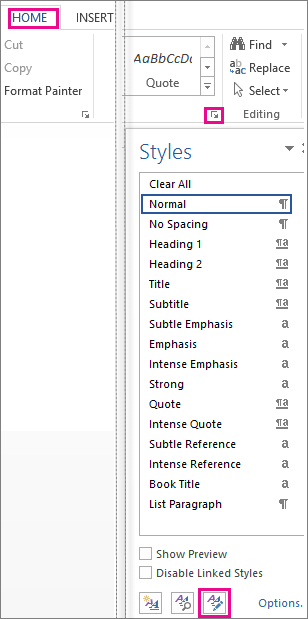
When you set a default font, every new document you open will use the font settings you selected and set as the default. The default font applies to new documents that are based on the active template, usually Normal.dotm. You can create different templates to use different default font settings.
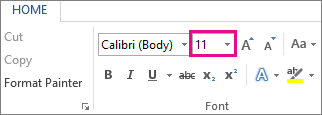
Change the size of selected text
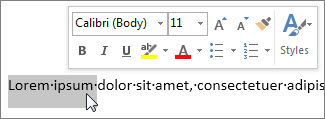
To change the font size of selected text in desktop Excel, PowerPoint, or Word:
-
Select the text or cells with text you want to change. To select all text in a Word document, press Ctrl + A.
-
On the Home tab, click the font size in the Font Size box.
You can also type in any size you want, within the following limits:
-
Excel: between 1 and 409, between 1 and 409, in multiples of .5 (such as 10.5 or 105.5)
-
PowerPoint: between 1 and 3600, in multiples of .1 (such as 10.3 or 105.7)
-
Word: between 1 and 1638, in multiples of .5 (such as 10.5 or 105.5)
-
Tips:
-
When you select text, a mini toolbar appears near your cursor. You can also change the text size in this toolbar.
-
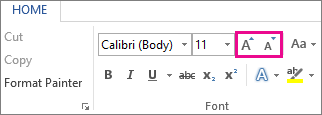
You can also click the Increase Font Size or Decrease Font Size (Grow Font and Shrink Font in some earlier versions of Office programs) icons until the size you want is displayed in the Font Size box.
See Also
Change or set the default font in Word
Change the fonts in a footer on a slide
Change a theme (Excel and Word)
Format text in cells (Excel)
Need more help?
Want more options?
Explore subscription benefits, browse training courses, learn how to secure your device, and more.
Communities help you ask and answer questions, give feedback, and hear from experts with rich knowledge.
fonts
microsoft-word-2007
table-styles
Viewed 7 times
I made a custom table style using MS Word 2007. I set the font to be Arial 10pt and to apply to the whole table. The font changed to Arial, but the font size of my table did not change. When I go to Modify Table Style again the drop-down for the font size is blank (i.e. no size is selected). Attempting to change the font size via the drop-down or Format->Font button has no effect. Is this a bug, or am I doing something wrong? Thanks.
Answers
Only authorized users can answer the search term. Please sign in first, or register a free account.
Not the answer you’re looking for? Browse other questions tagged :
fonts
microsoft-word-2007
table-styles
This is apparently a bug that Microsoft isn’t going to fix.
I experienced the same problem and generalized the explanations in that question.
For that specific question, it comes from the fact that the Internal Root Style (IRS) is TNR, 10 pts. If the Paragraph style applied to the text in the table differs from that, it will override whatever you set in the Table style.
The solution is then to set the Normal Style to 10 pts, which will avoid him to override the IRS. Then you’ll have to deal with it and create your own styles if you don’t want to use 10 pts Font in your text body. My advise would be to create a «My Normal» style, and make every styles which previously inherits from the Normal style inherit from «My Normal» style. Note that the paragraph style applied to the table must also be 10 pts.