
Вставка диапазона со сдвигом ячеек вправо или вниз методом Insert объекта Range. Вставка и перемещение строк и столбцов из кода VBA Excel. Примеры.
Range.Insert – это метод, который вставляет диапазон пустых ячеек (в том числе одну ячейку) на рабочий лист Excel в указанное место, сдвигая существующие в этом месте ячейки вправо или вниз. Если в буфере обмена содержится объект Range, то вставлен будет он со своими значениями и форматами.
Синтаксис
|
Expression.Insert(Shift, CopyOrigin) |
Expression – выражение (переменная), возвращающее объект Range.
Параметры
| Параметр | Описание | Значения |
|---|---|---|
| Shift | Необязательный параметр. Определяет направление сдвига ячеек. Если параметр Shift опущен, направление выбирается в зависимости от формы* диапазона. | xlShiftDown (-4121) – ячейки сдвигаются вниз; xlShiftToRight (-4161) – ячейки сдвигаются вправо. |
| CopyOrigin | Необязательный параметр. Определяет: из каких ячеек копировать формат. По умолчанию формат копируется из ячеек сверху или слева. | xlFormatFromLeftOrAbove (0) – формат копируется из ячеек сверху или слева; xlFormatFromRightOrBelow (1) – формат копируется из ячеек снизу или справа. |
* Если диапазон горизонтальный или квадратный (количество строк меньше или равно количеству столбцов), ячейки сдвигаются вниз. Если диапазон вертикальный (количество строк больше количества столбцов), ячейки сдвигаются вправо.
Примеры
Простая вставка диапазона
Вставка диапазона ячеек в диапазон «F5:K9» со сдвигом исходных ячеек вправо:
|
Range(«F5:K9»).Insert Shift:=xlShiftToRight |
Если бы параметр Shift не был указан, сдвиг ячеек, по умолчанию, произошел бы вниз, так как диапазон горизонтальный.
Вставка вырезанного диапазона
Вставка диапазона, вырезанного в буфер обмена методом Range.Cut, из буфера обмена со сдвигом ячеек по умолчанию:
|
Range(«A1:B6»).Cut Range(«D2»).Insert |
Обратите внимание, что при использовании метода Range.Cut, точка вставки (в примере: Range("D2")) не может находится внутри вырезанного диапазона, а также в строке или столбце левой верхней ячейки вырезанного диапазона вне вырезанного диапазона (в примере: строка 1 и столбец «A»).
Вставка скопированного диапазона
Вставка диапазона, скопированного в буфер обмена методом Range.Copy, из буфера обмена со сдвигом ячеек по умолчанию:
|
Range(«B2:D10»).Copy Range(«F2»).Insert |
Обратите внимание, что при использовании метода Range.Copy, точка вставки (в примере: Range("F2")) не может находится внутри скопированного диапазона, но в строке или столбце левой верхней ячейки скопированного диапазона вне скопированного диапазона находится может.
Вставка и перемещение строк
Вставка одной строки на место пятой строки со сдвигом исходной строки вниз:
Вставка четырех строк на место пятой-восьмой строк со сдвигом исходных строк вниз:
Вставка строк с использованием переменных, указывающих над какой строкой осуществить вставку и количество вставляемых строк:
|
1 2 3 4 5 6 7 8 9 10 11 12 13 14 15 16 17 18 19 20 21 22 |
Sub Primer1() Dim n As Long, k As Long, s As String ‘Номер строки, над которой необходимо вставить строки n = 8 ‘Количесто вставляемых строк k = 4 ‘Указываем адрес диапазона строк s = n & «:» & (n + k — 1) ‘Вставляем строки Rows(s).Insert End Sub ‘или то же самое с помощью цикла Sub Primer2() Dim n As Long, k As Long, i As Long n = 8 k = 4 For i = 1 To k Rows(n).Insert Next End Sub |
Перемещение второй строки на место шестой строки:
|
Rows(2).Cut Rows(6).Insert |
Вторая строка окажется на месте пятой строки, так как третья строка заместит вырезанную вторую строку, четвертая встанет на место третьей и т.д.
Перемещение шестой строки на место второй строки:
|
Rows(6).Cut Rows(2).Insert |
В этом случае шестая строка окажется на месте второй строки.
Вставка и перемещение столбцов
Вставка одного столбца на место четвертого столбца со сдвигом исходного столбца вправо:
Вставка трех столбцов на место четвертого-шестого столбцов со сдвигом исходных столбцов вправо:
Перемещение третьего столбца на место седьмого столбца:
|
Columns(3).Cut Columns(7).Insert |
Третий столбец окажется на месте шестого столбца, так как четвертый столбец заместит вырезанный третий столбец, пятый встанет на место четвертого и т.д.
Перемещение седьмого столбца на место третьего столбца:
|
Columns(7).Cut Columns(3).Insert |
В этом случае седьмой столбец окажется на месте третьего столбца.
 In certain cases, you may need to automate the process of inserting a row (or several rows) in a worksheet. This is useful, for example, when you’re (i) manipulating or adding data entries, or (ii) formatting a worksheet that uses blank rows for organization purposes.
The information and examples in this VBA Tutorial should allow you to insert rows in a variety of circumstances.
This VBA Tutorial is accompanied by Excel workbooks containing the data and macros I use in the examples below. You can get immediate free access to these example workbooks by clicking the button below.

Use the following Table of Contents to navigate to the section you’re interested in.
Insert Rows in Excel
When working manually with Excel, you can insert rows in the following 2 steps:
- Select the row or rows above which to insert the row or rows.
- Do one of the following:
- Right-click and select Insert.
- Go to Home > Insert > Insert Sheet Rows.
- Use the “Ctrl + Shift + +” keyboard shortcut.

You can use the VBA constructs and structures I describe below to automate this process to achieve a variety of results.
Excel VBA Constructs to Insert Rows
Insert Rows with the Range.Insert Method
Purpose of Range.Insert
Use the Range.Insert method to insert a cell range into a worksheet. The 2 main characteristics of the Range.Insert method are the following:
- Range.Insert can insert a single cell or a cell range. For purposes of this VBA Tutorial, you’re interested in inserting entire rows.
- To make space for the newly-inserted cells, Range.Insert shifts other cells away.
Syntax of Range.Insert
expression.Insert(Shift, CopyOrigin)
“expression” is a Range object. Therefore, I simplify as follows:
Range.Insert(Shift, CopyOrigin)
Parameters of Range.Insert
- Parameter: Shift.
- Description: Specifies the direction in which cells are shifted away to make space for the newly-inserted row.
- Optional/Required: Optional.
- Data type: Variant.
- Values: Use a constant from the xlInsertShiftDirection Enumeration:
- xlShiftDown or -4121: Shifts cells down.
- xlShiftToRight or -4161: Shifts cells to the right.
- Default: Excel decides based on the range’s shape.
- Usage notes: When you insert a row: (i) use xlShiftDown or -4121, or (ii) omit parameter and rely on the default behavior.
- Parameter: CopyOrigin.
- Description: Specifies from where (the origin) is the format for the cells in the newly inserted row copied.
- Optional/Required: Optional.
- Data type: Variant.
- Values: A constant from the xlInsertFormatOrigin Enumeration:
- xlFormatFromLeftOrAbove or 0: Newly-inserted cells take formatting from cells above or to the left.
- xlFormatFromRightOrBelow or 1: Newly-inserted cells take formatting from cells below or to the right.
- Default: xlFormatFromLeftOrAbove or 0. Newly-inserted cells take the formatting from cells above or to the left.
How to Use Range.Insert to Insert Rows
Use the Range.Insert method to insert a row into a worksheet. Use a statement with the following structure:
Range.Insert Shift:=xlShiftDown CopyOrigin:=xlInsertFormatOriginConstant
For these purposes:
- Range: Range object representing an entire row. Use the Worksheet.Rows or Range.EntireRow properties to return a Range object that represents the entire row. Please refer to the sections about the Rows and EntireRow properties below.
- xlInsertFormatOriginConstant: xlFormatFromLeftOrAbove or xlFormatFromRightOrBelow. xlFormatFromLeftOrAbove is the default value. Therefore, when inserting rows with formatting from row above, you can usually omit the CopyOrigin parameter.
You can usually omit the Shift parameter. By default, VBA decides how to shift the cells based on the range’s shape. When inserting a row, this usually results in Excel shifting the cells down.
Specify Rows with the Worksheet.Rows Property
Purpose of Worksheet.Rows
Use the Worksheet.Rows property to return a Range object representing all the rows within the worksheet the property works with.
Worksheet.Rows is read-only.
Syntax of Worksheet.Rows
expression.Rows
“expression” is a Worksheet object. Therefore, I simplify as follows:
Worksheet.Rows
How to Use Worksheet.Rows to Insert Rows
Use the Worksheet.Rows property to specify the row or rows above which new rows are inserted.
To insert a row, use a statement with the following structure:
Worksheets.Rows(row#).Insert
“row#” is the number of the row above which the row is inserted.
To insert multiple rows, use a statement with the following structure:
Worksheet.Rows("firstRow#:lastRow#").Insert
“firstRow#” is the row above which the rows are inserted. The number of rows VBA inserts is calculated as follows:
lastRow# - firstRow# + 1
Specify the Active Cell with the Application.ActiveCell Property
Purpose of Application.ActiveCell
Use the Application.ActiveCell property to return a Range object representing the active cell.
Application.ActiveCell is read-only.
Syntax of Application.ActiveCell
expression.ActiveCell
“expression” is the Application object. Therefore, I simplify as follows:
Application.ActiveCell
How to Use Application.ActiveCell To Insert Rows
When you insert a row, use the Application.ActiveCell property to return the active cell. This allows you to use the active cell as reference for the row insertion operation.
Use the Range.Offset property to return a Range object a specific number of rows above or below the active cell. Use the Range.EntireRow property to return a Range object representing the entire row or rows above which to insert the new row. Please refer to the sections about the Offset and EntireRow properties below.
To insert a row above the active cell, use the following statement:
ActiveCell.EntireRow.Insert Shift:=xlShiftDown
To insert a row a specific number of rows above or below the active cell, use a statement with the following structure:
ActiveCell.Offset(RowOffset).EntireRow.Insert Shift:=xlShiftDown
Specify a Cell Range with the Worksheet.Range Property
Purpose of Worksheet.Range
Use the Worksheet.Range property to return a Range object representing a single cell or a cell range.
Syntax of Worksheet.Range
expression.Range(Cell1, Cell2)
“expression” is a Worksheet object. Therefore, I simplify as follows:
Worksheet.Range(Cell1, Cell2)
Parameters of Worksheet.Range
- Parameter: Cell1.
- Description:
- If you use Cell1 alone (omit Cell2), Cell1 specifies the cell range.
- If you use Cell1 and Cell2, Cell1 specifies the cell in the upper-left corner of the cell range.
- Required/Optional: Required.
- Data type: Variant.
- Values:
- If you use Cell1 alone (omit Cell2): (i) range address as an A1-style reference in language of macro, or (ii) range name.
- If you use Cell1 and Cell2: (i) Range object, (ii) range address, or (iii) range name.
- Description:
- Parameter: Cell2.
- Description: Cell in the lower-right corner of the cell range.
- Required/Optional: Optional.
- Data type: Variant.
- Values: (i) Range object, (ii) range address, or (iii) range name.
How to Use Worksheet.Range to Insert Rows
When you insert a row, use the Worksheet.Range property to return a cell or cell range. This allows you to use a specific cell or cell range as reference for the row insertion operation.
Use the Range.Offset property to return a Range object a specific number of rows above or below the cell or cell range. Use the Range.EntireRow property to return a Range object representing the entire row or rows above which to insert the new row or rows. Please refer to the sections about the Offset and EntireRow properties below.
To insert rows above the cell range specified by Worksheet.Range, use a statement with the following structure:
Worksheet.Range(Cell1, Cell2).EntireRow.Insert Shift:=xlShiftDown
To insert rows a specific number of rows above or below the cell range specified by Worksheet.Range use a statement with the following structure:
Worksheet.Range(Cell1, Cell2).Offset(RowOffset).EntireRow.Insert Shift:=xlShiftDown
If the cell range represented by the Worksheet.Range property spans more than 1 row, the Insert method inserts several rows. The number of rows inserted is calculated as follows:
lastRow# - firstRow# + 1
Please refer to the section about the Worksheet.Rows property above for further information about this calculation.
Specify a Cell with the Worksheet.Cells and Range.Item Properties
Purpose of Worksheet.Cells and Range.Item
Use the Worksheet.Cells property to return a Range object representing all the cells within a worksheet.
Once your macro has all the cells within the worksheet, use the Range.Item property to return a Range object representing one of those cells.
Syntax of Worksheet.Cells and Range.Item
Worksheet.Cells
expression.Cells
“expression” is a Worksheet object. Therefore, I simplify as follows:
Worksheet.Cells
Range.Item
expression.Item(RowIndex, ColumnIndex)
“expression” is a Range object. Therefore, I simplify as follows:
Range.Item(RowIndex, ColumnIndex)
Worksheet.Cells and Range.Item Together
Considering the above:
Worksheet.Cells.Item(RowIndex, ColumnIndex)
However, Item is the default property of the Range object. Therefore, you can generally omit the Item keyword before specifying the RowIndex and ColumnIndex arguments. I simplify as follows:
Worksheet.Cells(RowIndex, ColumnIndex)
Parameters of Worksheet.Cells and Range.Item
- Parameter: RowIndex.
- Description:
- If you use RowIndex alone (omit ColumnIndex), RowIndex specifies the index of the cell you work with. Cells are numbered from left-to-right and top-to-bottom.
- If you use RowIndex and ColumnIndex, RowIndex specifies the row number of the cell you work with.
- Required/Optional: Required.
- Data type: Variant.
- Values: You usually specify RowIndex as a value.
- Description:
- Parameter: ColumnIndex.
- Description: Column number or letter of the cell you work with.
- Required/Optional: Optional.
- Data type: Variant.
- Values: You usually specify ColumnIndex as a value (column number) or letter within quotations (“”).
How to use Worksheet.Cells and Range.Item to Insert Rows
When you insert a row, use the Worksheet.Cells and Range.Item properties to return a cell. This allows you to use a specific cell as reference for the row insertion operation.
Use the Range.Offset property to return a Range object a specific number of rows above or below the cell. Use the Range.EntireRow property to return a Range object representing the entire row above which to insert the row. Please refer to the sections about the Offset and EntireRow properties below.
To insert a row above the cell specified by Worksheet.Cells, use a statement with the following structure:
Worksheet.Cells(RowIndex, ColumnIndex).EntireRow.Insert Shift:=xlShiftDown
To insert a row a specific number of rows above or below the cell specified by Worksheet.Cells, use a statement with the following structure:
Worksheet.Cells(RowIndex, ColumnIndex).Offset(RowOffset).EntireRow.Insert Shift:=xlShiftDown
Specify a Cell Range a Specific Number of Rows Below or Above a Cell or Cell Range with the Range.Offset Property
Purpose of Range.Offset
Use the Range.Offset property to return a Range object representing a cell range located a number of rows or columns away from the range the property works with.
Syntax of Range.Offset
expression.Offset(RowOffset, ColumnOffset)
“expression” is a Range object. Therefore, I simplify as follows:
Range.Offset(RowOffset, ColumnOffset)
Parameters of Range.Offset
- Parameter: RowOffset.
- Description: Number of rows by which cell or cell range is offset.
- Required/Optional: Optional.
- Data type: Variant.
- Values:
- Positive number: Moves down the worksheet.
- Negative number: Moves up the worksheet.
- 0: Stays on the same row.
- Default: 0. Stays on the same row.
- Parameter: ColumnOffset.
- Description: Number of columns by which cell or cell range is offset.
- Required/Optional: Optional.
- Data type: Variant.
- Values:
- Positive number: Moves towards the right of the worksheet.
- Negative number: Moves towards the left of the worksheet.
- 0: Stays on the same column.
- Default: 0. Stays on the same column.
- Usage notes: When you insert a row, you can usually omit the ColumnOffset parameter. You’re generally interested in moving a number of rows (not columns) above or below.
How to Use Range.Offset to Insert Rows
When you insert a row, use the Range.Offset property to specify a cell or cell range located a specific number of rows below above another cell or cell range. This allows you to use this new cell or cell range as reference for the row insertion operation.
Use properties such as Application.ActiveCell, Worksheet.Range and Worksheet.Cells to specify the base range the Offset property works with. Please refer to the sections about the ActiveCell, Range and Cells properties above.
Specify Entire Row with the Range.EntireRow Property
Purpose of Range.EntireRow
Use the Range.EntireRow property to return a Range object representing the entire row or rows containing the cell range the property works with.
Range.EntireRow is read-only.
Syntax of Range.EntireRow
expression.EntireRow
“expression” is a Range object. Therefore, I simplify as follows:
Range.EntireRow
How to Use Range.EntireRow to Insert Rows
When you insert a row, use the Range.EntireRow property to return the entire row or rows above which the new row or rows are inserted.
Use properties such as Application.ActiveCell, Worksheet.Range and Worksheet.Cells to specify the range the EntireRow property works with. Please refer to the sections about the ActiveCell, Range and Cells properties above.
Clear Row Formatting with the Range.ClearFormats Method
Purpose of Range.ClearFormats
Use the Range.ClearFormats method to clear the formatting of a cell range.
Syntax of Range.ClearFormats
expression.ClearFormats
“expression” is a Range object. Therefore, I simplify as follows:
Range.ClearFormats
How to Use Range.ClearFormats to Insert Rows
The format of the newly-inserted row is specified by the CopyOrigin parameter of the Range.Insert method. Please refer to the description of Range.Insert and CopyOrigin above.
When you insert a row, use the Range.ClearFormats method to clear the formatting of the newly-inserted rows. Use a statement with the following structure after the statement that inserts the new row (whose formatting you want to clear):
Range.ClearFormats
“Range” is a Range object representing the newly-inserted row.
Use the Worksheet.Rows or Range.EntireRow properties to return a Range object that represents the newly-inserted row. Please refer to the sections about the Rows and EntireRow properties above.
Copy Rows with the Range.Copy Method
Purpose of Range.Copy
Use the Range.Copy method to copy a cell range to another cell range or the Clipboard.
Syntax of Range.Copy
expression.Copy(Destination)
“expression” is a Range object. Therefore, I simplify as follows:
Range.Copy(Destination)
Parameters of Range.Copy
- Parameter: Destination.
- Description: Specifies the destination cell range to which the copied cell range is copied.
- Required/Optional: Optional parameter.
- Data type: Variant.
- Values: You usually specify Destination as a Range object.
- Default: Cell range is copied to the Clipboard.
- Usage notes: When you insert a copied row, omit the Destination parameter to copy the row to the Clipboard.
How to Use Range.Copy to Insert Rows
Use the Range.Copy method to copy a row which you later insert.
Use a statement with the following structure before the statement that inserts the row:
Range.Copy
“Range” is a Range object representing an entire row.
Use the Worksheet.Rows or Range.EntireRow properties to return a Range object that represents a row. Please refer to the sections about the Rows and EntireRow properties above.
Related VBA and Macro Tutorials
- General VBA constructs and structures:
- Introduction to Excel VBA constructs and structures.
- The Excel VBA Object Model.
- How to declare variables in Excel VBA.
- Excel VBA data types.
- Practical VBA applications and macro examples:
- How to copy and paste with Excel VBA.
You can find additional VBA and Macro Tutorials in the Archives.
Example Workbooks
This VBA Tutorial is accompanied by Excel workbooks containing the data and macros I explain below. If you want to follow and practice, you can get immediate free access to these example workbooks by clicking the button below.
Each worksheet within the workbook contains a single data range. Most of the entries simply state “Data”.

Example #1: Excel VBA Insert Row
VBA Code to Insert Row
The following macro inserts a row below row 5 of the worksheet named “Insert row”.
Sub insertRow()
    'Source: powerspreadsheets.com/
    'For further information: https://powerspreadsheets.com/excel-vba-insert-row/
    Worksheets("Insert row").Rows(6).Insert Shift:=xlShiftDown
End Sub

Process Followed by Macro

VBA Statement Explanation
Worksheets(“Insert row”).Rows(6).Insert Shift:=xlShiftDown
- Item: Worksheets(“Insert row”).
- VBA construct: Workbook.Worksheets property.
- Description: Returns a Worksheet object representing the “Insert row” worksheet.
- Item: Rows(6).
- VBA construct: Worksheets.Rows property.
- Description: Returns a Range object representing row 6 of the worksheet returned by item #1 above.
- Item: Insert.
- VBA construct: Range.Insert method.
- Description: Inserts a new row above the row returned by item #2 above.
- Item: Shift:=xlShiftDown.
- VBA construct: Shift parameter of Range.Insert method.
- Description:
- Shifts rows down (xlShiftDown) to make space for the row inserted by item #3 above.
- You can usually omit this parameter. By default, VBA decides how to shift the cells based on the range’s shape. When inserting a row, this usually results in Excel shifting the cells down.
Effects of Executing the Macro
The following GIF illustrates the results of executing this macro. As expected, VBA inserts a row below row 5 of the worksheet.

Example #2: Excel VBA Insert Multiple Rows
VBA Code to Insert Multiple Rows
The following macro inserts 5 rows below row 10 of the worksheet named “Insert row”.
Sub insertMultipleRows()
    'Source: powerspreadsheets.com/
    'For further information: https://powerspreadsheets.com/excel-vba-insert-row/
    Worksheets("Insert row").Rows("11:15").Insert Shift:=xlShiftDown
End Sub

Process Followed by Macro

VBA Statement Explanation
Worksheets(“Insert row”).Rows(“11:15”).Insert Shift:=xlShiftDown
- Item: Worksheets(“Insert row”).
- VBA construct: Workbook.Worksheets property.
- Description: Returns a Worksheet object representing the “Insert row” worksheet.
- Item: Rows(“11:15”).
- VBA construct: Worksheet.Rows property.
- Description: Returns a Range object representing rows 11 to 15 of the worksheet returned by item #1 above.
- Item: Insert.
- VBA construct: Range.Insert method.
- Description:
- Inserts new rows above the rows returned by item #2 above.
- The number of inserted rows is equal to the number of rows returned by item #2 above. This is calculated as follows:
lastRow# - firstRow# + 1
In this example:
15 - 11 + 1 = 5
- Item: Shift:=xlShiftDown.
- VBA construct: Shift parameter of Range.Insert method.
- Description:
- Shifts rows down (xlShiftDown) to make space for the rows inserted by item #3 above.
- You can usually omit this parameter. By default, VBA decides how to shift the cells based on the range’s shape. When inserting a row, this usually results in Excel shifting the cells down.
Effects of Executing the Macro
The following GIF illustrates the results of executing this macro. As expected, VBA inserts 5 rows below row 10 of the worksheet.

Example #3: Excel VBA Insert Row with Same Format as Row Above
VBA Code to Insert Row with Same Format as Row Above
The following macro (i) inserts a row below row 20, and (ii) applies the formatting of row 20 to the newly-inserted row.
Sub insertRowFormatFromAbove()
    'Source: powerspreadsheets.com/
    'For further information: https://powerspreadsheets.com/excel-vba-insert-row/
    Worksheets("Insert row").Rows(21).Insert Shift:=xlShiftDown, CopyOrigin:=xlFormatFromLeftOrAbove
End Sub

Process Followed by Macro

VBA Statement Explanation
Worksheets(“Insert row”).Rows(21).Insert Shift:=xlShiftDown, CopyOrigin:=xlFormatFromLeftOrAbove
- Item: Worksheets(“Insert row”).
- VBA construct: Workbook.Worksheets property.
- Description: Returns a Worksheet object representing the “Insert row” worksheet.
- Item: Rows(21).
- VBA construct: Worksheet.Rows property.
- Description: Returns a Range object representing row 21 of the worksheet returned by item #1 above.
- Item: Insert.
- VBA construct: Range.Insert method.
- Description: Inserts a new row above the row returned by item #2 above.
- Item: Shift:=xlShiftDown.
- VBA construct: Shift parameter of Range.Insert method.
- Description:
- Shifts rows down (xlShiftDown) to make space for the row inserted by item #3 above.
- You can usually omit this parameter. By default, VBA decides how to shift the cells based on the range’s shape. When inserting a row, this usually results in Excel shifting the cells down.
- Item: CopyOrigin:=xlFormatFromLeftOrAbove.
- VBA construct: CopyOrigin parameter of Range.Insert method.
- Description:
- Sets formatting of row inserted by item #3 above to be equal to that of row above (xlFormatFromLeftOrAbove).
- You can usually omit this parameter. xlFormatFromLeftOrAbove (or 0) is the default value of CopyOrigin.
Effects of Executing the Macro
The following GIF illustrates the results of executing this macro. As expected, VBA (i) inserts a row below row 20, and (ii) applies the formatting of row 20 to the newly-inserted row.

Example #4: Excel VBA Insert Row with Same Format as Row Below
VBA Code to Insert Row with Same Format as Row Below
The following macro (i) inserts a row below row 25, and (ii) applies the formatting of the row below to the newly-inserted row.
Sub insertRowFormatFromBelow()
    'Source: powerspreadsheets.com/
    'For further information: https://powerspreadsheets.com/excel-vba-insert-row/
    Worksheets("Insert row").Rows(26).Insert Shift:=xlShiftDown, CopyOrigin:=xlFormatFromRightOrBelow
End Sub

Process Followed by Macro

VBA Statement Explanation
Worksheets(“Insert row”).Rows(26).Insert Shift:=xlShiftDown, CopyOrigin:=xlFormatFromRightOrBelow
- Item: Worksheets(“Insert row”).
- VBA construct: Workbook.Worksheets property.
- Description: Returns a Worksheet object representing the “Insert row” worksheet.
- Item: Rows(26).
- VBA construct: Worksheet.Rows property.
- Description: Returns a Range object representing row 26 of the worksheet returned by item #1 above.
- Item: Insert.
- VBA construct: Range.Insert method.
- Description: Inserts a new row above the row returned by item #2 above.
- Item: Shift:=xlShiftDown.
- VBA construct: Shift parameter of Range.Insert method.
- Description:
- Shifts rows down (xlShiftDown) to make space for the row inserted by item #3 above.
- You can usually omit this parameter. By default, VBA decides how to shift the cells based on the range’s shape. When inserting a row, this usually results in Excel shifting the cells down.
- Item: CopyOrigin:=xlFormatFromRightOrBelow.
- VBA construct: CopyOrigin parameter of Range.Insert method.
- Description: Sets formatting of row inserted by item #3 above to be equal to that of row below (xlFormatFromRightOrBelow).
Effects of Executing the Macro
The following GIF illustrates the results of executing this macro. As expected, VBA (i) inserts a row below row 25, and (ii) applies the formatting of the row below to the newly-inserted row.

Example #5: Excel VBA Insert Row without Formatting
VBA Code to Insert Row without Formatting
The following macro inserts a row below row 30 without applying the formatting from the rows above or below the newly- inserted row.
Sub insertRowWithoutFormat()
    'Source: powerspreadsheets.com/
    'For further information: https://powerspreadsheets.com/excel-vba-insert-row/
    Dim myNewRowNumber As Long
    myNewRowNumber = 31
    With Worksheets("Insert row")
        .Rows(myNewRowNumber).Insert Shift:=xlShiftDown
        .Rows(myNewRowNumber).ClearFormats
    End With
End Sub

Process Followed by Macro

VBA Statement Explanation
Lines #4 and #5: Dim myNewRowNumber As Long | myNewRowNumber = 31
- Item: Dim myNewRowNumber As Long.
- VBA construct: Dim statement.
- Description:
- Declares a new variable (myNewRowNumber) as of the Long data type.
- myNewRowNumber represents the number of the newly inserted row.
- Item: myNewRowNumber = 31.
- VBA construct: Assignment statement.
- Description: Assigns the value 31 to myNewRowNumber
Lines #6 and #9: With Worksheets(“Insert row”) | End With
- Item: With | End With.
- VBA construct: With… End With statement.
- Description: Statements within the With… End With statement (lines #7 and #8 below) are executed on the worksheet returned by item #2 below.
- Item: Worksheets(“Insert row”).
- VBA construct: Workbook.Worksheets property.
- Description: Returns a Worksheet object representing the “Insert row” worksheet.
Line #7: .Rows(myNewRowNumber).Insert Shift:=xlShiftDown
- Item: Rows(myNewRowNumber).
- VBA construct: Worksheet.Rows property.
- Description:
- Returns a Range object representing a row (whose number is represented by myNewRowNumber) of the worksheet in the opening statement of the With… End With statement (line #6 above).
- In this example, myNewRowNumber equals 31. Therefore, Worksheet.Rows returns row 31 prior to the insertion of the new row. This is a different row from that returned by Worksheet.Rows in line #8 below.
- This line #7 returns a row prior to the row insertion. This line is that above which the new row is inserted.
- Line #8 below returns a row after the row insertion. This line is the newly-inserted row.
- Item: Insert.
- VBA construct: Range.Insert method.
- Description: Inserts a new row above the row returned by item #1 above.
- Item: Shift:=xlShiftDown.
- VBA construct: Shift parameter of Range.Insert method.
- Description:
- Shifts rows down (xlShiftDown) to make space for the row inserted by item #2 above.
- You can usually omit this parameter. By default, VBA decides how to shift the cells based on the range’s shape. When inserting a row, this usually results in Excel shifting the cells down.
Line #8: .Rows(myNewRowNumber).ClearFormats
- Item: Rows(myNewRowNumber).
- VBA construct: Worksheet.Rows property.
- Description:
- Returns a Range object representing a row (whose number is represented by myNewRowNumber) of the worksheet in the opening statement of the With… End With statement (line #6 above).
- In this example, myNewRowNumber equals 31. Therefore, Worksheet.Rows returns row 31 after the insertion of the new row. This is a different row from that returned by Worksheet.Rows in line #7 above.
- This line #8 returns a row after the row insertion. This line is the newly-inserted row.
- Line #7 above returns a row prior to the row insertion. This line is that below the newly-inserted row.
- Item: ClearFormats.
- VBA construct: Range.ClearFormats method.
- Description: Clears the formatting of the row returned by item #1 above.
Effects of Executing the Macro
The following GIF illustrates the results of executing this macro. As expected, VBA inserts a row below row 30 without applying the formatting from the rows above or below the newly- inserted row.

Example #6: Excel VBA Insert Row Below Active Cell
VBA Code to Insert Row Below Active Cell
The following macro inserts a row below the active cell.
Sub insertRowBelowActiveCell()
    'Source: powerspreadsheets.com/
    'For further information: https://powerspreadsheets.com/excel-vba-insert-row/
    ActiveCell.Offset(1).EntireRow.Insert Shift:=xlShiftDown
End Sub

Process Followed by Macro

VBA Statement Explanation
ActiveCell.Offset(1).EntireRow.Insert Shift:=xlShiftDown
- Item: ActiveCell.
- VBA construct: Application.ActiveCell property.
- Description: Returns a Range object representing the active cell.
- Item: Offset(1).
- VBA construct: Range.Offset property.
- Description:
- Returns a Range object representing the cell range 1 row below the cell returned by item #1 above.
- In this example, Range.Offset returns the cell immediately below the active cell.
- Item: EntireRow:
- VBA construct: Range.EntireRow property.
- Description: Returns a Range object representing the entire row containing the cell range returned by item #2 above.
- Item: Insert.
- VBA construct: Range.Insert method.
- Description: Inserts a new row above the row returned by item #3 above.
- Item: Shift:=xlShiftDown.
- VBA construct: Shift parameter of Range.Insert method.
- Description:
- Shifts rows down (xlShiftDown) to make space for the row inserted by item #4 above.
- You can usually omit this parameter. By default, VBA decides how to shift the cells based on the range’s shape. When inserting a row, this usually results in Excel shifting the cells down.
Effects of Executing the Macro
The following GIF illustrates the results of executing this macro. When I execute the macro, the active cell is B35. As expected, inserts a row below the active cell.

Example #7: Excel VBA Insert Copied Row
VBA Code to Insert Copied Row
The following macro (i) copies row 45, and (ii) inserts the copied row below row 40.
Sub insertCopiedRow()
    'Source: powerspreadsheets.com/
    'For further information: https://powerspreadsheets.com/excel-vba-insert-row/
    With Worksheets("Insert row")
        .Rows(45).Copy
        .Rows(41).Insert Shift:=xlShiftDown
    End With
    Application.CutCopyMode = False
End Sub

Process Followed by Macro

VBA Statement Explanation
Lines #4 and #7: With Worksheets(“Insert row”) | End With
- Item: With | End With.
- VBA construct: With… End With statement.
- Description: Statements within the With… End With statement (lines #5 and #6 below) are executed on the worksheet returned by item #2 below.
- Item: Worksheets(“Insert row”).
- VBA construct: Workbook.Worksheets property.
- Description: Returns a Worksheet object representing the “Insert row” worksheet.
Line #5: .Rows(45).Copy
- Item: Rows(45).
- VBA construct: Worksheet.Rows property.
- Description: Returns a Range object representing row 45 of the worksheet in the opening statement of the With… End With statement (line #4 above).
- Item: Copy.
- VBA construct: Range.Copy method.
- Description: Copies the row returned by item #1 above to the Clipboard.
Line #6: .Rows(41).Insert Shift:=xlShiftDown
- Item: Rows(41).
- VBA construct: Worksheet.Rows property.
- Description: Returns a Range object representing row 41 of the worksheet in the opening statement of the With… End With statement (line #4 above).
- Item: Insert.
- VBA construct: Range.Insert method.
- Description:
- Inserts a new row above the row returned by item #1 above.
- The newly-inserted row isn’t blank. VBA inserts the row copied by line #5 above.
- Item: Shift:=xlShiftDown.
- VBA construct: Shift parameter of Range.Insert method.
- Description:
- Shifts rows down (xlShiftDown) to make space for the row inserted by item #2 above.
- You can usually omit this parameter. By default, VBA decides how to shift the cells based on the range’s shape. When inserting a row, this usually results in Excel shifting the cells down.
Line #8: Application.CutCopyMode = False
- Item: Application.CutCopyMode = False.
- VBA construct: Application.CutCopyMode property.
- Description: Cancels (False) the Cut or Copy mode and removes the moving border that accompanies this mode.
Effects of Executing the Macro
The following GIF illustrates the results of executing this macro. As expected, VBA (i) copies row 45, and (ii) inserts the copied row below row 40.

Example #8: Excel VBA Insert Blank Rows Between Rows in a Data Range
VBA Code to Insert Blank Rows Between Rows in a Data Range
The following macro inserts blank rows within the specified data range. This results in all rows within the data range being separated by a blank row.
Sub insertBlankRowsBetweenRows()
    'Source: powerspreadsheets.com/
    'For further information: https://powerspreadsheets.com/excel-vba-insert-row/
    Dim myFirstRow As Long
    Dim myLastRow As Long
    Dim myWorksheet As Worksheet
    Dim iCounter As Long
    myFirstRow = 5
    Set myWorksheet = Worksheets("Insert blank rows")
    myLastRow = myWorksheet.Cells.Find( _
                                        What:="*", _
                                        LookIn:=xlFormulas, _
                                        LookAt:=xlPart, _
                                        SearchOrder:=xlByRows, _
                                        SearchDirection:=xlPrevious).Row
    For iCounter = myLastRow To (myFirstRow + 1) Step -1
        myWorksheet.Rows(iCounter).Insert Shift:=xlShiftDown
    Next iCounter
End Sub

Process Followed by Macro

VBA Statement Explanation
Lines #4 through #9: Dim myFirstRow As Long | Dim myLastRow As Long | Dim myWorksheet As Worksheet | Dim iCounter As Long | myFirstRow = 5 | Set myWorksheet = Worksheets(“Insert blank rows”)
- Item: Dim myFirstRow As Long.
- VBA construct: Dim statement.
- Description:
- Declares a new variable (myFirstRow) as of the Long data type.
- myFirstRow represents the number of the first row with data in the data range you work with.
- Item: Dim myLastRow As Long.
- VBA construct: Dim statement.
- Description:
- Declares a new variable (myLastRow) as of the Long data type.
- myLastRow represents the number of the last row with data in the data range you work with.
- Item: Dim myWorksheet As Worksheet.
- VBA construct: Dim statement.
- Description:
- Declares a new object variable (myWorksheet) to reference a Worksheet object.
- myWorksheet represents the worksheet you work with.
- Item: Dim iCounter As Long.
- VBA construct: Dim statement.
- Description:
- Declares a new variable (iCounter) as of the Long data type.
- iCounter represents a loop counter.
- Item: myFirstRow = 5.
- VBA construct: Assignment statement.
- Description: Assigns the value 5 to myFirstRow.
- Item: Set myWorksheet = Worksheets(“Insert blank rows”).
- VBA constructs:
- Set statement.
- Workbooks.Worksheets property.
- Description: Assigns the Worksheet object representing the “Insert blank rows” worksheet to myWorksheet.
- VBA constructs:
Lines #10 through #15: myLastRow = myWorksheet.Cells.Find( What:=”*”, LookIn:=xlFormulas, LookAt:=xlPart, SearchOrder:=xlByRows, SearchDirection:=xlPrevious).Row
- Item: myLastRow =.
- VBA construct: Assignment statement.
- Description: Assigns the value returned by items #2 through #9 below to myLastRow.
- Item: myWorksheet.Cells.
- VBA construct: Worksheet.Cells property.
- Description: Returns a Range object representing all cells on myWorksheet.
- Item: Find.
- VBA construct: Range.Find method.
- Description:
- Finds information in the cell range returned by item #2 above and returns a Range object representing the first cell where the information is found.
- In this example, the Range object Range.Find returns represents the last cell with data in last row with data in myWorksheet.
- Item: What:=”*”.
- VBA construct: What parameter of Range.Find method.
- Description: Specifies the data Range.Find searches for. The asterisk (*) is a wildcard and, therefore, Range.Find searches for any character sequence.
- Item: LookIn:=xlFormulas.
- VBA construct: LookIn parameter of Range.Find method.
- Description: Specifies that Range.Find looks in formulas (xlFormulas).
- Item: LookAt:=xlPart.
- VBA construct: LookAt parameter of Range.Find method.
- Description: Specifies that Range.Find looks at (and matches) a part (xlPart) of the search data.
- Item: SearchOrder:=xlByRows.
- VBA construct: SearchOrder parameter of Range.Find method.
- Description: Specifies that Range.Find searches by rows (xlByRows).
- Item: SearchDirection:=xlPrevious.
- VBA construct: SearchDirection parameter of Range.Find method.
- Description: Specifies that Range.Find searches for the previous match (xlPrevious).
- Item: Row.
- VBA construct: Range.Row property.
- Description:
- Returns the row number of the Range object returned by item #3 above.
- In this example, the number returned by Range.Row corresponds to the last row with data in myWorksheet.
Lines #16 and #18: For iCounter = myLastRow To (myFirstRow + 1) Step -1 | Next iCounter
- Item: For | Next iCounter.
- VBA construct: For… Next statement.
- Description:
- Repeats the statement inside the For… Next loop (line #17 below) a specific number of times.
- In this example:
- The macro starts on the last row of the data range as specified by item #2 below.
- Every iteration, the loop counter decreases by 1, as specified by item #4 below. Therefore, the macro moves to the previous row.
- The macro exits the loop after working with the second row in the data range (myFirstRow + 1), as specified by item #3 below.
- Item: iCounter = myLastRow.
- VBA construct: Counter and Start of For… Next statement.
- Description: Specifies myLastRow as the initial value of the loop counter (iCounter).
- Item: To (myFirstRow + 1).
- VBA construct: End of For… Next statement.
- Description: Specifies the value represented by myFirstRow plus 1 (myFirstRow + 1) as the final value of the loop counter.
- Item: Step -1.
- VBA construct: Step of For… Next statement.
- Description: Specifies that the loop counter (iCounter) decreases by 1 (-1) every loop iteration.
Line #17: myWorksheet.Rows(iCounter).Insert Shift:=xlShiftDown
- Item: myWorksheet.Rows(iCounter).
- VBA construct: Worksheet.Rows property.
- Description:
- Returns a Range object representing the row (whose number is represented by iCounter) of myWorksheet.
- Worksheet.Rows returns the row through which the macro is currently looping.
- Item: Insert.
- VBA construct: Range.Insert method.
- Description:
- Inserts a new row above the row returned by item #1 above.
- The macro loops through each line in the data range (excluding the first) as specified by lines #16 and #18 above. Therefore, Range.Insert inserts a row between all rows with data.
- Item: Shift:=xlShiftDown.
- VBA construct: Shift parameter of Range.Insert method.
- Description:
- Shifts rows down (xlShiftDown) to make space for the row inserted by item #2 above.
- You can usually omit this parameter. By default, VBA decides how to shift the cells based on the range’s shape. When inserting a row, this usually results in Excel shifting the cells down.
Effects of Executing the Macro
The following GIF illustrates the results of executing this macro. As expected, VBA inserts blank rows within the specified data range. This results in all rows within the data range being separated by a blank row.

Example #9: Excel VBA Insert a Number of Rows Every Number of Rows in a Data Range
VBA Code to Insert a Number of Rows Every Number of Rows in a Data Range
The following macro inserts 2 rows every 3 rows within the specified data range.
Sub insertMRowsEveryNRows()
    'Source: powerspreadsheets.com/
    'For further information: https://powerspreadsheets.com/excel-vba-insert-row/
    Dim myFirstRow As Long
    Dim myLastRow As Long
    Dim myNRows As Long
    Dim myRowsToInsert As Long
    Dim myWorksheet As Worksheet
    Dim iCounter As Long
    myFirstRow = 5
    myNRows = 3
    myRowsToInsert = 2
    Set myWorksheet = Worksheets("Insert M rows every N rows")
    myLastRow = myWorksheet.Cells.Find( _
                                        What:="*", _
                                        LookIn:=xlFormulas, _
                                        LookAt:=xlPart, _
                                        SearchOrder:=xlByRows, _
                                        SearchDirection:=xlPrevious).Row
    For iCounter = myLastRow To (myFirstRow + myNRows) Step -1
        If (iCounter - myFirstRow) Mod myNRows = 0 Then myWorksheet.Rows(iCounter & ":" & iCounter + myRowsToInsert - 1).Insert Shift:=xlShiftDown
    Next iCounter
End Sub

Process Followed by Macro

VBA Statement Explanation
Lines #4 through 13: Dim myFirstRow As Long | Dim myLastRow As Long | Dim myNRows As Long | Dim myRowsToInsert As Long | Dim myWorksheet As Worksheet | Dim iCounter As Long | myFirstRow = 5 | myNRows = 3 | myRowsToInsert = 2 | Set myWorksheet = Worksheets(“Insert M rows every N rows”)
- Item: Dim myFirstRow As Long.
- VBA construct: Dim statement.
- Description:
- Declares a new variable (myFirstRow) as of the Long data type.
- myFirstRow represents the number of the first row with data in the data range you work with.
- Item: Dim myLastRow As Long.
- VBA construct: Dim statement.
- Description:
- Declares a new variable (myLastRow) as of the Long data type.
- myLastRow represents the number of the last row with data in the data range you work with.
- Item: Dim myNRows As Long.
- VBA construct: Dim statement.
- Description:
- Declares a new variable (myNRows) as of the Long data type.
- myNRows represents the number of rows per block. The macro doesn’t insert rows between these rows.
- Item: Dim myRowsToInsert As Long.
- VBA construct: Dim statement.
- Description:
- Declares a new variable (myRowsToInsert) as of the Long data type.
- myRowsToInsert represents the number of rows to insert.
- Item: Dim myWorksheet As Worksheet.
- VBA construct: Dim statement.
- Description:
- Declares a new object variable (myWorksheet) to reference a Worksheet object.
- myWorksheet represents the worksheet you work with.
- Item: Dim iCounter As Long.
- VBA construct: Dim statement.
- Description:
- Declares a new variable (iCounter) as of the Long data type.
- iCounter represents a loop counter.
- Item: myFirstRow = 5.
- VBA construct: Assignment statement.
- Description: Assigns the value 5 to myFirstRow.
- Item: myNRows = 3.
- VBA construct: Assignment statement.
- Description: Assigns the value 3 to myNRows.
- Item: myRowsToInsert = 2.
- VBA construct: Assignment statement.
- Description: Assigns the value 2 to myRowsToInsert.
- Item: Set myWorksheet = Worksheets(“Insert M rows every N rows”).
- VBA constructs:
- Set statement.
- Workbooks.Worksheets property.
- Description: Assigns the Worksheet object representing the “Insert M rows every N rows” worksheet to myWorksheet.
- VBA constructs:
Lines #14 through #19: myLastRow = myWorksheet.Cells.Find( What:=”*”, LookIn:=xlFormulas, LookAt:=xlPart, SearchOrder:=xlByRows, SearchDirection:=xlPrevious).Row
- Item: myLastRow =.
- VBA construct: Assignment statement.
- Description: Assigns the value returned by items #2 through #9 below to myLastRow.
- Item: myWorksheet.Cells.
- VBA construct: Worksheet.Cells property.
- Description: Returns a Range object representing all cells on myWorksheet.
- Item: Find.
- VBA construct: Range.Find method.
- Description:
- Finds information in the cell range returned by item #2 above and returns a Range object representing the first cell where the information is found.
- In this example, the Range object Range.Find returns represents the last cell with data in last row with data in myWorksheet.
- Item: What:=”*”.
- VBA construct: What parameter of Range.Find method.
- Description: Specifies the data Range.Find searches for. The asterisk (*) is a wildcard and, therefore, Range.Find searches for any character sequence.
- Item: LookIn:=xlFormulas.
- VBA construct: LookIn parameter of Range.Find method.
- Description: Specifies that Range.Find looks in formulas (xlFormulas).
- Item: LookAt:=xlPart.
- VBA construct: LookAt parameter of Range.Find method.
- Description: Specifies that Range.Find looks at (and matches) a part (xlPart) of the search data.
- Item: SearchOrder:=xlByRows.
- VBA construct: SearchOrder parameter of Range.Find method.
- Description: Specifies that Range.Find searches by rows (xlByRows).
- Item: SearchDirection:=xlPrevious.
- VBA construct: SearchDirection parameter of Range.Find method.
- Description: Specifies that Range.Find searches for the previous match (xlPrevious).
- Item: Row.
- VBA construct: Range.Row property.
- Description:
- Returns the row number of the Range object returned by item #3 above.
- In this example, the number returned by Range.Row corresponds to the last row with data in myWorksheet.
Lines #20 and #22: For iCounter = myLastRow To (myFirstRow + myNRows) Step -1 | Next iCounter
- Item: For | Next iCounter.
- VBA construct: For… Next statement.
- Description:
- Repeats the statement inside the For… Next loop (line #21 below) a specific number of times.
- In this example:
- The macro starts on the last row of the data range as specified by item #2 below.
- Every iteration, the loop counter decreases by 1, as specified by item #4 below. Therefore, the macro moves to the previous row.
- The macro exits the loop after working with the row below the first block of rows you want to keep, as specified by item #3 below. Each block of rows has a number of rows equal to myNRows.
- In this example, myNRows equals 3. Therefore, the macro exits the loop after working with the fourth row in the data range.
- Item: iCounter = myLastRow.
- VBA constructs: Counter and Start of For… Next statement.
- Description: Specifies myLastRow as the initial value of the loop counter (iCounter).
- Item: To (myFirstRow + myNRows).
- VBA construct: End of For… Next statement.
- Description: Specifies the value represented by myFirstRow plus myNRows (myFirstRow + myNRows) as the final value of the loop counter.
- Item: Step -1.
- VBA construct: Step of For… Next statement.
- Description: Specifies that the loop counter (iCounter) decreases by 1 (-1) every loop iteration.
Line #21: If (iCounter – myFirstRow) Mod myNRows = 0 Then myWorksheet.Rows(iCounter & “:” & iCounter + myRowsToInsert – 1).Insert Shift:=xlShiftDown
- Item: If | Then.
- VBA construct: If… Then… Else statement.
- Description: Conditionally executes the statement specified by items #3 and #4 below, subject to condition specified by item #2 below being met.
- Item: (iCounter – myFirstRow) Mod myNRows = 0.
- VBA constructs:
- Condition of If… Then… Else statement.
- Numeric expression with Mod operator.
- Description:
- The Mod operator (Mod) (i) divides one number (iCounter – myFirstRow) by a second number (myNRows), and (ii) returns the remainder of the division.
- The condition ((iCounter – myFirstRow) Mod myNRows = 0) is met (returns True) if the remainder returned by Mod is 0.
- The condition is met (returns True) every time the macro loops through a row above which blank rows should be added.
- iCounter represents the number of the row through which the macro is currently looping.
- (iCounter – myFirstRow) is the number of rows (in the data range) above the row through which the macro is currently looping.
- ((iCounter – myFirstRow) Mod myNRows) equals 0 when the number of rows returned by (iCounter – myFirstRow) is a multiple of myNRows. This ensures that the number of rows left above the row through which the macro is currently looping can be appropriately separated into blocks of myNRows. In this example, myNRows equals 3. Therefore, the condition is met every 3 rows.
- VBA constructs:
- Item: myWorksheet.Rows(iCounter & “:” & iCounter + myRowsToInsert – 1).
- VBA constructs:
- Statements executed if the condition specified by item #2 above is met.
- Worksheet.Rows property.
- Description:
- Returns an object representing several rows of myWorksheet. The first row is represented by iCounter. The last row is represented by (iCounter + myRowsToInsert – 1).
- The number of rows Worksheet.Rows returns equals the number of rows to insert (myRowsToInsert).
- iCounter represents the number of the row through which the macro is currently looping.
- (iCounter + myRowsToInsert – 1) returns a row located a number of rows (myRowsToInsert – 1) below the row through which the macro is currently looping. In this example, myRowsToInsert equals 2. Therefore, (iCounter + myRowsToInsert – 1) returns a row located 1 (2 – 1) rows below the row through which the macro is currently looping.
- VBA constructs:
- Item: Insert.
- VBA construct: Range.Insert method.
- Description:
- Inserts new rows above the rows returned by item #3 above.
- The number of inserted rows is equal to the value of myRowsToInsert. This is calculated as follows:
lastRow# - firstRow# + 1
(iCounter + myRowsToInsert - 1) - iCounter + 1 = myRowsToInsert
In this example, if the current value of iCounter is 8:
(8 + 2 - 1) - 8 + 1
9 - 8 + 1 = 2
- Item: Shift:=xlShiftDown.
- VBA construct: Shift parameter of Range.Insert method.
- Description:
- Shifts rows down (xlShiftDown) to make space for the rows inserted by item #4 above.
- You can usually omit this parameter. By default, VBA decides how to shift the cells based on the range’s shape. When inserting a row, this usually results in Excel shifting the cells down.
Effects of Executing the Macro
The following GIF illustrates the results of executing this macro. As expected, VBA inserts 2 rows every 3 rows within the specified data range.

|
brunokaz  Пользователь Сообщений: 68 |
Господа. Есть таблица. Юзер должен только заполнять данные в таблице и добавлять строки (по необходимости) макросом. Заголовок таблицы и расчет итогов защищен 1) Написал простейший макрос добавления строк Теперь столкнулся с проблемой. Выше этой таблицы есть области где юзер может добавить строки сам, вручную. Если он там добавляет, то у меня смещается диапазон вставки (так как он прописан конкретно в макросе), а также нарушается и итоговое суммирование (начальная ячейка прописана в ДВССЫЛ). Как быть? Эту таблицу можете посмотреть в примере. Буду благодарен за помощь |
|
Владимир Пользователь Сообщений: 8196 |
Пускай вставляет. Какие проблемы? «..Сладку ягоду рвали вместе, горьку ягоду я одна.» |
|
brunokaz Пользователь Сообщений: 68 |
Владимир,Спасибо за подсказку по сумме. Что будет если сверху добавить сверху таблицы строку? 1) Вставка будет осуществляться в 6 строку, которая уже сместиться на заголовок таблицы Понимаете? |
|
Владимир Пользователь Сообщений: 8196 |
Тогда нужно через ПОИСКПОЗ привязаться к слову «рыночная». «..Сладку ягоду рвали вместе, горьку ягоду я одна.» |
|
Nordheim Пользователь Сообщений: 3154 |
#5 16.08.2017 11:19:15 Аналог вашего макроса!
Изменено: Nordheim — 16.08.2017 11:21:40 «Все гениальное просто, а все простое гениально!!!» |
||
|
brunokaz Пользователь Сообщений: 68 |
Владимир,принято. Благодарю. Попробую. Только у меня строк надо ставить 5000 и главное чтобы никто больше не прописал слово рыночная в этом дипазоне Скажите, а по вставке строк макросом нет идей? ) |
|
Владимир Пользователь Сообщений: 8196 |
#7 16.08.2017 11:31:46
Тут нужны Ваши пояснения, что хотите получить на выходе? Копировать нужно с листа 2 одну строку или то, что заполнено и т.д. в этом духе. «..Сладку ягоду рвали вместе, горьку ягоду я одна.» |
||
|
brunokaz Пользователь Сообщений: 68 |
Nordheim, Изменено: brunokaz — 16.08.2017 11:49:44 |
|
brunokaz Пользователь Сообщений: 68 |
Владимир, тогда по примеру с адресами пройдусь: 1) Я заполнил таблицу, все данные в ней, и понял, что у меня есть еще 1 объект, данные по которому необходимо внести в эту таблицу. Я нажимаю кнопку — строка добавляется выше сроки заполненной мною ранее (становится первой в этой таблице). При этом, сохраняются форматирования, оформление и выпадающий список новой добавленной строки.я заполняю данные по второму объекту. Как-то так. Эта таблица большого заключения, под которой и над которой будет вестись работа по заполнению данных… Изменено: brunokaz — 16.08.2017 11:51:17 |
|
Nordheim Пользователь Сообщений: 3154 |
#10 16.08.2017 11:49:45 Файл без данных поэтому не отследил, ничего заполненного не должен удалять.
Subbrunokaz написал: 2) Вставляет по несколько строк всегда вставляет только 1 строку brunokaz написал: 3) в случае добавления строк выше таблицы, начнется чорти чо. Проблема не решается получается Как может макрос вставит строку выше таблицы? Вы планируете смещать таблицу? Изменено: Nordheim — 16.08.2017 11:51:30 «Все гениальное просто, а все простое гениально!!!» |
||
|
Владимир Пользователь Сообщений: 8196 |
А почему Вы не хотите просто защитить первые три строки от вставки строк, редактирования? «..Сладку ягоду рвали вместе, горьку ягоду я одна.» |
|
brunokaz Пользователь Сообщений: 68 |
#12 16.08.2017 11:54:56 Nordheim, Мы привязаны к строке 6. Если я добавлю строку выше таблицы, это же станет строкой заголовка и начнуться проблемы
Изменено: brunokaz — 16.08.2017 11:55:25 |
||
|
Nordheim Пользователь Сообщений: 3154 |
#13 16.08.2017 12:02:54 Я не пойму как вы добавите строку выше таблицы, в коде зашита вставка в 6 строку, и дальнейшее форматирование конкретно 6 сроки.
Вроде код примитивный до невозможности и все понятно. «Все гениальное просто, а все простое гениально!!!» |
||
|
Nordheim Пользователь Сообщений: 3154 |
#14 16.08.2017 12:03:54
Каким образом? «Все гениальное просто, а все простое гениально!!!» |
||
|
brunokaz Пользователь Сообщений: 68 |
Nordheim, в моем примере выделите строку два и вручную добавьте строку, а потом добавьте строку в таблицу при помощи написанного Вами макроса. Получится так, что строка 6 (Rows(«6:6»).Insert Shift:=xlDown) это уже строка заголовка таблицы ….. Код простой, может я не верно объясняю, за что и извиняюсь, если это так. Изменено: brunokaz — 16.08.2017 12:18:40 |
|
Nordheim Пользователь Сообщений: 3154 |
#16 16.08.2017 12:27:19
Я и спросил разве таблица будет смещаться?
проделайте манипуляции с вашим макросом результат идентичный будет. «Все гениальное просто, а все простое гениально!!!» |
||||
|
brunokaz Пользователь Сообщений: 68 |
#17 16.08.2017 12:39:57
Не понял фразу сначала по смещению….
Согласен
Этот лист состоит из десятков таблиц. Таблицы и их форму изменять нельзя — это утвержденная форма заключения, но в некоторых местах строки добавлять можно (например под таблицами), с целью отражения комментариев к изложенным в таблицах данным и изложением доп инфы по данным из таблицы. Изменено: brunokaz — 16.08.2017 12:40:19 |
||||||
|
Владимир Пользователь Сообщений: 8196 |
Попробуйте добавить строки выше табличной формы.. Изменено: Владимир — 16.08.2017 13:54:52 «..Сладку ягоду рвали вместе, горьку ягоду я одна.» |
|
brunokaz Пользователь Сообщений: 68 |
#19 16.08.2017 15:09:04
Лист защищен…. |
||
|
brunokaz Пользователь Сообщений: 68 |
Если эту проблему не решить или трудно решаема, прошу подтвердить кто может. Тогда я буду думать что делать… |
|
Nordheim Пользователь Сообщений: 3154 |
#21 17.08.2017 08:39:47
«Все гениальное просто, а все простое гениально!!!» |
||
|
brunokaz Пользователь Сообщений: 68 |
Nordheim, к сожалению это не решает вопрос с возможным смещением таблицы. Если только весь лист не защищать по вставке строк, что я не могу сделать Изменено: brunokaz — 17.08.2017 09:16:32 |
|
Nordheim Пользователь Сообщений: 3154 |
#23 17.08.2017 09:22:28
Почему же?, Строки вставляются благополучно макросом. Пользователь вставить строки не может. как в таком случае сместится таблица? «Все гениальное просто, а все простое гениально!!!» |
||
|
brunokaz Пользователь Сообщений: 68 |
Nordheim, ладно…придется запрещать пользователям вставлять строки. Спасибо Вам за помощь |
|
Nordheim Пользователь Сообщений: 3154 |
Попробуйте сделать обходной вариант. Вставление строк в любое место кроме шапки таблицы, с использованием InputBox. «Все гениальное просто, а все простое гениально!!!» |
|
brunokaz Пользователь Сообщений: 68 |
|
|
Kcuxa_xa  Пользователь Сообщений: 68 |
Подскажите, а что нужно поменять в макросе, что бы он добавлял новую строку не в начало таблицы, а в конец? Изменено: Kcuxa_xa — 07.01.2019 22:26:50 |
|
Nordheim Пользователь Сообщений: 3154 |
Kcuxa_xa, А в чем смысл? Вам нужно вставить пустую строку перед последней заполненной в таблице? «Все гениальное просто, а все простое гениально!!!» |
|
Kcuxa_xa Пользователь Сообщений: 68 |
#29 07.01.2019 23:16:38
да Вы правы это в принципе не критично. А не подскажите как в таком случае сделать, что бы новая строка автоматом нумеровалась по порядку? |
||
|
Nordheim Пользователь Сообщений: 3154 |
#30 07.01.2019 23:29:58 Файл пример покажите.
Изменено: Nordheim — 07.01.2019 23:34:39 «Все гениальное просто, а все простое гениально!!!» |
||
В данном практическом примере приведен код макроса для умной вставки пустых строк между ячейками. Пошаговая инструкция как вставлять строки между объединенными и необъединенными ячейками одновременно для любой таблицы.
Макрос для вставки строк с определенной высотой
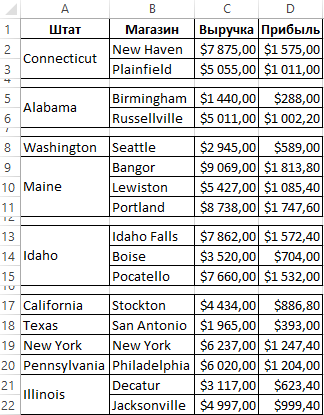
В таблице отчета по продажам в розничных точках содержаться объединенные ячейки, как показано ниже на рисунке:
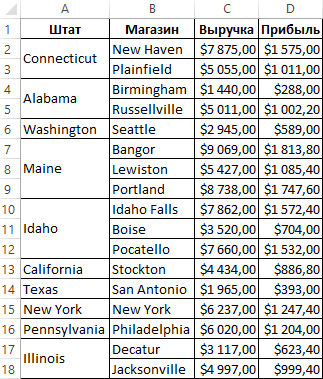
Необходимо экспонировать группы ячеек для каждого штата. Для этого мы добавим по одной пустой строке между каждой группой розничных точек. При этом не имеет значение будет ли содержать группа объединенные ячейки или нет. Ведь некоторые группы состоят из одной строки. А также дополнительно уменьшим высоту этих пустых строк, чтобы внешний вид таблицы был стильным. Выполнить вручную все эти действия: выделение отдельных групп ячеек, вставка между ними пустых строк, а потом изменение высоты для этих же строк – это не рационально использование сил и времени. Особенно если таблица имеет десятки тысяч строк. Лучше написать свой макрос, который сам автоматически и молниеносно выполнит эту рутинную работу за Вас.
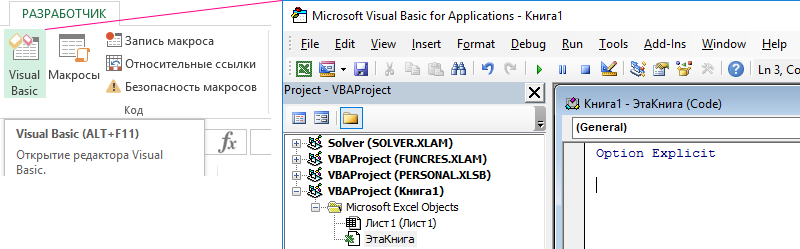
Перейдите в режим редактора макросов Visual Basic (ALT+F11):
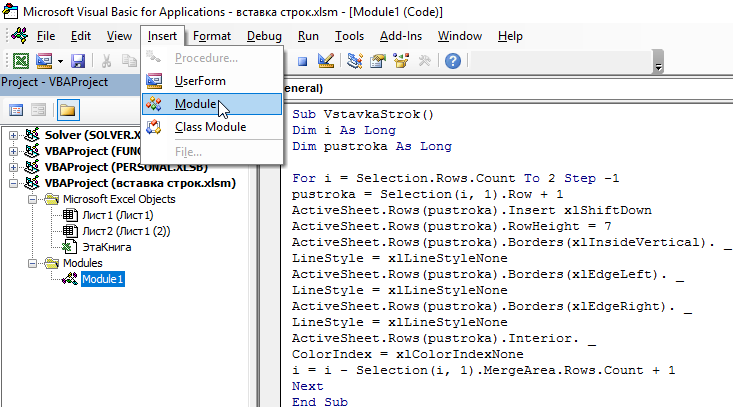
Создайте в нем новый модуль с помощью инструмента: «Insert»-«Module». А потом запишите в него VBA-код самого макроса:
Sub VstavkaStrok()
Dim i As Long
Dim pustroka As Long
For i = Selection.Rows.Count To 2 Step -1
pustroka = Selection(i, 1).Row + 1
ActiveSheet.Rows(pustroka).Insert xlShiftDown
ActiveSheet.Rows(pustroka).RowHeight = 7
ActiveSheet.Rows(pustroka).Borders(xlInsideVertical). _
LineStyle = xlLineStyleNone
ActiveSheet.Rows(pustroka).Borders(xlEdgeLeft). _
LineStyle = xlLineStyleNone
ActiveSheet.Rows(pustroka).Borders(xlEdgeRight). _
LineStyle = xlLineStyleNone
ActiveSheet.Rows(pustroka).Interior. _
ColorIndex = xlColorIndexNone
i = i - Selection(i, 1).MergeArea.Rows.Count + 1
Next
End Sub
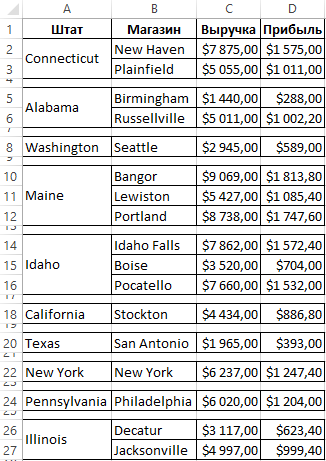
Теперь если мы хотим вставить по одной пустой строке между каждой объединенной и необъединенной ячейкой, которые находиться в столбце A? Тогда а в таблице отчета по продажам выделяем диапазон ячеек A:D18 и запускаем наш макрос выбрав инструмент: «РАЗРАБОТЧИК»-«Код»-«Макросы»-«VstavkaStrok»-«Выполнить». После запуска макроса таблица будет выглядеть как показано на рисунке:
Сначала в коде объявлены две переменные:
- i – переменная выполняет роль счетчика в цикле.
- pustroka – переменная будет хранить в себе очередной номер для каждой строки выделенного диапазона.
В макросе находиться цикл, который запускает целый ряд инструкций для каждой строки в выделенном диапазоне ячеек. Направление цикла идет с нижней строки выделения к верхней.
- В первой инструкции мы присваиваем для переменной pustroka номер строки которая находиться под текущей строкой.
- Следующая инструкция добавляет пустую строку с высотой в 7 пикселей.
- Удаляются в добавленной строке все вертикальные границы, а также заливка.
- Уменьшается значение переменной i на количество строк, которые охватывает текущая объединенная ячейка, находящаяся в первом столбце выделенного диапазона.
Умная вставка строк с помощью макроса
Если же мы хотим экспонировать только самые большие группы. Допустим Вы желаете сделать так, чтобы макросом были вставлены пустые строки только после объединенных ячеек в столбце A, которые охватывают много строк. И не вставлять пустые строки после необъединенных ячеек или тех объединенных ячеек, которые охватывают не более 1-ой строки. Тогда после строки в коде макроса где описано начало цикла добавляем строку кода с условной инструкцией:
If Selection(i, 1).MergeArea.Rows.Count <> 1 Then
Также перед инструкцией конца цикла Next следует вставить инструкцию конца условия – End If.
Обратите внимание! Параметр условия для игнорирования объединенных ячеек с определенным количеством озвучиваемых строк можно будет даже настраивать, изменяя число после оператора сравнения.
Такая модификация кода макроса внутри цикла будет следить за тем применять ли ряд инструкций к текущей строке или игнорировать их на данном этапе прохода по срокам. Если же текущая строка не содержит необъединенной ячейки или объединенная ячейка охватывает более чем 1-ну строку, тогда для нее применяться все инструкции форматирования. Полная версия модифицированного года выглядит так:
Sub VstavkaStrok1()
Dim i As Long
Dim pustroka As Long
For i = Selection.Rows.Count To 2 Step -1
  If Selection(i, 1).MergeArea.Rows.Count <> 1 Then
  pustroka = Selection(i, 1).Row + 1
  ActiveSheet.Rows(pustroka).Insert xlShiftDown
  ActiveSheet.Rows(pustroka).RowHeight = 7
  ActiveSheet.Rows(pustroka).Borders(xlInsideVertical). _
  LineStyle = xlLineStyleNone
  ActiveSheet.Rows(pustroka).Borders(xlEdgeLeft). _
  LineStyle = xlLineStyleNone
  ActiveSheet.Rows(pustroka).Borders(xlEdgeRight). _
  LineStyle = xlLineStyleNone
  ActiveSheet.Rows(pustroka).Interior. _
  ColorIndex = xlColorIndexNone
  i = i - Selection(i, 1).MergeArea.Rows.Count + 1
  End If
Next
End Sub
Результат автоматического форматирования таблицы отчета с учетом новых условий в коде макроса:
Как видите с помощью макросов таблицы любых объемов данных можно форматировать в один клик мышкой.
-

1
Open your project in Excel. To do this, double-click the Excel document that contains your data in Finder (Macs) or File Explorer (Windows). Alternatively, if you already have Excel open, click File > Open and select the file that has your data.
-
2
Make sure the Developer tab is displayed on your editing ribbon. If it isn’t and you’re using Windows, go to the File tab and click Options > Customize ribbon. Under «Main tabs'» check the box next to «Developer.»
- If you’re using a Mac, enable the Developer tab by clicking the Excel menu at the top of the screen and selecting Preferences. Click Ribbon & Toolbar, check the «Developer» box in the «Customize this Ribbon» category, and click Save.
Advertisement
-
3
Open the VBA editor. Click the Developer tab and select Visual Basic to do so. Alternatively, you can press Alt + F11.
-
4
Right-click a sheet. In the vertical menu on the left side of the window, you’ll see a list of your workbook’s sheets. Right-click on any of these to get another drop-down menu.
-
5
Hover your cursor over Insert and click Module. When you hover over Insert, a menu will pop out to the right of the menu. Clicking on Module will create a space for you to enter a VBA code and run it.
-
6
Enter this code into your VBA window:
Sub Insert_Rows_Loop()
     Dim CurrentSheet As Object

     ' Loop through all selected sheets.
     For Each CurrentSheet In ActiveWindow.SelectedSheets
        ' Insert 5 rows at top of each sheet.
        CurrentSheet.Range("a1:a5").EntireRow.Insert
     Next CurrentSheet
End Sub
- With this code, you’ll be inserting rows starting at A1 and ending at A5—that’s 5 empty new rows at the top of the sheet.[1]
You can replace these cell addresses with the location into which you want to place the code, such as beginning with the last row in the sheet to any ending point.
- With this code, you’ll be inserting rows starting at A1 and ending at A5—that’s 5 empty new rows at the top of the sheet.[1]
-
7
Press F5. Alternatively, you can click the green Play icon above the VB editor writing space.
-
8
Click OK to continue. This adds the rows to your sheet.


Advertisement
-
1
Open your project in Excel. To do this, double-click the Excel document that contains your data in Finder (Macs) or File Explorer (Windows). Alternatively, if you already have Excel open, click File > Open and select the file.
- Use this method if you want to learn how to copy existing formulas into new rows you add to your data.
-
2
Insert a row inside your data. The keyboard shortcut you’ll use can only add a formula from the row above it, so make sure you insert the row in the middle or the bottom of your data collection.
- To insert a row, right-click the row below where you want the new row to be added, then click Insert.
-
3
Click to select the cell in the new row where you want to include the formula. Remember, this keyboard shortcut will copy the formula from the cell above to the cell you have selected.
- The cell will highlight to indicate that it is selected.
-
4
Press Ctrl+D. The shortcut is the same for Mac and Windows and will fill the formula down from the cell above.
[2]


Advertisement
Ask a Question
200 characters left
Include your email address to get a message when this question is answered.
Submit
Advertisement
Thanks for submitting a tip for review!
About This Article
Article SummaryX
1. Open your project in Excel.
2. Insert a row inside your data.
3. Click to select the cell in the new row where you want to include the formula.
4. Press Crtl + D.
Did this summary help you?
Thanks to all authors for creating a page that has been read 34,621 times.