
Объединение диапазона ячеек в одну или построчно с помощью кода VBA Excel. Метод Range.Merge и свойство MergeCells. Отмена объединения ячеек. Примеры.
Метод Range.Merge
Метод Merge объекта Range объединяет ячейки заданного диапазона в одну или построчно из кода VBA Excel.
Синтаксис метода:
- Expression — выражение, возвращающее объект Range.
- Across — логическое значение, определяющее характер объединения ячеек:
- True — ячейки объединяются построчно: каждая строка заданного диапазона преобразуется в одну ячейку.
- False — весь диапазон преобразуется в одну ячейку. False является значением по умолчанию.
Преимущество метода Range.Merge перед свойством MergeCells заключается в возможности построчного объединения ячеек заданного диапазона без использования цикла.
Свойство MergeCells
Свойство MergeCells объекта Range применяется как для объединения ячеек, так и для его отмены.
Синтаксис свойства с присвоением значения:
|
Expression.MergeCells = Boolean |
- Expression — выражение, представляющее объект Range.
- Boolean — логическое значение, определяющее необходимость объединения ячеек или его отмены:
- True — объединение ячеек заданного диапазона.
- False — отмена объединения ячеек.
С помощью свойства MergeCells можно из кода VBA Excel проверять диапазон (отдельную ячейку), входит ли он (она) в объединенную ячейку (True) или нет (False). Если проверяемый диапазон окажется комбинированным, то есть содержащим объединенные и необъединенные ячейки, компилятор сгенерирует ошибку.
Переменная Expression для отмены объединения ячеек с помощью свойства Range.MergeCells может представлять одну любую ячейку, входящую в объединенный диапазон.
Метод Range.UnMerge
Метод UnMerge объекта Range разделяет объединенную область на отдельные ячейки из кода VBA Excel.
Синтаксис метода:
Expression — выражение, возвращающее объект Range.
Переменная Expression для отмены объединения ячеек методом UnMerge может представлять одну любую ячейку, входящую в объединенный диапазон.
Примеры объединения ячеек и его отмены
Пример 1
Наблюдаем, как происходит объединение ячеек при разных значениях параметра Across:
|
Sub Primer1() ‘Объединяем ячейки диапазона «A1:D4» построчно Range(«A1:D4»).Merge (True) ‘Объединяем диапазон «A5:D8» в одну ячейку ‘Across принимает значение False по умолчанию Range(«A5:D8»).Merge End Sub |
Не забываем, что логическое выражение True можно заменить единичкой, а False — нулем.
Пример 2
Отменяем объединение ячеек в диапазонах из первого примера:
|
Sub Primer2() Range(«A1:D8»).MergeCells = False End Sub |
Пример 3
Предполагается, что перед этим примером отменено объединение ячеек кодом из предыдущего примера.
|
Sub Primer3() ‘Объединяем ячейки диапазона «A1:D4» Range(«A1:D4»).MergeCells = 1 ‘Проверяем принадлежность диапазона ‘объединенной ячейке* MsgBox Range(«A1:C2»).MergeCells MsgBox Range(«A6:C7»).MergeCells ‘Ячейки диапазона «A5:D8» ‘можно объединить и так Cells(5, 1).Resize(4, 4).Merge End Sub |
*Если проверяемый диапазон окажется комбинированным, VBA Excel сгенерирует ошибку.
Пример 4
Отмена объединения ячеек с помощью метода Range.UnMerge:
|
Sub Primer4() ‘Объединяем ячейки диапазона «A1:C4» Range(«A1:C4»).Merge MsgBox «Ячейки диапазона ««A1:C4»» объединены» ‘Смотрим адрес диапазона, входящего в объединенную ячейку MsgBox Range(«A2»).MergeArea.Address ‘Отменяем объединение ячеек диапазона «A1:C4» Range(«B3»).UnMerge ‘или: Range(«B3»).MergeArea.UnMerge MsgBox «Объединение ячеек диапазона ««A1:C4»» отменено» End Sub |
Предупреждение перед объединением
Если объединяемые ячейки не являются пустыми, пред их объединением появится предупреждающее диалоговое окно с сообщением: «В объединенной ячейке сохраняется только значение из верхней левой ячейки диапазона. Остальные значения будут потеряны.»
Пример 5
Наблюдаем появление предупреждающего окна:
|
Sub Primer5() ‘Отменяем объединение ячеек в диапазоне «A1:D4» Range(«A1:D4»).MergeCells = 0 ‘Заполняем ячейки диапазона текстом Range(«A1:D4») = «Ячейка не пустая» ‘Объединяем ячейки диапазона «A1:D4» Range(«A1:D4»).MergeCells = 1 ‘Наблюдаем предупреждающее диалоговое окно End Sub |

Чтобы избежать появление предупреждающего окна, следует использовать свойство Application.DisplayAlerts, с помощью которого можно отказаться от показа диалоговых окон при работе кода VBA Excel.
Пример 6
|
Sub Primer6() ‘Отменяем объединение ячеек в диапазоне «A5:D8» Range(«A5:D8»).MergeCells = 0 ‘Заполняем ячейки диапазона «A5:D8» текстом Range(«A5:D8») = «Ячейка не пустая» Application.DisplayAlerts = False Range(«A5:D8»).MergeCells = 1 Application.DisplayAlerts = True End Sub |
Теперь все прошло без появления диалогового окна. Главное, не забывать после объединения ячеек возвращать свойству Application.DisplayAlerts значение True.
Кстати, если во время работы VBA Excel предупреждающее окно не показывается, это не означает, что оно игнорируется. Просто программа самостоятельно принимает к действию ответное значение диалогового окна по умолчанию.
 In this VBA Tutorial, you learn how to merge cells and unmerge cells in a variety of ways.
This VBA Tutorial is accompanied by Excel workbooks containing the data and macros I use in the examples below. You can get immediate free access to these example workbooks by subscribing to the Power Spreadsheets Newsletter.
Use the following Table of Contents to navigate to the section you’re interested in.
Related VBA and Macro Tutorials
The following VBA and Macro Tutorials may help you better understand and implement the contents below:
- General VBA constructs and structures:
- Learn about using variables here.
- Learn about VBA data types here.
- Learn about R1C1 and A1 style references here.
- Practical VBA applications and macro examples:
- Learn how to work with worksheets here.
You can find additional VBA and Macro Tutorials in the Archives.
VBA Code to Merge Cells
To merge cells with VBA, use a statement with the following structure:
Worksheet.Range("FirstCell:LastCell").Merge
Process Followed by VBA Code

VBA Statement Explanation
- Item: Worksheet.
- VBA Construct: Workbook.Worksheets property.
- Description: Returns a Worksheet object representing the worksheet you work with.
- Item: Range(“FirstCell:LastCell”).
- VBA Construct: Worksheet.Range property.
- Description: Returns a Range object representing the cell range between FirstCell and LastCell. This is the cell range you merge.
Specify FirstCell and LastCell using an A1-style cell reference. Separate FirstCell and LastCell using the range operator, a colon (:). Enclose the entire cell range address within quotations (“”).
- Item: Merge.
- VBA Construct: Range.Merge method.
- Description: Merges the cells represented by the Range object you specify in item #2 above to create a merged cell.
Macro Example
The following macro merges cells A5 to E6 of the worksheet named “Merge Cells”.
Sub mergeCells()

    Worksheets("Merge Cells").Range("A5:E6").Merge

End Sub
Effects of Executing Macro Example
The following GIF illustrates the results of executing this macro example. As expected, cells A5 to E6 are merged.

#2: Unmerge Cells
VBA Code to Unmerge Cells
To unmerge cells with VBA, use a statement with the following structure:
Worksheet.Range("A1CellReference").UnMerge
Process Followed by VBA Code

VBA Statement Explanation
- Item: Worksheet.
- VBA Construct: Workbook.Worksheets property.
- Description: Returns a Worksheet object representing the worksheet you work with.
- Item: Range(“A1CellReference”).
- VBA Construct: Worksheet.Range property.
- Description: Returns a Range object representing a cell within the merged cell you unmerge. Specify the cell using an A1-style cell reference (A1CellReference) enclosed within quotations (“”).
- Item: UnMerge.
- VBA Construct: Range.UnMerge method.
- Description: Separates the merged cell containing the cell you specify in item #2 above into individual regular cells.
Macro Example
The following macro unmerges the merged cell containing cell C6 of the worksheet named “Merge Cells”.
Sub unmergeCells()

    Worksheets("Merge Cells").Range("C6").UnMerge

End Sub
Effects of Executing Macro Example
The following GIF illustrates the results of executing this macro example. As expected, the merged cell containing cell C6 is unmerged into individual regular cells.
The merged cell range (A5 to E6) was originally merged using the macro example #1 above.

#3: Merge Cells and Center
VBA Code to Merge Cells and Center
To merge cells and center the contents with VBA, use a macro with the following statement structure:
With Worksheet.Range("FirstCell:LastCell")
    .HorizontalAlignment = xlCenter
    .VerticalAlignment = xlCenter
    .Merge
End With
Process Followed by VBA Code

VBA Statement Explanation
Lines #1 and #5: With Worksheet.Range(“FirstCell:LastCell”) | End With
- Item: With… End With.
- VBA Construct: With… End With statement.
- Description: Statements within the With… End With statement (lines #2 through #4 below) are executed on the Range object returned by item #3 below.
- Item: Worksheet.
- VBA Construct: Workbook.Worksheets property.
- Description: Returns a Worksheet object representing the worksheet you work with.
- Item: Range(“FirstCell:LastCell”).
- VBA Construct: Worksheet.Range property.
- Description: Returns a Range object representing the cell range between FirstCell and LastCell. This is the cell range you merge.
Specify FirstCell and LastCell using an A1-style cell reference. Separate FirstCell and LastCell using the range operator, a colon (:). Enclose the entire cell range address within quotations (“”).
Line #2: .HorizontalAlignment = xlCenter
- Item: HorizontalAlignment = xlCenter.
- VBA Construct: Range.HorizontalAlignment property.
- Description: Horizontally centers the contents of the cell range you specify in line #1 above by setting the HorizontalAlignment property to xlCenter.
Line #3: VerticalAlignment = xlCenter
- Item: VerticalAlignment = xlCenter.
- VBA Construct: Range.VerticalAlignment property.
- Description: Vertically centers the contents of the cell range you specify in line #1 above by setting the VerticalAlignment property to xlCenter.
Line #4: Merge
- Item: Merge.
- VBA Construct: Range.Merge method.
- Description: Merges the cells represented by the Range object you specify in line #1 above to create a merged cell.
Macro Example
The following macro (i) centers the contents in cells A8 to E9 of the worksheet named “Merge Cells”, and (ii) merges those cells.
Sub mergeCellsAndCenter()

    With Worksheets("Merge Cells").Range("A8:E9")
        .HorizontalAlignment = xlCenter
        .VerticalAlignment = xlCenter
        .Merge
    End With

End Sub
Effects of Executing Macro Example
The following GIF illustrates the results of executing this macro example. As expected, VBA merges cells A8 to E9 and centers the contents.

#4: Merge Cells Across
VBA Code to Merge Cells Across
To merge cells across (in the same row) with VBA, use a statement with the following structure:
Worksheet.Range("FirstCell:LastCell").Merge Across:=True
Process Followed by VBA Code

VBA Statement Explanation
- Item: Worksheet.
- VBA Construct: Workbook.Worksheets property.
- Description: Returns a Worksheet object representing the worksheet you work with.
- Item: Range(“FirstCell:LastCell”).
- VBA Construct: Worksheet.Range property.
- Description: Returns a Range object representing the cell range between FirstCell and LastCell. This is the cell range you merge.
Specify FirstCell and LastCell using an A1-style cell reference. Separate FirstCell and LastCell using the range operator, a colon (:). Enclose the entire cell range address within quotations (“”).
- Item: Merge.
- VBA Construct: Range.Merge method.
- Description: Merges the cells in each row of the cell range you specify in item #2 above to create separate merged cells. For these purposes, considers the Across parameter (item #4 below).
- Item: Across:=True.
- VBA Construct: Across parameter of the Range.Merge method.
- Description: Specifies that the cells in each row of the cell range you specify in item #2 above are merged separately. In other words, the cells in each row are merged into separate merged cells (vs. a single merged cell covering the entire cell range).
The default value of the Across parameter is False. In such case, all cells within the cell range you specify are merged into a single cell. This is the equivalent of simply merging cells (operation #1 above).
Macro Example
The following macro merges cells A11 to E15 of the worksheet named “Merge Cells” across. Therefore, the cells in each row from row 11 to row 15 are merged into separate merged cells.
Sub mergeCellsAcross()

    Worksheets("Merge Cells").Range("A11:E15").Merge Across:=True

End Sub
Effects of Executing Macro Example
The following GIF illustrates the results of executing this macro example. As expected, VBA merges cells A11 to E15 across.

#5: Merge Cells Based on Cell Value
VBA Code to Merge Cells Based on Cell Value
To merge cells based on a cell value (whether it meets certain criteria), use a macro with the following statement structure:
With Worksheet
    For Counter = LastRow To FirstRow Step -1
        If .Cells(Counter, CriteriaColumn).Value = Criteria Then .Range(.Cells(Counter, FirstColumn), .Cells(Counter, LastColumn)).Merge
    Next Counter
End With
Process Followed by VBA Code

VBA Statement Explanation
Lines #1 and #5: With Worksheet | End With
- Item: With… End With.
- VBA Construct: With… End With statement.
- Description: Statements within the With… End With statement (lines #2 through #4 below) are executed on the Worksheet object returned by item #2 below.
- Item: Worksheet.
- VBA Construct: Workbook.Worksheets property.
- Description: Returns a Worksheet object representing the worksheet you work with.
Lines #2 and #4: For Counter = LastRow To FirstRow Step -1 | Next Counter
- Item: For… Next Counter.
- VBA Construct: For… Next statement.
- Description: Repeats the statements within the loop (line #3 below) for each row between FirstRow (item #4 below) and LastRow (item #3 below).
- Item: Counter.
- VBA Construct: Counter of For… Next statement.
- Description: Loop counter. If you explicitly declare a variable to represent the loop counter, use the Long data type.
- Item: LastRow.
- VBA Construct: Counter Start of For… Next statement.
- Description: Number of the last row (further down the worksheet) you want the macro to consider when identifying rows to merge cells. The number of the last row is also the initial value of Counter (item #2 above).
If you explicitly declare a variable to represent the number of the last row to consider, use the Long data type.
- Item: FirstRow.
- VBA Construct: Counter End of For… Next statement.
- Description: Number of the first row (closer to the top of the worksheet) you want the macro to consider when identifying rows to merge cells. The number of the first row is also the final value of Counter (item (#2 above).
If you explicitly declare a variable to represent the number of the first row to consider, use the Long data type.
- Item: Step -1.
- VBA Construct: Step of For… Next statement.
- Description: Amount by which Counter (item #2 above) changes every time a loop iteration occurs.
In this scenario, you loop backwards: from LastRow (item #3 above) to FirstRow (item #4 above). Therefore, step is -1.
Line #3: If .Cells(Counter, CriteriaColumn).Value = Criteria Then .Range(.Cells(Counter, FirstColumn), .Cells(Counter, LastColumn)).Merge
- Item: If… Then.
- VBA Construct: If… Then… Else statement.
- Description: Conditionally executes the statement at the end of the line of code (items #5 through #8 below) if the condition specified in item #4 below is met.
- Item: .Cells(Counter, CriteriaColumn).
- VBA Construct: Worksheet.Cells property and Range.Item property.
- Description: Returns a Range object representing the cell at the intersection of row number Counter and column number CriteriaColumn.
At any given time, the value of the loop counter (Counter) is the same as that of the row through which the macro is currently looping. CriteriaColumn is the number of the column containing the cells you consider for purposes of determining whether to merge cells in the row through which the macro is currently looping.
- Item: Value.
- VBA Construct: Range.Value property.
- Description: Returns the value of the cell represented by the Range object returned by item #2 above.
- Item: .Cells(Counter, CriteriaColumn).Value = Criteria.
- VBA Construct: Condition of If… Then… Else statement.
- Description: This condition is an expression that evaluates to True or False, as follows:
-
- True: When the value of the cell represented by the Range object returned by item #2 above is equal to the criteria you specify (Criteria).
- False: When the value of the cell represented by the Range object returned by item #2 above isn’t equal to the criteria you specify (Criteria).
If you explicitly declare a variable to represent value, ensure that the data type you use can handle the value you use as criteria.
-
- Item: .Range.
- VBA Construct: Worksheet.Range property.
- Description: Returns a Range object representing a cell range specified as follows:
- Leftmost cell: Range object returned by item #6 below.
- Rightmost cell: Range object returned by item #7 below.
- Item: .Cells(Counter, FirstColumn).
- VBA Construct: Worksheet.Cells property and Range.Item property.
- Description: Returns a Range object representing the cell at the intersection of row number Counter and column number FirstColumn.
At any given time, the value of the loop counter (Counter) is the same as that of the row through which the macro is currently looping. FirstColumn is the number of the first column in the cell range you want the macro to merge. If you explicitly declare a variable to represent FirstColumn, use the Long data type.
- Item: .Cells(Counter, LastColumn).
- VBA Construct: Worksheet.Cells property and Range.Item property.
- Description: Returns a Range object representing the cell at the intersection of row number Counter and column number LastColumn.
At any given time, the value of the loop counter (Counter) is the same as that of the row through which the macro is currently looping. LastColumn is the number of the last column in the cell range you want the macro to merge. If you explicitly declare a variable to represent LastColumn, use the Long data type.
- Item: Merge.
- VBA Construct: Range.Merge method.
- Description: Merges the cells represented by the Range object returned by items #5 through #7 above to create a merged cell.
Macro Example
The following macro merges cells in columns myFirstColumn through myLastColumn in each row between myFirstRow and myLastRow where the value stored in column myCriteriaColumn is the string held by the myCriteria variable.
- myFirstRow is set to 5.
- myLastRow is set to the number of the last row with data in the worksheet named “Merge Cells Based on Criteria”. The constructs used by the statement that finds the last row with data in the worksheet are the Worksheet.Cells property, the Range.Find method, and the Range.Row property.
- Both myCriteriaColumn and myFirstColumn are set to 1 (column A).
- myLastColumn is set to 5 (column E).
- myCriteria holds the string “Merge cells”
Sub mergeCellsBasedOnCriteria()

    Dim myFirstRow As Long
    Dim myLastRow As Long
    Dim myCriteriaColumn As Long
    Dim myFirstColumn As Long
    Dim myLastColumn As Long
    Dim myWorksheet As Worksheet
    Dim myCriteria As String
    Dim iCounter As Long

    myFirstRow = 5
    myCriteriaColumn = 1
    myFirstColumn = 1
    myLastColumn = 5
    myCriteria = "Merge cells"

    Set myWorksheet = Worksheets("Merge Cells Based on Criteria")

    With myWorksheet

        myLastRow = .Cells.Find(What:="*", LookIn:=xlFormulas, LookAt:=xlPart, SearchOrder:=xlByRows, SearchDirection:=xlPrevious).Row

        For iCounter = myLastRow To myFirstRow Step -1
            If .Cells(iCounter, myCriteriaColumn).Value = myCriteria Then .Range(.Cells(iCounter, myFirstColumn), .Cells(iCounter, myLastColumn)).Merge
        Next iCounter

    End With

End Sub
Effects of Executing Macro Example
The following GIF illustrates the results of executing this macro example. As expected, VBA merges cells in columns A through E in each row where the value stored in column A is the string “Merge Cells”.

#6: Merge Cells Within a Row Based on Cell Value
VBA Code to Merge Cells Within a Row Based on Cell Value
To merge cells within a row based on a cell value (the cell value determines the number of cells to merge), use a macro with the following statement structure:
With Worksheet
    For Counter = LastRow To FirstRow Step -1
        .Cells(Counter, BaseColumn).Resize(ColumnSize:=.Cells(Counter, SizeColumn).Value).Merge
    Next iCounter
End With
Process Followed by VBA Code

VBA Statement Explanation
Lines #1 and #5: With Worksheet | End With
- Item: With… End With.
- VBA Construct: With… End With statement.
- Description: Statements within the With… End With statement (lines #2 through #4 below) are executed on the Worksheet object returned by item #2 below.
- Item: Worksheet.
- VBA Construct: Workbook.Worksheets property.
- Description: Returns a Worksheet object representing the worksheet you work with.
Lines #2 and #4: For Counter = LastRow To FirstRow Step -1 | Next Counter
- Item: For… Next Counter.
- VBA Construct: For… Next statement.
- Description: Repeats the statements within the loop (line #3 below) for each row between FirstRow (item #4 below) and LastRow (item #3 below).
- Item: Counter.
- VBA Construct: Counter of For… Next statement.
- Description: Loop counter. If you explicitly declare a variable to represent the loop counter, use the Long data type.
- Item: LastRow.
- VBA Construct: Counter Start of For… Next statement.
- Description: Number of the last row (further down the worksheet) you want the macro to consider when identifying rows to merge cells. The number of the last row is also the initial value of Counter (item #2 above).
If you explicitly declare a variable to represent the number of the last row to consider, use the Long data type.
- Item: FirstRow.
- VBA Construct: Counter End of For… Next statement.
- Description: Number of the first row (closer to the top of the worksheet) you want the macro to consider when identifying rows to merge cells. The number of the first row is also the final value of Counter (item (#2 above).
If you explicitly declare a variable to represent the number of the first row to consider, use the Long data type.
- Item: Step -1.
- VBA Construct: Step of For… Next statement.
- Description: Amount by which Counter (item #2 above) changes every time a loop iteration occurs.
In this scenario, you loop backwards: from LastRow (item #3 above) to FirstRow (item #4 above). Therefore, step is -1.
Line #3: .Cells(Counter, BaseColumn).Resize(ColumnSize:=.Cells(Counter, SizeColumn).Value).Merge
- Item: .Cells(Counter, BaseColumn).
- VBA Construct: Worksheet.Cells property and Range.Item property.
- Description: Returns a Range object representing the cell at the intersection of row number Counter and column number BaseColumn.
At any given time, the value of the loop counter (Counter) is the same as that of the row through which the macro is currently looping. BaseColumn is the number of the column you use as base for purposes of merging cells within the row through which the macro is currently looping.
- Item: Resize(ColumnSize:=.Cells(Counter, SizeColumn).Value).
- VBA Construct: Range.Resize property.
- Description: Returns a Range object representing a resized cell range. The Range object returned by Range.Resize is determined as follows:
- Base Cell Range: The base Range object (prior to resizing) is that returned by item #1 above.
- Row Size: The number of rows in the cell range returned by Range.Resize remain the same. In other words, the cell range where cells are merged is 1 row tall.
This is because the first parameter of Resize (known as RowSize) is omitted. Therefore, the number of rows in the cell range remains the same.
- Column Size: The number of columns in the cell range returned by Range.Resize is determined by item #3 below.
- Item: ColumnSize:=.Cells(Counter, SizeColumn).Value.
- VBA Constructs: ColumnSize parameter of Range.Resize property and Range.Value property.
- Description: Specifies the number of columns in the Range object returned by the Range.Resize property. The number of columns in this cell range is equal to the value within the cell at the intersection of row number Counter and column number SizeColumn (.Cells(Counter, SizeColumn).Value).
At any given time, the value of the loop counter (Counter) is the same as that of the row through which the macro is currently looping. SizeColumn is the number of the column containing the number of cells you want to merge within the row through which the macro is currently looping.
- Item: Merge.
- VBA Construct: Range.Merge method.
- Description: Merges the cells represented by the Range object returned by items #1 through #3 above.
Macro Example
The following macro merges a certain number of cells, starting with the cell in column myBaseColumn, in each row between myFirstRow and myLastRow. The number of merged cells is equal to the value stored in mySizeColumn. If that value is 1, no cells are merged.
In other words, the macro merges the cells between column number mySizeColumn and the column whose number is equal to that stored within the cell in myBaseColumn.
- myFirstRow is set to 5.
- myLastRow is set to the number of the last row with data in the worksheet named “Merge Cells Based on Cell Value”. The constructs used by the statement that finds the last row with data in the worksheet are the Worksheet.Cells property, the Range.Find method, and the Range.Row property.
- Both myBaseColumn and mySizeColumn are set to 1 (column A).
Sub mergeCellsBasedOnCellValue()

    Dim myFirstRow As Long
    Dim myLastRow As Long
    Dim myBaseColumn As Long
    Dim mySizeColumn As Long
    Dim myWorksheet As Worksheet
    Dim iCounter As Long

    myFirstRow = 5
    myBaseColumn = 1
    mySizeColumn = 1

    Set myWorksheet = Worksheets("Merge Cells Based on Cell Value")

    With myWorksheet

        myLastRow = .Cells.Find(What:="*", LookIn:=xlFormulas, LookAt:=xlPart, SearchOrder:=xlByRows, SearchDirection:=xlPrevious).Row

        For iCounter = myLastRow To myFirstRow Step -1
            .Cells(iCounter, myBaseColumn).Resize(ColumnSize:=.Cells(iCounter, mySizeColumn).Value).Merge
        Next iCounter

End With

End Sub
Effects of Executing Macro Example
The following GIF illustrates the results of executing this macro example. As expected, for each row with data, the macro merges the cells between column A and the column whose number is specified in column A.

References to VBA Constructs Used in this VBA Tutorial
Use the following links to visit the appropriate webpage within the Microsoft Office Dev Center:
- Identify the worksheet you work with:
- Workbook.Worksheets property.
- Return a Range object representing the cells you merge:
- Worksheet.Range property.
- Worksheet.Cells property.
- Range.Resize property.
- Merge cells:
- Range.Merge method.
- Unmerge cells:
- Range.UnMerge method.
- Center the contents of a cell range horizontally or vertically:
- Range.HorizontalAlignment property.
- Range.VerticalAlignment property.
- Identify last row with data in a worksheet:
- Range.Find method.
- Range.Row property.
- Loop through rows:
- For… Next statement.
- Identify the value stored in a cell to specify criteria for merging cells.
- Range.Value property.
- Test if cells meet criteria for merging:
- If… Then… Else statement.
- Work with variables:
- Dim statement.
- Set statement.
- Data types:
- Long data type.
- String data type.
- Simplify object references:
- With… End With statement.
Home / VBA / How to Merge Cells in Excel using a VBA Code
In VBA, there is a “MERGE” method that you can use to merge a range of cells or even multiple ranges into one. This method has an argument “Across” which is optional. If you specify TRUE it will merge each row in the range separately, and if you specify FALSE it will merge the entire range as one.

Steps to follow to use VBA to Merge Cells:
- First, you need to define the range of cells that you want to merge.

- After that, type a (.) dot to get the list of properties and methods and select “Merge” from that list or you can type it directly.

- After that, you need to define the argument “Across” as TRUE or FALSE.

- In the end, run that code to merge the range.


Here’s the code.
Range("A1:A2").Merge FalseAnd if you want to merge rows across the range you can use TRUE for the argument across.

Selection.Merge Across:=TrueIn the above code, you have the selection as the range, the merge method, and across as true. And it has merged all the rows in the selected range.
Now, let’s say you want to merge the range of cells from another worksheet, you don’t need to activate it first. You can simply refer to the worksheet first and then use the merge methods with the renege that you want to merge.
Worksheets("Sheet1").Range("A1:A2").MergeIn the same way, you can refer to a workbook as well by specifying the name of the workbook.
Workbooks("Book1.xlsx").Worksheets("Sheet1").Range("A1:A2").MergeMerge a Range and Align the Cell Content
Now when you merge two or more cells you need to align the content that you have in the cell. Look at the below snapshot where you have cell A1 and A2 merged and the value in the cells is aligned bottom. To deal with this problem, you can use the alignment property and align the cell content to the center and middle so that it’ll be easy for you to read it.

With Range("A1:A2")

    .Merge
    .HorizontalAlignment = xlCenter
    .VerticalAlignment = xlCenter

End With
Combine the Text and then Merge
Let’s talk about a real-life scenario. You have text in a range of cells and you to merge those cells but don’t want to lose the content that you have. Well, you can write a code loop through the entire range using each and combine text and then add it to the merged range in the end.

- In the first part, you have variables to use to store values from the range and define itself.
- In the second part, you have a LOOP to combine value from each cell to create a new string with that.
- In the third part, merge the range, add the combined string, apply the wrap, and alignment of the cell content.
Here’s the full code.
Sub vba_merge_with_values()

Dim val As String
Dim rng As Range

Set rng = Range("A1:A10")

For Each Cell In rng
    val = val & " " & Cell.Value
Next Cell

With rng
    .Merge
    .Value = Trim(val)
    .WrapText = True
    .HorizontalAlignment = xlCenter
    .VerticalAlignment = xlCenter
End With

End Sub
More Tutorials
- Count Rows using VBA in Excel
- Excel VBA Font (Color, Size, Type, and Bold)
- Excel VBA Hide and Unhide a Column or a Row
- Excel VBA Range – Working with Range and Cells in VBA
- Apply Borders on a Cell using VBA in Excel
- Find Last Row, Column, and Cell using VBA in Excel
- Insert a Row using VBA in Excel
- Select a Range/Cell using VBA in Excel
- SELECT ALL the Cells in a Worksheet using a VBA Code
- ActiveCell in VBA in Excel
- Special Cells Method in VBA in Excel
- UsedRange Property in VBA in Excel
- VBA AutoFit (Rows, Column, or the Entire Worksheet)
- VBA ClearContents (from a Cell, Range, or Entire Worksheet)
- VBA Copy Range to Another Sheet + Workbook
- VBA Enter Value in a Cell (Set, Get and Change)
- VBA Insert Column (Single and Multiple)
- VBA Named Range | (Static + from Selection + Dynamic)
- VBA Range Offset
- VBA Sort Range | (Descending, Multiple Columns, Sort Orientation
- VBA Wrap Text (Cell, Range, and Entire Worksheet)
- VBA Check IF a Cell is Empty + Multiple Cells
⇠ Back to What is VBA in Excel
Helpful Links – Developer Tab – Visual Basic Editor – Run a Macro – Personal Macro Workbook – Excel Macro Recorder – VBA Interview Questions – VBA Codes
Return to VBA Code Examples
In this Article
- Merge Cells Using VBA
- Unmerge Cells Using VBA
- More Merge Examples
- Merge Rows Using VBA
- Merge Columns Using VBA
- Merge and Center Cell Contents Horizontally
- Merge and Center Cell Contents Vertically
- Merge Cells Across a Cell Range
In this tutorial, we are going to look at the different ways you can merge cells using VBA.
Merge Cells Using VBA
You can merge cells in VBA using the Range.Merge method. The following code will merge cells A1:C1:
Sub MergingCells()

Range("A1:C1").Merge

End Sub
The result is:

Unmerge Cells Using VBA
You can unmerge a merged cell range using the Range.UnMerge method. Let’s say you’ve merged the cell range A1:D1. You can use one of the cell references in the range to unmerge the cells. The following code shows you how to unmerge cells A1:D1, in this case we are using cell B1:
Sub UnmergeCells()

Range("B1").UnMerge

End Sub
More Merge Examples
Merge Rows Using VBA
You can merge rows using VBA by specifying the row numbers that you want to merge. We have the text in cell A1 shown below:
The following code will merge rows 1-4:
Sub MergeRows()

Range("1:4").Merge

End Sub
The result is:

Merge Columns Using VBA
You can merge columns using VBA and the column letters. The following code will merge columns A:C.
Sub MergeColumns()

Range("A:C").Merge

End Sub
The result is:
Merge and Center Cell Contents Horizontally
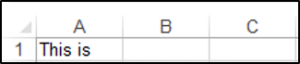
You can merge and center cell contents horizontally across a cell range. You have to merge the cells of interest and also set the horizontal alignment property of the range object to center. We have the text in cell A1 as shown below:
![]()
The following code will merge the cell range A1:D1 and center the contents of cell A1 horizontally across this cell range:
Sub MergeandCenterContentsHorizontally()

Range("A1:D1").Merge
Range("A1:D1").HorizontalAlignment = xlCenter

End Sub
The result is:

VBA Coding Made Easy
Stop searching for VBA code online. Learn more about AutoMacro — A VBA Code Builder that allows beginners to code procedures from scratch with minimal coding knowledge and with many time-saving features for all users!

Learn More
Merge and Center Cell Contents Vertically
You can merge and center cell contents vertically across a cell range. You have to merge the cells of interest and also set the vertical alignment property of the range object to center. We have the text in cell A1 as shown below:

The following code will merge the cell range A1:A4 and center the contents of cell A1 vertically across this cell range:
Sub MergeandCenterContentsVertically()

Range("A1:A4").Merge
Range("A1:D1").VerticalAlignment = xlCenter

End Sub
The result is:
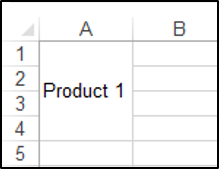
Merge Cells Across a Cell Range
You can merge cells across a cell range. You have to set the optional Across parameter of the Merge method to True. We have the text in cell A1 as shown below:
![]()
The following code will merge the cell range A1:D1:
Sub MergeCellsAcross()

Range("A1:D1").Merge Across:=True

End Sub
The result is:
![]()
Excel VBA, Merge Cells
In this article I will explain how you can use VBA to merge cells in Excel. I have also provided two sample codes.
Jump To:
- Basics, MergeCells
- Example 1, Merge Rows
- Example 2, Merge Columns
You can download the code and file related to this article here.
–
Basics, MergeCells:
Using the code below the cells A1 to D1 will be merged:
Range("A1:D1").MergeCells = True
Before:

After:

The line below will remove the merge cell property from the cells A1 to D1:
Range("A1").MergeCells = False
Note the lines below will not remove the merge cell property:
Range("A2").MergeCells = False
Range("A3").MergeCells = False
Range("A4").MergeCells = False
–
Example 1, Merge Rows:
The code below will loop through the rows in column A and merge the first 3 cells in each row:
Sub  Exampl1()

Dim  i As  Integer

For  i = 1 To  10

    Range(Cells(i, 1), Cells(i, 3)).MergeCells = True

Next  i

End  Sub
Before:

After:

–
Example 2, Merge Columns:
The code below will loop through the first 8 columns in row 1 and merge the first 7 cells in each column:
Sub  Example2()

Dim  i As  Integer

For  i = 1 To  8

    Range(Cells(1, i), Cells(7, i)).MergeCells = True

Next  i

End  Sub
Before:

After:

You can download the code and file related to this article here.
See also:
- VBA Excel, Alignment
- Excel VBA, Shrink to Fit On/Off
- Excel VBA, Wrap Text On/Off
If you need assistance with your code, or you are looking for a VBA programmer to hire feel free to contact me. Also please visit my website www.software-solutions-online.com
Merged cells are one of the most popular options used by beginner spreadsheet users.
But they have a lot of drawbacks that make them a not so great option.
In this post, I’ll show you everything you need to know about merged cells including 8 ways to merge cells.
I’ll also tell you why you shouldn’t use them and a better alternative that will produce the same visual result.
What is a Merged Cell
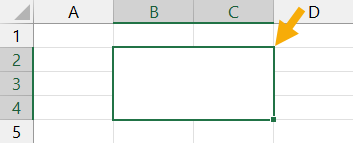
A merged cell in Excel combines two or more cells into one large cell. You can only merge contiguous cells that form a rectangular shape.
The above example shows a single merged cell resulting from merging 6 cells in the range B2:C4.
Why You Might Merge a Cell
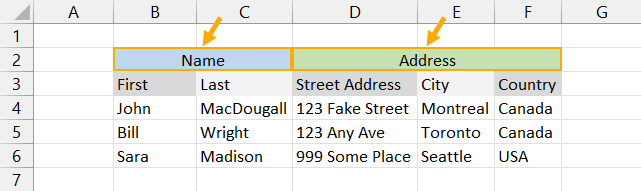
Merging cells is a common technique used when a title or label is needed for a group of cells, rows or columns.
When you merge cells, only the value or formula in the top left cell of the range is preserved and displayed in the resulting merged cell. Any other values or formulas are discarded.
The above example shows two merged cells in B2:C2 and D2:F2 which indicates the category of information in the columns below. For example the First and Last name columns are organized with a Name merged cell.
Why is the Merge Command Disabled?
On occasion, you might find the Merge & Center command in Excel is greyed out and not available to use.
There are two reasons why the Merge & Center command can become unavailable.
- You are trying to merge cells inside an Excel table.
- You are trying to merge cells in a protected sheet.
Cells inside an Excel table can not be merged and there is no solution to enable this.
If most of the other commands in the ribbon are greyed out too, then it’s likely the sheet is protected. In order to access the Merge option, you will need to unprotect the worksheet.
This can be done by going to the Review tab and clicking the Unprotect Sheet command.
If the sheet has been protected with a password, then you will need to enter it in order to unprotect the sheet.
Now you should be able to merge cells inside the sheet.
Merged Cells Only Retain the Top Left Values
Warning before you start merging cells!
If the cells contain data or formulas, then you will lose anything not in the upper left cell.
A warning dialog box will appear telling you Merging cells only keeps the upper-left value and discards other values.
The above example shows the result of merging cells B2:C4 which contains text data. Only the data from cell B2 remains in the resulting merged cells.
If no data is present in the selected cells, then no warning will appear when trying to merge cells.
8 Ways to Merge a Cell
Merging cells is an easy task to perform and there are a variety of places this command can be found.
Merge Cells with the Merge & Center Command in the Home Tab
The easiest way to merge cells is using the command found in the Home tab.
- Select the cells you want to merge together.
- Go to the Home tab.
- Click on the Merge & Center command found in the Alignment section.
Merge Cells with the Alt Hotkey Shortcut
There is an easy way to access the Home tab Merge and Center command using the Alt key.
Press Alt H M C in sequence on your keyboard to use the Merge & Center command.
Merge Cells with the Format Cells Dialog Box
Merging cells is also available from the Format Cells dialog box. This is the menu which contains all formatting options including merging cells.
You can open the Format Cells dialog box a few different ways.
- Go to the Home tab and click on the small launch icon in the lower right corner of the Alignment section.
- Use the Ctrl + 1 keyboard shortcut.
- Right click on the selected cells and choose Format Cells.
Go to the Alignment tab in the Format Cells menu then check the Merge cells option and press the OK button.
Merge Cells with the Quick Access Toolbar
If you use the Merge & Center command a lot, then it might make sense to add it to the Quick Access Toolbar so it’s always readily available to use.
Go to the Home tab and right click on the Merge & Center command then choose Add to Quick Access Toolbar from the options.
This will add the command to your QAT which is always available to use.
A nice bonus that comes with the quick access command is it gets its own hotkey shortcut based on its position in the QAT. When you press the Alt key, Excel will show you what key to press next in order to access the command.
In the above example, the Merge and Center command is the third command in the QAT so the hotkey shortcut is Alt 3.
Merge Cells with Copy and Paste
If you have a merged cell in your sheet already then you can copy and paste it to create more merged cells. This will produce merged cells with the exact same dimensions.
Copy a merged cell using Ctrl + C then paste it into a new location using Ctrl + V. Just make sure the paste area doesn’t overlap an existing merged cell.
Merge Cells with VBA
Sub MergeCells()
    Range("B2:C4").Merge
End Sub
The basic command for merging cells in VBA is quite simple. The above code will merge cells B2:C4.
Merge Cells with Office Scripts
function main(workbook: ExcelScript.Workbook) {
	let selectedSheet = workbook.getActiveWorksheet();
	selectedSheet.getRange("B2:C4").merge(false);
	selectedSheet.getRange("B2:C4").getFormat().setHorizontalAlignment(ExcelScript.HorizontalAlignment.center);
}
The above office script will merge and center the range B2:C4.
Merge Cells inside a PivotTable
We can’t make this change for the selected cells because it will affect a PivotTable. Use the field list to change the report. If you are trying to insert or delete cells, move the PivotTable and try again.
If you try to use the Merge and Center command inside a Pivot Table, you will be greeted with the above error message.
You can’t use the Merge & Center command inside a PivotTable, but there is a way to merge cells in the PivotTable options menu.
In order to avail of this option, you will first need to make sure your Pivot Table is in the tabular display mode.
- Select a cell inside your PivotTable.
- Go to the Design tab.
- Click on Report Layout.
- Choose Show in Tabular Form.
Your pivot table will now be in the tabular form where each field you add to the Rows area will be in its own column with data in a displayed in a single row.
Now you can enable the option to show merge cells inside the pivot table.
- Select a cell inside your PivotTable.
- Go to the PivotTable Analyze tab.
- Click on Options.
This will open up the PivotTable Options menu.
Enable the Merge and center cells with labels setting in the PivotTable Options menu.
- Click on the Layout & Format tab.
- Check the Merge and center cells with labels option.
- Press the OK button.
Now as you expand and collapse fields in your pivot table, fields will merge when they have a common label.
10 Ways to Unmerge a Cell
Unmerging a cell is also quick and easy. Most methods involve the same steps as used to merge the cell, but there are a few extra methods worth knowing.
Unmerge Cells with the Home Tab Command
This is the same process as merging cells from the Home tab command.
- Select the merged cells to unmerge.
- Go to the Home tab.
- Click on the Merge & Center command.
Unmerge Cells with the Format Cells Menu
You can unmerge cells from the Format Cells dialog box as well.
Press Ctrl + 1 to open the Format Cells menu then go to the Alignment tab then uncheck the Merge cells option and press the OK button.
Unmerge Cells with the Alt Hot Key Shortcut
You can use the same Alt hot key combination to unmerge a merged cell. Select the merged cell you want to unmerge then press Alt H M C in sequence to unmerge the cells.
Unmerge Cells with Copy and Paste
You can copy the format from a regular single cell to unmerge merged cells.
Find a single cell and use Ctrl + C to copy it, then select the merged cells and press Ctrl + V to paste the cell.
You can use the Paste Special options to avoid overwriting any data when pasting. Press Ctrl + Alt + V then select the Formats option.
Unmerge Cells with the Quick Access Toolbar
This is a great option if you have already added the Merge & Center command to the quick access toolbar previously.
All you need to do is select the merged cells and click on the command or use the Alt hot key shortcut.
Unmerge Cells with the Clear Formats Command
Merged cells are a type of format, so it’s possible to unmerge cells by clearing the format from the cell.
- Select the merged cell to unmerge.
- Go to the Home tab.
- Click on the right part of the Clear button found in the Editing section.
- Select Clear Formats from the options.
Unmerge Cells with VBA
Sub UnMergeCells()
    Range("B2:C4").UnMerge
End Sub
Above is the basic command for unmerging cells in VBA. This will unmerge cells B2:C4.
Unmerge Cells with Office Scripts
Most methods of merging a cell can be performed again to unmerge cells like a toggle switch to merge or unmerge.
However the code in office scripts doesn’t work like this and instead, you will need to remove formatting to unmerge.
function main(workbook: ExcelScript.Workbook) {
	let selectedSheet = workbook.getActiveWorksheet();
	selectedSheet.getRange("B2:C4").clear(ExcelScript.ClearApplyTo.formats);
}
The above code will clear the format in cells B2:C4 and unmerge any merged cells it contains.
Unmerge Cells with the Accessibility Pane
Merged cells create problems for screen readers which is an accessibility issue. Because of this, they are flagged in the Accessibility window pane.
If you know the location of the merged cells, you can select them and go to the Review tab then click on the lower part of the Check Accessibility button and choose Unmerge Cells.
If you don’t know where all the merged cells are, you can open up the accessibility pane and it will show you where there are and you will be able to unmerge them one by one.
Go to the Review tab and click on the top part of the Check Accessibility command to launch the accessibility window pane.
This will show a Merged Cells section which you can expand to see all merged cells in the workbook. Click on the address and Excel will take you to that location.
Click on the downward chevron icon to the right of the address and the Unmerge option can be selected.
Unmerge Cells inside a PivotTable
To unmerge cells inside a pivot table, you just need to disable the setting in the pivot table options menu.
Now you can enable the option to show merge cells inside the pivot table.
- Select a cell inside your PivotTable.
- Go to the PivotTable Analyze tab.
- Click on Options.
- Click on the Layout & Format tab.
- Uncheck the Merge and center cells with labels option.
- Press the OK button.
Merge Multiple Ranges in One Step
In Excel, you can select multiple non-continuous ranges in a sheet by holding the Ctrl key. A nice consequence of this is you can convert these multiple ranges into merged cells in one step.
Hold the Ctrl key while selecting multiple ranges with the mouse. When you’re finished selecting the ranges you can release the Ctrl key and then go to the Home tab and click on the Merge & Center command.
Each range will become its own merged cell.
Combine Data Before Merging Cells
Before you merge any cells which contain data, it’s advised to combine the data since only the data in the top left cell is preserved when merging cells.
There are a variety of ways to do this, but using the TEXTJOIN function is among the easiest and most flexible as it will allow you to separate each cell’s data using a delimiter if needed.
= TEXTJOIN ( ", ", TRUE, B2:C4 )The above formula will join all the text in range B2:C4 going from left to right and then top to bottom. Text in each cell is separated with a comma and space.
Once you have the formula result, you can copy and paste it as a value so that the data is retained when you merge the cells.
How to Get Data from Merged Cells in Excel
A common misconception is that each cell of in the merged range contains the data entered inside.
In fact, only the top left cell will contain any data.
In the above example, the formula references the top left value in the merged range. The result returned is what is seen in the merged range.
In this example, the formula references a cell that is not the top left most cell in the merged range. The result is 0 because this cell is empty and contains no value.
In order to extract data from a merged range, you will always need to reference the top left most cell of the range. Fortunately, Excel automatically does this for you when you select the merged cell in a formula.
How to Find Merged Cells in a Workbook
If you create a bunch of merged cells, you might need to find them all later. Thankfully it’s not a painful process.
This can be done using the Find & Select command.
Go to the Home tab and click on the Find & Select button found in the Editing section, then choose the Find option. This will open the Find and Replace menu
You can also use the Ctrl + F keyboard shortcut.
You don’t need to enter any text to find, you can use this menu to find cells formatted as merged cells.
- Click on the Format button to open the Find Format menu.
- Go to the Alignment tab.
- Check the Merge cells option.
- Press the OK button in the Find Format menu.
- Press the Find All or Find Next button in the Find and Replace menu.
Unmerge All Merged Cells
Fortunately, unmerging all merged cells in a sheet is very easy.
- Select the entire sheet. You can do this two ways.
- Click on the select all button where the column headings meet the row headings.
- Press Ctrl + A on your keyboard.
- Go to the Home tab.
- Press the Merge & Center command.
This will unmerge all the merged cells and leave all the other cells unaffected.
Why You Shouldn’t Merge Cells
There are a lot of reasons why you shouldn’t merge cells.
- You can’t sort data with merged cells.
- You can’t filter data with merged cells.
- You can’t copy and paste values into merged cells.
- It will create accessibility problems for screen readers by changing the order in which text should be read.
This isn’t an exhaustive list, there are likely many more you will come across should you choose to merge cells.
Alternative to Merging a Cell
Good news!
There is a much better alternative than merging cells.
This alternative has none of the negative features that come with merging cells but will still allow you to achieve the same visual look of a merged cell.
It will allow you to display text centered across a range of cells without merging the cells.
Unfortunately, this technique will only work horizontally with one row of cells. There is no option to do something similar with a vertical range of cells.
Select the horizontal range of cells that you would like to center your text across. The first cell should contain the text which is to be centered while the remaining cells should be empty.
This example shows text in cell B2 and the range B2:C2 is selected as the range to center across.
Go to the Home tab and click on the small launch icon in the lower right corner of the Alignment section. This will open up the Format Cells dialog box with the Alignment tab active.
You can also press Ctrl + 1 to open the Format Cells dialog box and navigate to the Alignment tab.
Select Center Across Selection from the Horizontal dropdown options in the Text alignment section.
The text will now appear as though it occupies all cells but it will only exist in the first cell of the centering selection and each cell is still separate.
Pros
- The text appears centered across the selected range similar to a merged cell.
- No negative effects from merged cells.
- Can be used inside an Excel table.
Cons
- Can not center across a vertical range of cells.
Conclusions
There are lots of ways to merge cells in Excel. You can also easily unmerge cells too if you need to.
There are many things to consider when merging cells in Excel.
As you have seen, there are lots of pitfalls to merged cells that you should consider before implementing them in your workbooks.
Do you have a favorite merge method or warning about the dangers of merged cells that are not listed in the post? Let me know about it in the comments.
About the Author
John is a Microsoft MVP and qualified actuary with over 15 years of experience. He has worked in a variety of industries, including insurance, ad tech, and most recently Power Platform consulting. He is a keen problem solver and has a passion for using technology to make businesses more efficient.
A Powerful & Multi-purpose Templates for project management. Now seamlessly manage your projects, tasks, meetings, presentations, teams, customers, stakeholders and time. This page describes all the amazing new features and options that come with our premium templates.
Save Up to 85% LIMITED TIME OFFER

All-in-One Pack
120+ Project Management Templates
Essential Pack
50+ Project Management Templates
Excel Pack
50+ Excel PM Templates
PowerPoint Pack
50+ Excel PM Templates
MS Word Pack
25+ Word PM Templates
Ultimate Project Management Template
Ultimate Resource Management Template
Project Portfolio Management Templates
- VBA Merge Range – Syntax
- VBA Merge Range – Example1
- VBA Merge Range – Example2
- VBA Merge Rows- Example Macro
- VBA Merge Column – Example Macro
Page load link
Go to Top
I have a similar question to this one:
Merge the contents of 2 cells into another 3rd cell using VBA in Excel
But I want to combine a range of cells within a column, eg A2:A50. Sometimes I have over 300 cells to be combined into one. Values are text. Is there any way to modify this macro so that it works on a range instead of just two cells?
Thanks!
![]()
asked Jan 18, 2010 at 22:45
![]()
Based on the thread you are citing, I guess you wish to return the concatination of all the values held by the cells, interpreting all the values as strings?
For that, you could use a VBA macro that looks like this:
Function ConcatinateAllCellValuesInRange(sourceRange As Excel.Range) As String
    Dim finalValue As String

    Dim cell As Excel.Range

    For Each cell In sourceRange.Cells
        finalValue = finalValue + CStr(cell.Value)
    Next cell

    ConcatinateAllCellValuesInRange = finalValue
End Function
As an example, you could call it like this:
Sub MyMacro()
    MsgBox ConcatinateAllCellValuesInRange([A1:C3])
End Sub
Is this what you were looking for?
Mike
![]()
answered Jan 18, 2010 at 23:18
![]()
Mike RosenblumMike Rosenblum
12k6 gold badges48 silver badges64 bronze badges
Try the following macro, not very elegant in that it doesn’t do any error checking etc but works. Assign the macro to a button, click in a cell, click the macro button, highlight the desired (source) range to merge using your mouse (will autofill in range in the input box in the dialogue box), click ok, highlight the destination cell (will autofill the input box in the next dialogue box) click ok, all cells will be merged with a single space character into the destination cell, which can be in the original source range). Up to you to delete the superfluous cells manually. Workks with both rows and columns but not blocks.
Sub JoinCells()

Set xJoinRange = Application.InputBox(prompt:="Highlight source cells to merge",    Type:=8)
xSource = 0
xSource = xJoinRange.Rows.Count
xType = "rows"
If xSource = 1 Then
    xSource = xJoinRange.Columns.Count
    xType = "columns"
End If
Set xDestination = Application.InputBox(prompt:="Highlight destination cell", Type:=8)
If xType = "rows" Then
    temp = xJoinRange.Rows(1).Value
    For i = 2 To xSource
        temp = temp & " " & xJoinRange.Rows(i).Value
    Next i
Else
    temp = xJoinRange.Columns(1).Value
    For i = 2 To xSource
        temp = temp & " " & xJoinRange.Columns(i).Value
    Next i
End If

xDestination.Value = temp

End Sub
answered Aug 23, 2011 at 15:15
![]()
Just to add to Mike’s solution, if you want to get your range from a variable instead of a defined range (I had trouble with the syntax):
Sub MyMacro()

dim myVar As Range

    MsgBox ConcatinateAllCellValuesInRange(myVar)

End Sub
answered Apr 13, 2015 at 9:55
![]()
Here is a macro developed circa 2006.
I still use it today!
Usage:
- Select the cells you want to merge (the marco assumes they are all in the same column, one below the other)
- Run the macro (a good idea is to assign it a short-cut key via Excel’s Developer->Code->Macros-> select the macro -> Options)
Sub MergeCells()
'
Dim myString As String
Dim myUnion As Range

   Count = Selection.Count

   myValue = Selection

   myrow = Selection.Row
   mycol = Selection.Column
   myString = ""

   For Index = 1 To Count
      If Index > 1 Then myString = myString & Chr(10) & myValue(Index, 1) Else myString = myValue(Index, 1)
   Next Index

  Selection.ClearContents
  Cells(myrow, mycol) = myString


' Uncomment this loop if you want to delete the rows that are below the top cell (the rows with the cells whose content was concatenated to the top cell)
' For Index = 1 To Count - 1
'    Rows(myrow + 1).Delete
' Next Index

 Cells(myrow, mycol).Select

End Sub
answered Mar 25 at 18:02
![]()