
You all must have worked with Excel at some time in your life and must have felt the need for automating some repetitive or tedious task. Don’t worry in this tutorial we are going to learn about how to work with Excel using Python, or automating Excel using Python. We will be covering this with the help of the Openpyxl module.
Getting Started
Openpyxl is a Python library that provides various methods to interact with Excel Files using Python. It allows operations like reading, writing, arithmetic operations, plotting graphs, etc.
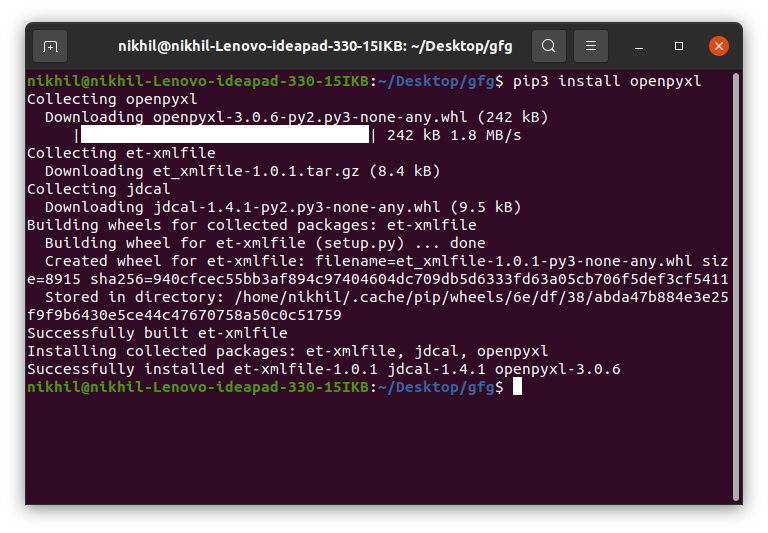
This module does not come in-built with Python. To install this type the below command in the terminal.
pip install openpyxl
Reading from Spreadsheets
To read an Excel file you have to open the spreadsheet using the load_workbook() method. After that, you can use the active to select the first sheet available and the cell attribute to select the cell by passing the row and column parameter. The value attribute prints the value of the particular cell. See the below example to get a better understanding.
Note: The first row or column integer is 1, not 0.
Dataset Used: It can be downloaded from here.
Example:
Python3
import openpyxl
path = "gfg.xlsx"
wb_obj = openpyxl.load_workbook(path)
sheet_obj = wb_obj.active
cell_obj = sheet_obj.cell(row = 1, column = 1)
print(cell_obj.value)
Output:
Name
Reading from Multiple Cells
There can be two ways of reading from multiple cells.
Method 1: We can get the count of the total rows and columns using the max_row and max_column respectively. We can use these values inside the for loop to get the value of the desired row or column or any cell depending upon the situation. Let’s see how to get the value of the first column and first row.
Example:
Python3
import openpyxl
path = "gfg.xlsx"
wb_obj = openpyxl.load_workbook(path)
sheet_obj = wb_obj.active
row = sheet_obj.max_row
column = sheet_obj.max_column
print("Total Rows:", row)
print("Total Columns:", column)
print("nValue of first column")
for i in range(1, row + 1):
cell_obj = sheet_obj.cell(row = i, column = 1)
print(cell_obj.value)
print("nValue of first row")
for i in range(1, column + 1):
cell_obj = sheet_obj.cell(row = 2, column = i)
print(cell_obj.value, end = " ")
Output:
Total Rows: 6
Total Columns: 4

Value of first column
Name
Ankit
Rahul
Priya
Nikhil
Nisha

Value of first row
Ankit  B.Tech CSE 4
Method 2: We can also read from multiple cells using the cell name. This can be seen as the list slicing of Python.
Python3
import openpyxl
path = "gfg.xlsx"
wb_obj = openpyxl.load_workbook(path)
sheet_obj = wb_obj.active
cell_obj = sheet_obj['A1': 'B6']
for cell1, cell2 in cell_obj:
print(cell1.value, cell2.value)
Output:
Name Course
Ankit  B.Tech
Rahul M.Tech
Priya MBA
Nikhil B.Tech
Nisha B.Tech
Refer to the below article to get detailed information about reading excel files using openpyxl.
- Reading an excel file using Python openpyxl module
Writing to Spreadsheets
First, let’s create a new spreadsheet, and then we will write some data to the newly created file. An empty spreadsheet can be created using the Workbook() method. Let’s see the below example.
Example:
Python3
from openpyxl import Workbook
workbook = Workbook()
workbook.save(filename="sample.xlsx")
Output:
After creating an empty file, let’s see how to add some data to it using Python. To add data first we need to select the active sheet and then using the cell() method we can select any particular cell by passing the row and column number as its parameter. We can also write using cell names. See the below example for a better understanding.
Example:
Python3
import openpyxl
wb = openpyxl.Workbook()
sheet = wb.active
c1 = sheet.cell(row = 1, column = 1)
c1.value = "Hello"
c2 = sheet.cell(row= 1 , column = 2)
c2.value = "World"
c3 = sheet['A2']
c3.value = "Welcome"
c4 = sheet['B2']
c4.value = "Everyone"
wb.save("sample.xlsx")
Output:
Refer to the below article to get detailed information about writing to excel.
- Writing to an excel file using openpyxl module
Appending to the Spreadsheet
In the above example, you will see that every time you try to write to a spreadsheet the existing data gets overwritten, and the file is saved as a new file. This happens because the Workbook() method always creates a new workbook file object. To write to an existing workbook you must open the file with the load_workbook() method. We will use the above-created workbook.
Example:
Python3
import openpyxl
wb = openpyxl.load_workbook("sample.xlsx")
sheet = wb.active
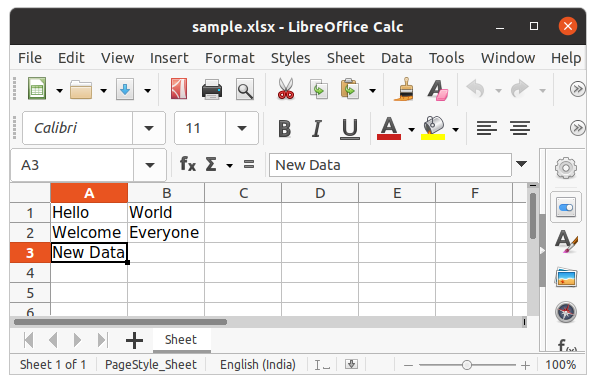
c = sheet['A3']
c.value = "New Data"
wb.save("sample.xlsx")
Output:
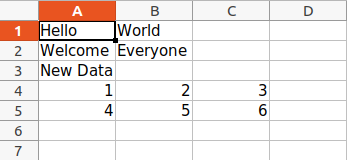
We can also use the append() method to append multiple data at the end of the sheet.
Example:
Python3
import openpyxl
wb = openpyxl.load_workbook("sample.xlsx")
sheet = wb.active
data = (
(1, 2, 3),
(4, 5, 6)
)
for row in data:
sheet.append(row)
wb.save('sample.xlsx')
Output:
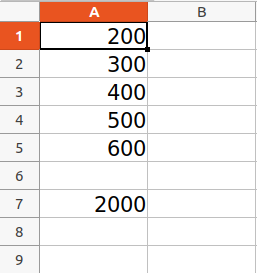
Arithmetic Operation on Spreadsheet
Arithmetic operations can be performed by typing the formula in a particular cell of the spreadsheet. For example, if we want to find the sum then =Sum() formula of the excel file is used.
Example:
Python3
import openpyxl
wb = openpyxl.Workbook()
sheet = wb.active
sheet['A1'] = 200
sheet['A2'] = 300
sheet['A3'] = 400
sheet['A4'] = 500
sheet['A5'] = 600
sheet['A7'] = '= SUM(A1:A5)'
wb.save("sum.xlsx")
Output:
Refer to the below article to get detailed information about the Arithmetic operations on Spreadsheet.
- Arithmetic operations in excel file using openpyxl
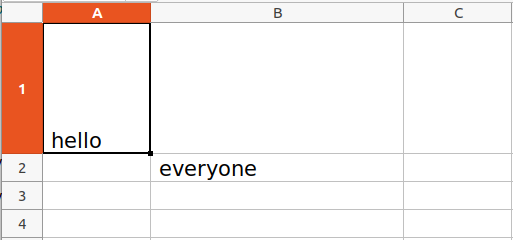
Adjusting Rows and Column
Worksheet objects have row_dimensions and column_dimensions attributes that control row heights and column widths. A sheet’s row_dimensions and column_dimensions are dictionary-like values; row_dimensions contains RowDimension objects and column_dimensions contains ColumnDimension objects. In row_dimensions, one can access one of the objects using the number of the row (in this case, 1 or 2). In column_dimensions, one can access one of the objects using the letter of the column (in this case, A or B).
Example:
Python3
import openpyxl
wb = openpyxl.Workbook()
sheet = wb.active
sheet.cell(row = 1, column = 1).value = ' hello '
sheet.cell(row = 2, column = 2).value = ' everyone '
sheet.row_dimensions[1].height = 70
sheet.column_dimensions['B'].width = 20
wb.save('sample.xlsx')
Output:
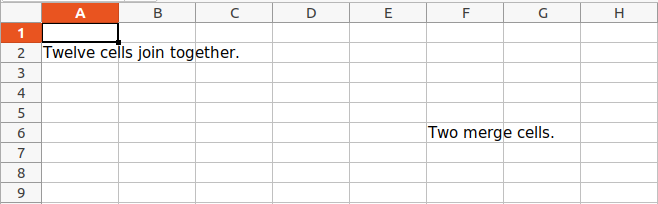
Merging Cells
A rectangular area of cells can be merged into a single cell with the merge_cells() sheet method. The argument to merge_cells() is a single string of the top-left and bottom-right cells of the rectangular area to be merged.
Example:
Python3
import openpyxl
wb = openpyxl.Workbook()
sheet = wb.active
sheet.merge_cells('A2:D4')
sheet.cell(row = 2, column = 1).value = 'Twelve cells join together.'
sheet.merge_cells('C6:D6')
sheet.cell(row = 6, column = 6).value = 'Two merge cells.'
wb.save('sample.xlsx')
Output:

Unmerging Cells
To unmerge cells, call the unmerge_cells() sheet method.
Example:
Python3
import openpyxl
wb = openpyxl.load_workbook('sample.xlsx')
sheet = wb.active
sheet.unmerge_cells('A2:D4')
sheet.unmerge_cells('C6:D6')
wb.save('sample.xlsx')
Output:
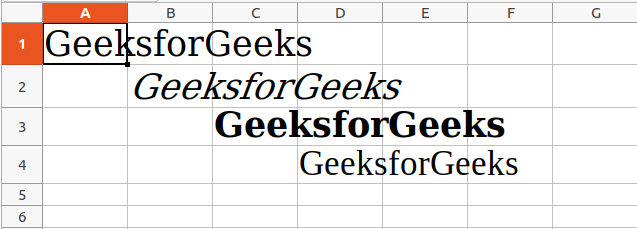
Setting Font Style
To customize font styles in cells, important, import the Font() function from the openpyxl.styles module.
Example:
Python3
import openpyxl
from openpyxl.styles import Font
wb = openpyxl.Workbook()
sheet = wb.active
sheet.cell(row = 1, column = 1).value = "GeeksforGeeks"
sheet.cell(row = 1, column = 1).font = Font(size = 24 )
sheet.cell(row = 2, column = 2).value = "GeeksforGeeks"
sheet.cell(row = 2, column = 2).font = Font(size = 24, italic = True)
sheet.cell(row = 3, column = 3).value = "GeeksforGeeks"
sheet.cell(row = 3, column = 3).font = Font(size = 24, bold = True)
sheet.cell(row = 4, column = 4).value = "GeeksforGeeks"
sheet.cell(row = 4, column = 4).font = Font(size = 24, name = 'Times New Roman')
wb.save('sample.xlsx')
Output:
Refer to the below article to get detailed information about adjusting rows and columns.
- Adjusting rows and columns of an excel file using openpyxl module
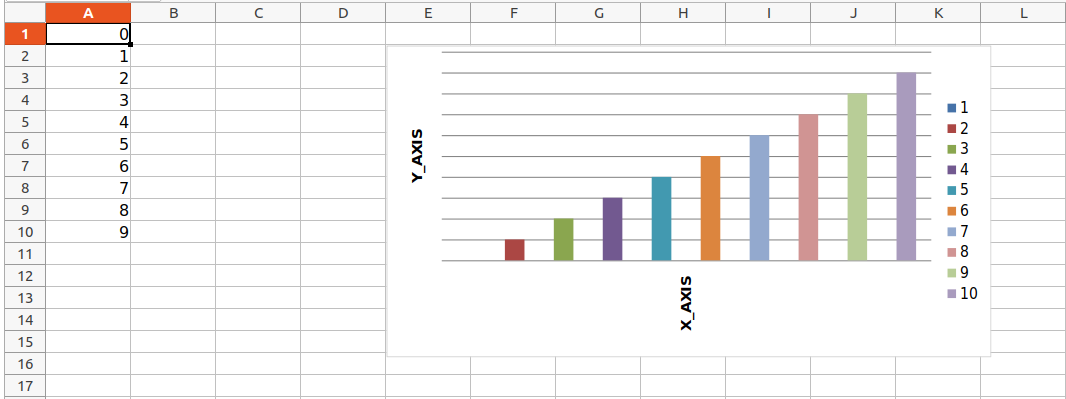
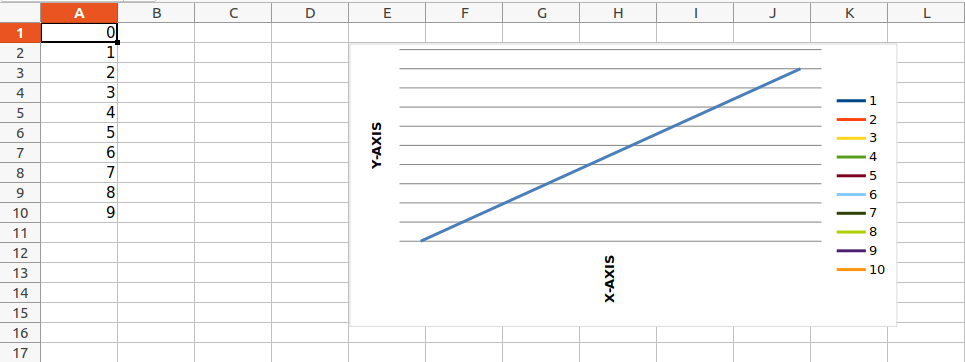
Plotting Charts
Charts are composed of at least one series of one or more data points. Series themselves are comprised of references to cell ranges. For plotting the charts on an excel sheet, firstly, create chart objects of specific chart class( i.e BarChart, LineChart, etc.). After creating chart objects, insert data in it, and lastly, add that chart object in the sheet object.
Example 1:
Python3
import openpyxl
from openpyxl.chart import BarChart, Reference
wb = openpyxl.Workbook()
sheet = wb.active
for i in range(10):
sheet.append([i])
values = Reference(sheet, min_col=1, min_row=1,
max_col=1, max_row=10)
chart = BarChart()
chart.add_data(values)
chart.title = " BAR-CHART "
chart.x_axis.title = " X_AXIS "
chart.y_axis.title = " Y_AXIS "
sheet.add_chart(chart, "E2")
wb.save("sample.xlsx")
Output:
Example 2:
Python3
import openpyxl
from openpyxl.chart import LineChart, Reference
wb = openpyxl.Workbook()
sheet = wb.active
for i in range(10):
sheet.append([i])
values = Reference(sheet, min_col=1, min_row=1,
max_col=1, max_row=10)
chart = LineChart()
chart.add_data(values)
chart.title = " LINE-CHART "
chart.x_axis.title = " X-AXIS "
chart.y_axis.title = " Y-AXIS "
sheet.add_chart(chart, "E2")
wb.save("sample.xlsx")
Output:
Refer to the below articles to get detailed information about plotting in excel using Python.
- Plotting charts in excel sheet using openpyxl module | Set 1
- Plotting charts in excel sheet using openpyxl module | Set 2
- Plotting charts in excel sheet using openpyxl module | Set 3
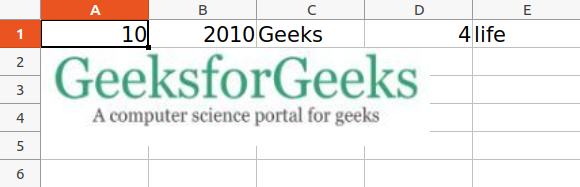
Adding Images
For the purpose of importing images inside our worksheet, we would be using openpyxl.drawing.image.Image. The method is a wrapper over PIL.Image method found in PIL (pillow) library. Due to which it is necessary for the PIL (pillow) library to be installed in order to use this method.
Image Used:

Example:
Python3
import openpyxl
from openpyxl.drawing.image import Image
wb = openpyxl.Workbook()
sheet = wb.active
sheet.append([10, 2010, "Geeks", 4, "life"])
img = Image("geek.jpg")
sheet.add_image(img, 'A2')
wb.save('sample.xlsx')
Output:
Refer to the below article to get detailed information about adding images.
- Openpyxl – Adding Image
Some More Functionality of Excel using Python
- How to delete one or more rows in excel using Openpyxl?
- Trigonometric operations in excel file using openpyxl
- How to copy data from one excel sheet to another
- How to Automate an Excel Sheet in Python?
Время на прочтение
6 мин
Количество просмотров 349K
Добрый день, уважаемые читатели.
В сегодняшней статье я хотел бы, как можно подробнее, рассмотреть интеграцию приложений Python и MS Excel. Данные вопрос может возникнуть, например, при создании какой-либо системы онлайн отчетности, которая должна выгружать результаты в общепринятый формат ну или какие-либо другие задачи. Также в статье я покажу и обратную интеграцию, т.е. как использовать функцию написанную на python в Excel, что также может быть полезно для автоматизации отчетов.
Работаем с файлами MS Excel на Python
Для работы с Excel файлами из Python мне известны 2 варианта:
- Использование библиотек, таких как xlrd, xlwt, xlutils или openpyxl
- Работа с com-объектом
Рассмотрим работу с этими способами подробнее. В качестве примера будем использовать готовый файл excel из которого мы сначала считаем данные из первой ячейки, а затем запишем их во вторую. Таких простых примеров будет достаточно для первого ознакомления.
Использование библиотек
Итак, первый метод довольно простой и хорошо описан. Например, есть отличная статья для описания работы c xlrd, xlwt, xlutils. Поэтому в данном материале я приведу небольшой кусок кода с их использованием.
Для начала загрузим нужные библиотеки и откроем файл xls на чтение и выберем
нужный лист с данными:
import xlrd, xlwt
#открываем файл
rb = xlrd.open_workbook('../ArticleScripts/ExcelPython/xl.xls',formatting_info=True)

#выбираем активный лист
sheet = rb.sheet_by_index(0)
Теперь давайте посмотрим, как считать значения из нужных ячеек:
#получаем значение первой ячейки A1
val = sheet.row_values(0)[0]

#получаем список значений из всех записей
vals = [sheet.row_values(rownum) for rownum in range(sheet.nrows)]
Как видно чтение данных не составляет труда. Теперь запишем их в другой файл. Для этого создам новый excel файл с новой рабочей книгой:
wb = xlwt.Workbook()
ws = wb.add_sheet('Test')
Запишем в новый файл полученные ранее данные и сохраним изменения:
#в A1 записываем значение из ячейки A1 прошлого файла
ws.write(0, 0, val[0])

#в столбец B запишем нашу последовательность из столбца A исходного файла
i = 0
for rec in vals:
    ws.write(i,1,rec[0])
    i =+ i

#сохраняем рабочую книгу
wb.save('../ArticleScripts/ExcelPython/xl_rec.xls')
Из примера выше видно, что библиотека xlrd отвечает за чтение данных, а xlwt — за запись, поэтому нет возможности внести изменения в уже созданную книгу без ее копирования в новую. Кроме этого указанные библиотеки работают только с файлами формата xls (Excel 2003) и у них нет поддержки нового формата xlsx (Excel 2007 и выше).
Чтобы успешно работать с форматом xlsx, понадобится библиотека openpyxl. Для демонстрации ее работы проделаем действия, которые были показаны для предыдущих библиотек.
Для начала загрузим библиотеку и выберем нужную книгу и рабочий лист:
import openpyxl
wb = openpyxl.load_workbook(filename = '../ArticleScripts/ExcelPython/openpyxl.xlsx')
sheet = wb['test']
Как видно из вышеприведенного листинга сделать это не сложно. Теперь посмотрим как можно считать данные:
#считываем значение определенной ячейки
val = sheet['A1'].value

#считываем заданный диапазон
vals = [v[0].value for v in sheet.range('A1:A2')]
Отличие от прошлых библиотек в том, что openpyxl дает возможность отображаться к ячейкам и последовательностям через их имена, что довольно удобно и понятно при чтении программы.
Теперь посмотрим как нам произвести запись и сохранить данные:
#записываем значение в определенную ячейку
sheet['B1'] = val

#записываем последовательность
i = 0
for rec in vals:
    sheet.cell(row=i, column=2).value = rec
    i =+ 1

# сохраняем данные
wb.save('../ArticleScripts/ExcelPython/openpyxl.xlsx')
Из примера видно, что запись, тоже производится довольно легко. Кроме того, в коде выше, можно заметить, что openpyxl кроме имен ячеек может работать и с их индексами.
К недостаткам данной библиотеки можно отнести, то что, как и в предыдущем примере, нет возможности сохранить изменения без создания новой книги.
Как было показано выше, для более менее полноценной работы с excel файлами, в данном случае, нужно 4 библиотеки, и это не всегда удобно. Кроме этого, возможно нужен будет доступ к VBA (допустим для какой-либо последующей обработки) и с помощью этих библиотек его не получить.
Однако, работа с этими библиотеками достаточно проста и удобна для быстрого создания Excel файлов их форматирования, но если Вам надо больше возможностей, то следующий подпункт для Вас.
Работа с com-объектом
В своих отчетах я предпочитаю использовать второй способ, а именно использование файла Excel через com-объект с использованием библиотеки win32com. Его преимуществом, является то, что вы можете выполнять с файлом все операции, которые позволяет делать обычный Excel с использованием VBA.
Проиллюстрируем это на той же задаче, что и предыдущие примеры.
Для начала загрузим нужную библиотеку и создадим COM объект.
import win32com.client
Excel = win32com.client.Dispatch("Excel.Application")
Теперь мы можем работать с помощью объекта Excel мы можем получить доступ ко всем возможностям VBA. Давайте, для начала, откроем любую книгу и выберем активный лист. Это можно сделать так:
wb = Excel.Workbooks.Open(u'D:\Scripts\DataScience\ArticleScripts\ExcelPython\xl.xls')
sheet = wb.ActiveSheet
Давайте получим значение первой ячейки и последовательности:
#получаем значение первой ячейки
val = sheet.Cells(1,1).value

#получаем значения цепочки A1:A2
vals = [r[0].value for r in sheet.Range("A1:A2")]
Как можно заметить, мы оперируем здесь функциями чистого VBA. Это очень удобно если у вас есть написанные макросы и вы хотите использовать их при работе с Python при минимальных затратах на переделку кода.
Посмотрим, как можно произвести запись полученных значений:
#записываем значение в определенную ячейку
sheet.Cells(1,2).value = val

#записываем последовательность
i = 1
for rec in vals:
    sheet.Cells(i,3).value = rec
    i = i + 1

#сохраняем рабочую книгу
wb.Save()

#закрываем ее
wb.Close()

#закрываем COM объект
Excel.Quit()
Из примера видно, что данные операции тоже довольно просто реализовываются. Кроме этого, можно заметить, что изменения мы сохранили в той же книге, которую открыли для чтения, что достаточно удобно.
Однако, внимательный читатель, обратит внимание на переменную i, которая инициализируется не 0, как принято python, а 1. Это связано с тем, что мы работаем с индексами ячеек как из VBA, а там нумерация начинается не с 0, а с 1.
На этом закончим разбор способов работы с excel файлами в python и перейдем к обратной задаче.
Вызываем функции Python из MS Excel
Может возникнуть такая ситуация, что у вас уже есть какой-либо функция, которая обрабатывает данные на python, и нужно перенести ее функциональность в Excel. Конечно же можно переписать ее на VBA, но зачем?
Для использования функций python в Excel есть прекрасная надстройка ExcelPython. С ее помощью вы сможете вызывать функции написанные на python прямо из Excel, правда придется еще написать небольшую обертку на VBA, и все это будет показано ниже.
Итак, предположим у нас есть функция, написанная на python, которой мы хотим воспользоваться:
def get_unique(lists):
    sm = 0
    for i in lists:
        sm = sm + int(i.pop())
    return sm
На вход ей подается список, состоящий из списков, это одно из условий, которое должно выполняться для работы данной функции в Excel.
Сохраним функцию в файле plugin.py и положим его в ту же директорию, где будет лежать наш excel файл, с которым мы будем работать.
Теперь установим ExcelPython. Установка происходит через запуск exe-файла и не вызывает затруднений.
Когда все приготовления выполнены, открываем тестовый файл excel и вызовем редактор VBA (Alt+F11). Для работы с вышеуказанной надстройкой необходимо ее подключить, через Tools->References, как показано на рисунке:

Ну что же, теперь можно приступить к написанию функции-обертки для нашего Python-модуля plugin.py. Выглядеть она будет следующим образом:
Function sr(lists As Range)
    On Error GoTo do_error
        Set plugin = PyModule("plugin", AddPath:=ThisWorkbook.Path)
        Set result = PyCall(plugin, "get_unique", PyTuple(lists.Value2))
        sr = WorksheetFunction.Transpose(PyVar(result))
        Exit Function
do_error:
        sr = Err.Description
End Function
Итак, что же происходит в данной функции?
Для начала, с помощью PyModule, мы подключаем нужный модуль. Для этого в качестве параметров ей передается имя модуля без расширения, и путь до папки в которой он находится. На выходе работы PyModule мы получаем объект для работы с модулем.
Затем, с помощью PyCall, вызываем нужную нам функцию из указанного модуля. В качестве параметров PyCall получает следующее:
- Объект модуля, полученный на предыдущем шаге
- Имя вызываемой функции
- Параметры, передаваемые функции (передаются в виде списка)
Функция PyTuple, получает на вход какие-либо значения и преобразует их в объект tuple языка Python.
Ну и, соответственно, PyVar выполняет операцию преобразования результата функции python, к типу понятному Excel.
Теперь, чтобы убедиться в работоспособности нашей связки, вызовем нашу свежеиспеченую функцию на листе в Excel:

Как видно из рисунка все отработало правильно.
Надо отметить, что в данном материале используется старая версия ExcelPython, и на GitHub’e автора доступна новая версия.
Заключение
В качестве заключения, надо отметить, примеры в данной статье самые простые и для более глубоко изучения данных методов, я рекомендую обратиться к
документации по нужным пакетам.
Также хочу заметить, что указанные пакеты не являются единственными и в статье опущено рассмотрение, таких пакетов как xlsxwriter для генерации excel файлов или xlwings, который может работать с Excel файлами «на лету», а также же PyXLL, который выполняет аналогичные функции ExcelPython.
Кроме этого в статье я попытался несколько обобщить разборасанный по сети материал, т.к. такие вопросы часто фигурируют на форумах и думаю некоторым будет полезно иметь, такую «шпаргалку» под рукой.
Электронные таблицы Excel — это интуитивно понятный и удобный способ манипулирования большими наборами данных без какой-либо предварительной технической подготовки. По этому, это один из форматов, с которым, в какой-то момент времени, вам придется иметь дело. Часто будут стоять задачи по извлечению каких-то данных из базы данных или файла логов в электронную таблицу Excel, или наоборот, преобразовывать электронную таблицу Excel в какую-либо более удобную программную форму, примеров этому масса.
Модуль openpyxl — это библиотека Python для чтения/записи форматов Office Open XML (файлов Excel 2010) с расширениями xlsx/xlsm/xltx/xltm.
Установка модуля openpyxl в виртуальное окружение.
Модуль openpyxl размещен на PyPI, поэтому установка относительно проста.
# создаем виртуальное окружение, если нет
$ python3 -m venv .venv --prompt VirtualEnv
# активируем виртуальное окружение
$ source .venv/bin/activate
# ставим модуль openpyxl
(VirtualEnv):~$ python3 -m pip install -U openpyxl
Основы работы с файлами Microsoft Excel на Python.
- Создание книги Excel.
- Новый рабочий лист книги Excel.
- Копирование рабочего листа книги Excel.
- Удаление рабочего листа книги Excel.
- Доступ к ячейке электронной таблицы и ее значению.
- Доступ к диапазону ячеек листа электронной таблицы.
- Получение только значений ячеек листа.
- Добавление данных в ячейки списком.
- Сохранение созданной книги в файл Excel.
- Сохранение данных книги в виде потока.
- Загрузка документа XLSX из файла.
Создание книги Excel.
Чтобы начать работу с модулем openpyxl, нет необходимости создавать файл электронной таблицы в файловой системе. Нужно просто импортировать класс Workbook и создать его экземпляр. Рабочая книга всегда создается как минимум с одним рабочим листом, его можно получить, используя свойство Workbook.active:
>>> from openpyxl import Workbook
# создаем книгу
>>> wb = Workbook()
# делаем единственный лист активным
>>> ws = wb.active
Новый рабочий лист книги Excel.
Новые рабочие листы можно создавать, используя метод Workbook.create_sheet():
# вставить рабочий лист в конец (по умолчанию)
>>> ws1 = wb.create_sheet("Mysheet")
# вставить рабочий лист в первую позицию
>>> ws2 = wb.create_sheet("Mysheet", 0)
# вставить рабочий лист в предпоследнюю позицию
>>> ws3 = wb.create_sheet("Mysheet", -1)
Листам автоматически присваивается имя при создании. Они нумеруются последовательно (Sheet, Sheet1, Sheet2, …). Эти имена можно изменить в любое время с помощью свойства Worksheet.title:
Цвет фона вкладки с этим заголовком по умолчанию белый. Можно изменить этот цвет, указав цветовой код RRGGBB для атрибута листа Worksheet.sheet_properties.tabColor:
>>> ws.sheet_properties.tabColor = "1072BA"
Рабочий лист можно получить, используя его имя в качестве ключа экземпляра созданной книги Excel:
Что бы просмотреть имена всех рабочих листов книги, необходимо использовать атрибут Workbook.sheetname. Также можно итерироваться по рабочим листам книги Excel.
>>> wb.sheetnames
# ['Mysheet1', 'NewPage', 'Mysheet2', 'Mysheet']

>>> for sheet in wb:
...     print(sheet.title)
# Mysheet1
# NewPage
# Mysheet2
# Mysheet
Копирование рабочего листа книги Excel.
Для создания копии рабочих листов в одной книге, необходимо воспользоваться методом Workbook.copy_worksheet():
>>> source_page = wb.active
>>> target_page = wb.copy_worksheet(source_page)
Примечание. Копируются только ячейки (значения, стили, гиперссылки и комментарии) и определенные атрибуты рабочего листа (размеры, формат и свойства). Все остальные атрибуты книги/листа не копируются, например, изображения или диаграммы.
Поддерживается возможность копирования рабочих листов между книгами. Нельзя скопировать рабочий лист, если рабочая книга открыта в режиме только для чтения или только для записи.
Удаление рабочего листа книги Excel.
Очевидно, что встает необходимость удалить лист электронной таблицы, который уже существует. Модуль openpyxl дает возможность удалить лист по его имени. Следовательно, сначала необходимо выяснить, какие листы присутствуют в книге, а потом удалить ненужный. За удаление листов книги отвечает метод Workbook.remove().
Смотрим пример:
# выясним, названия листов присутствуют в книге
>>> name_list = wb.sheetnames
>>> name_list
# ['Mysheet1', 'NewPage', 'Mysheet2', 'Mysheet', 'Mysheet1 Copy']

# допустим, что нам не нужны первый и последний
# удаляем первый лист по его имени с проверкой
# существования такого имени в книге
>>> if 'Mysheet1' in wb.sheetnames:
        # Если лист с именем `Mysheet1` присутствует
        # в списке листов экземпляра книги, то удаляем
...     wb.remove(wb['Mysheet1'])
...
>>> wb.sheetnames
# ['NewPage', 'Mysheet2', 'Mysheet', 'Mysheet1 Copy']

# удаляем последний лист через оператор
#  `del`, имя листа извлечем по индексу
# полученного списка `name_list`
>>> del wb[name_list[-1]]
>>> wb.sheetnames
# ['NewPage', 'Mysheet2', 'Mysheet']
Доступ к ячейке и ее значению.
После того как выбран рабочий лист, можно начинать изменять содержимое ячеек. К ячейкам можно обращаться непосредственно как к ключам рабочего листа, например ws['A4']. Это вернет ячейку на A4 или создаст ее, если она еще не существует. Значения могут быть присвоены напрямую:
>>> ws['A4'] = 5
>>> ws['A4']
# <Cell 'NewPage'.A4>
>>> ws['A4'].value
# 5
>>> ws['A4'].column
# 1
>>> ws['A4'].row
# 4
Если объект ячейки присвоить переменной, то этой переменной, также можно присваивать значение:
>>> c = ws['A4']
>>> c.value = c.value * 2
>>> c.value
# 10
Существует также метод Worksheet.cell(). Он обеспечивает доступ к ячейкам с непосредственным указанием значений строк и столбцов:
>>> d = ws.cell(row=4, column=2, value=10)
>>> d
# <Cell 'NewPage'.B4>
>>> d.value = 3.14
>>> print(d.value)
# 3.14
Примечание. При создании рабочего листа в памяти, он не содержит ячеек. Ячейки создаются при первом доступе к ним.
Важно! Из-за такого поведения, простой перебор ячеек в цикле, создаст объекты этих ячеек в памяти, даже если не присваивать им значения.
Не запускайте этот пример, поверьте на слово:
# создаст в памяти 100x100=10000 пустых объектов
# ячеек, просто так израсходовав оперативную память.
>>> for x in range(1,101):
...        for y in range(1,101):
...            ws.cell(row=x, column=y)
Доступ к диапазону ячеек листа электронной таблицы.
Диапазон с ячейками активного листа электронной таблицы можно получить с помощью простых срезов. Эти срезы будут возвращать итераторы объектов ячеек.
>>> cell_range = ws['A1':'C2']
>>> cell_range
# ((<Cell 'NewPage'.A1>, <Cell 'NewPage'.B1>, <Cell 'NewPage'.C1>),
# (<Cell 'NewPage'.A2>, <Cell 'NewPage'.B2>, <Cell 'NewPage'.C2>))
Аналогично можно получить диапазоны имеющихся строк или столбцов на листе:
# Все доступные ячейки в колонке `C`
>>> colC = ws['C']
# Все доступные ячейки в диапазоне колонок `C:D`
>>> col_range = ws['C:D']
# Все доступные ячейки в строке 10
>>> row10 = ws[10]
# Все доступные ячейки в диапазоне строк `5:10`
>>> row_range = ws[5:10]
Можно также использовать метод Worksheet.iter_rows():
>>> for row in ws.iter_rows(min_row=1, max_col=3, max_row=2):
...    for cell in row:
...        print(cell)
# <Cell Sheet1.A1>
# <Cell Sheet1.B1>
# <Cell Sheet1.C1>
# <Cell Sheet1.A2>
# <Cell Sheet1.B2>
# <Cell Sheet1.C2>
Точно так же метод Worksheet.iter_cols() будет возвращать столбцы:
>>> for col in ws.iter_cols(min_row=1, max_col=3, max_row=2):
...     for cell in col:
...         print(cell)
# <Cell Sheet1.A1>
# <Cell Sheet1.A2>
# <Cell Sheet1.B1>
# <Cell Sheet1.B2>
# <Cell Sheet1.C1>
# <Cell Sheet1.C2>
Примечание. Из соображений производительности метод Worksheet.iter_cols() недоступен в режиме только для чтения.
Если необходимо перебрать все строки или столбцы файла, то можно использовать свойство Worksheet.rows:
>>> ws = wb.active
>>> ws['C9'] = 'hello world'
>>> tuple(ws.rows)
# ((<Cell Sheet.A1>, <Cell Sheet.B1>, <Cell Sheet.C1>),
# (<Cell Sheet.A2>, <Cell Sheet.B2>, <Cell Sheet.C2>),
# (<Cell Sheet.A3>, <Cell Sheet.B3>, <Cell Sheet.C3>),
# ...
# (<Cell Sheet.A7>, <Cell Sheet.B7>, <Cell Sheet.C7>),
# (<Cell Sheet.A8>, <Cell Sheet.B8>, <Cell Sheet.C8>),
# (<Cell Sheet.A9>, <Cell Sheet.B9>, <Cell Sheet.C9>))
или свойство Worksheet.columns:
>>> tuple(ws.columns)
# ((<Cell Sheet.A1>,
# <Cell Sheet.A2>,
# ...
# <Cell Sheet.B8>,
# <Cell Sheet.B9>),
# (<Cell Sheet.C1>,
# <Cell Sheet.C2>,
# ...
# <Cell Sheet.C8>,
# <Cell Sheet.C9>))
Примечание. Из соображений производительности свойство Worksheet.columns недоступно в режиме только для чтения.
Получение только значений ячеек активного листа.
Если просто нужны значения из рабочего листа, то можно использовать свойство активного листа Worksheet.values. Это свойство перебирает все строки на листе, но возвращает только значения ячеек:
for row in ws.values:
   for value in row:
     print(value)
Для возврата только значения ячейки, методы Worksheet.iter_rows() и Worksheet.iter_cols(), представленные выше, могут принимать аргумент values_only:
>>> for row in ws.iter_rows(min_row=1, max_col=3, max_row=2, values_only=True):
...   print(row)
# (None, None, None)
# (None, None, None)
Добавление данных в ячейки листа списком.
Модуль openpyxl дает возможность супер просто и удобно добавлять данные в конец листа электронной таблицы. Такое удобство обеспечивается методом объекта листа Worksheet.append(iterable), где аргумент iterable — это любой итерируемый объект (список, кортеж и т.д.). Такое поведение позволяет, без костылей, переносить в электронную таблицу данные из других источников, например CSV файлы, таблицы баз данных, дата-фреймы из Pandas и т.д.
Метод Worksheet.append() добавляет группу значений в последнюю строку, которая не содержит данных.
- Если это список: все значения добавляются по порядку, начиная с первого столбца.
- Если это словарь: значения присваиваются столбцам, обозначенным ключами (цифрами или буквами).
Варианты использования:
- добавление списка:
.append([‘ячейка A1’, ‘ячейка B1’, ‘ячейка C1’]) - добавление словаря:
- вариант 1:
.append({‘A’ : ‘ячейка A1’, ‘C’ : ‘ячейка C1’}), в качестве ключей используются буквы столбцов. - вариант 2:
.append({1 : ‘ячейка A1’, 3 : ‘ячейка C1’}), в качестве ключей используются цифры столбцов.
- вариант 1:
Пример добавление данных из списка:
# существующие листы рабочей книги
>>> wb.sheetnames
# ['NewPage', 'Mysheet2', 'Mysheet']

# добавим данные в лист с именем `Mysheet2`
>>> ws = wb["Mysheet2"]
# создадим произвольные данные, используя
# вложенный генератор списков
>>> data = [[row*col for col in range(1, 10)] for row in range(1, 31)]
>>> data
# [
#     [1, 2, 3, 4, 5, 6, 7, 8, 9],
#     [2, 4, 6, 8, 10, 12, 14, 16, 18],
# ...
# ...
#     [30, 60, 90, 120, 150, 180, 210, 240, 270]
# ]

# добавляем данные в выбранный лист
>>> for row in data:
...     ws.append(row)
...
Вот и все, данные добавлены… Просто? Не просто, а супер просто!
Сохранение созданной книги в файл Excel.
Самый простой и безопасный способ сохранить книгу, это использовать метод Workbook.save() объекта Workbook:
>>> wb = Workbook()
>>> wb.save('test.xlsx')
Внимание. Эта операция перезапишет существующий файл без предупреждения!!!
После сохранения, можно открыть полученный файл в Excel и посмотреть данные, выбрав лист с именем NewPage.
Примечание. Расширение имени файла не обязательно должно быть xlsx или xlsm, хотя могут возникнуть проблемы с его открытием непосредственно в другом приложении. Поскольку файлы OOXML в основном представляют собой ZIP-файлы, их также можете открыть с помощью своего любимого менеджера ZIP-архивов.
Сохранение данных книги в виде потока.
Если необходимо сохранить файл в поток, например, при использовании веб-приложения, такого как Flask или Django, то можно просто предоставить tempfile.NamedTemporaryFile():
from tempfile import NamedTemporaryFile
from openpyxl import Workbook

wb = Workbook()

with NamedTemporaryFile() as tmp:
    wb.save(tmp.name)
    tmp.seek(0)
    stream = tmp.read()
Можно указать атрибут template=True, чтобы сохранить книгу как шаблон:
>>> from openpyxl import load_workbook
>>> wb = load_workbook('test.xlsx')
>>> wb.template = True
>>> wb.save('test_template.xltx')
Примечание. Атрибут wb.template по умолчанию имеет значение False, это означает — сохранить как документ.
Внимание. Следующее не удастся:
>>> from openpyxl import load_workbook
>>> wb = load_workbook('test.xlsx')
# Необходимо сохранить с расширением *.xlsx
>>> wb.save('new_test.xlsm') # MS Excel не может открыть документ

# Нужно указать атрибут `keep_vba=True`
>>> wb = load_workbook('test.xlsm')
>>> wb.save('new_test.xlsm')

>>> wb = load_workbook('test.xltm', keep_vba=True)
# Если нужен шаблон документа, то необходимо указать расширение *.xltm.
>>> wb.save('new_test.xlsm') # MS Excel не может открыть документ
Загрузка документа XLSX из файла.
Чтобы открыть существующую книгу Excel необходимо использовать функцию openpyxl.load_workbook():
>>> from openpyxl import load_workbook
>>> wb2 = load_workbook('test.xlsx')
>>> print(wb2.sheetnames)
# ['Mysheet1', 'NewPage', 'Mysheet2', 'Mysheet']
Есть несколько флагов, которые можно использовать в функции openpyxl.load_workbook().
data_only: определяет, будут ли содержать ячейки с формулами — формулу (по умолчанию) или только значение, сохраненное/посчитанное при последнем чтении листа Excel.keep_vbaопределяет, сохраняются ли какие-либо элементы Visual Basic (по умолчанию). Если они сохранены, то они не могут изменяться/редактироваться.
Installation
Install openpyxl using pip. It is advisable to do this in a Python virtualenv
without system packages:
Note
There is support for the popular lxml library which will be used if it
is installed. This is particular useful when creating large files.
Warning
To be able to include images (jpeg, png, bmp,…) into an openpyxl file,
you will also need the “pillow” library that can be installed with:
or browse https://pypi.python.org/pypi/Pillow/, pick the latest version
and head to the bottom of the page for Windows binaries.
Working with a checkout
Sometimes you might want to work with the checkout of a particular version.
This may be the case if bugs have been fixed but a release has not yet been
made.
$ pip install -e hg+https://foss.heptapod.net/openpyxl/openpyxl/@3.1#egg=openpyxl
Create a workbook
There is no need to create a file on the filesystem to get started with openpyxl.
Just import the Workbook class and start work:
>>> from openpyxl import Workbook
>>> wb = Workbook()
A workbook is always created with at least one worksheet. You can get it by
using the Workbook.active property:
Note
This is set to 0 by default. Unless you modify its value, you will always
get the first worksheet by using this method.
You can create new worksheets using the Workbook.create_sheet() method:
>>> ws1 = wb.create_sheet("Mysheet") # insert at the end (default)
# or
>>> ws2 = wb.create_sheet("Mysheet", 0) # insert at first position
# or
>>> ws3 = wb.create_sheet("Mysheet", -1) # insert at the penultimate position
Sheets are given a name automatically when they are created.
They are numbered in sequence (Sheet, Sheet1, Sheet2, …).
You can change this name at any time with the Worksheet.title property:
Once you gave a worksheet a name, you can get it as a key of the workbook:
>>> ws3 = wb["New Title"]
You can review the names of all worksheets of the workbook with the
Workbook.sheetname attribute
>>> print(wb.sheetnames)
['Sheet2', 'New Title', 'Sheet1']
You can loop through worksheets
>>> for sheet in wb:
...     print(sheet.title)
You can create copies of worksheets within a single workbook:
Workbook.copy_worksheet() method:
>>> source = wb.active
>>> target = wb.copy_worksheet(source)
Note
Only cells (including values, styles, hyperlinks and comments) and
certain worksheet attributes (including dimensions, format and
properties) are copied. All other workbook / worksheet attributes
are not copied — e.g. Images, Charts.
You also cannot copy worksheets between workbooks. You cannot copy
a worksheet if the workbook is open in read-only or write-only
mode.
Playing with data
Accessing one cell
Now we know how to get a worksheet, we can start modifying cells content.
Cells can be accessed directly as keys of the worksheet:
This will return the cell at A4, or create one if it does not exist yet.
Values can be directly assigned:
There is also the Worksheet.cell() method.
This provides access to cells using row and column notation:
>>> d = ws.cell(row=4, column=2, value=10)
Note
When a worksheet is created in memory, it contains no cells. They are
created when first accessed.
Warning
Because of this feature, scrolling through cells instead of accessing them
directly will create them all in memory, even if you don’t assign them a value.
Something like
>>> for x in range(1,101):
...        for y in range(1,101):
...            ws.cell(row=x, column=y)
will create 100×100 cells in memory, for nothing.
Accessing many cells
Ranges of cells can be accessed using slicing:
>>> cell_range = ws['A1':'C2']
Ranges of rows or columns can be obtained similarly:
>>> colC = ws['C']
>>> col_range = ws['C:D']
>>> row10 = ws[10]
>>> row_range = ws[5:10]
You can also use the Worksheet.iter_rows() method:
>>> for row in ws.iter_rows(min_row=1, max_col=3, max_row=2):
...    for cell in row:
...        print(cell)
<Cell Sheet1.A1>
<Cell Sheet1.B1>
<Cell Sheet1.C1>
<Cell Sheet1.A2>
<Cell Sheet1.B2>
<Cell Sheet1.C2>
Likewise the Worksheet.iter_cols() method will return columns:
>>> for col in ws.iter_cols(min_row=1, max_col=3, max_row=2):
...     for cell in col:
...         print(cell)
<Cell Sheet1.A1>
<Cell Sheet1.A2>
<Cell Sheet1.B1>
<Cell Sheet1.B2>
<Cell Sheet1.C1>
<Cell Sheet1.C2>
Note
For performance reasons the Worksheet.iter_cols() method is not available in read-only mode.
If you need to iterate through all the rows or columns of a file, you can instead use the
Worksheet.rows property:
>>> ws = wb.active
>>> ws['C9'] = 'hello world'
>>> tuple(ws.rows)
((<Cell Sheet.A1>, <Cell Sheet.B1>, <Cell Sheet.C1>),
(<Cell Sheet.A2>, <Cell Sheet.B2>, <Cell Sheet.C2>),
(<Cell Sheet.A3>, <Cell Sheet.B3>, <Cell Sheet.C3>),
(<Cell Sheet.A4>, <Cell Sheet.B4>, <Cell Sheet.C4>),
(<Cell Sheet.A5>, <Cell Sheet.B5>, <Cell Sheet.C5>),
(<Cell Sheet.A6>, <Cell Sheet.B6>, <Cell Sheet.C6>),
(<Cell Sheet.A7>, <Cell Sheet.B7>, <Cell Sheet.C7>),
(<Cell Sheet.A8>, <Cell Sheet.B8>, <Cell Sheet.C8>),
(<Cell Sheet.A9>, <Cell Sheet.B9>, <Cell Sheet.C9>))
or the Worksheet.columns property:
>>> tuple(ws.columns)
((<Cell Sheet.A1>,
<Cell Sheet.A2>,
<Cell Sheet.A3>,
<Cell Sheet.A4>,
<Cell Sheet.A5>,
<Cell Sheet.A6>,
...
<Cell Sheet.B7>,
<Cell Sheet.B8>,
<Cell Sheet.B9>),
(<Cell Sheet.C1>,
<Cell Sheet.C2>,
<Cell Sheet.C3>,
<Cell Sheet.C4>,
<Cell Sheet.C5>,
<Cell Sheet.C6>,
<Cell Sheet.C7>,
<Cell Sheet.C8>,
<Cell Sheet.C9>))
Note
For performance reasons the Worksheet.columns property is not available in read-only mode.
Values only
If you just want the values from a worksheet you can use the Worksheet.values property.
This iterates over all the rows in a worksheet but returns just the cell values:
for row in ws.values:
   for value in row:
     print(value)
Both Worksheet.iter_rows() and Worksheet.iter_cols() can
take the values_only parameter to return just the cell’s value:
>>> for row in ws.iter_rows(min_row=1, max_col=3, max_row=2, values_only=True):
...   print(row)

(None, None, None)
(None, None, None)
Data storage
Once we have a Cell, we can assign it a value:
>>> c.value = 'hello, world'
>>> print(c.value)
'hello, world'

>>> d.value = 3.14
>>> print(d.value)
3.14
Saving to a file
The simplest and safest way to save a workbook is by using the
Workbook.save() method of the Workbook object:
>>> wb = Workbook()
>>> wb.save('balances.xlsx')
Warning
This operation will overwrite existing files without warning.
Note
The filename extension is not forced to be xlsx or xlsm, although you might have
some trouble opening it directly with another application if you don’t
use an official extension.
As OOXML files are basically ZIP files, you can also open it with your
favourite ZIP archive manager.
If required, you can specify the attribute wb.template=True, to save a workbook
as a template:
>>> wb = load_workbook('document.xlsx')
>>> wb.template = True
>>> wb.save('document_template.xltx')
Saving as a stream
If you want to save the file to a stream, e.g. when using a web application
such as Pyramid, Flask or Django then you can simply provide a
NamedTemporaryFile():
>>> from tempfile import NamedTemporaryFile
>>> from openpyxl import Workbook
>>> wb = Workbook()
>>> with NamedTemporaryFile() as tmp:
        wb.save(tmp.name)
        tmp.seek(0)
        stream = tmp.read()
Warning
You should monitor the data attributes and document extensions
for saving documents in the document templates and vice versa,
otherwise the result table engine can not open the document.
Note
The following will fail:
>>> wb = load_workbook('document.xlsx')
>>> # Need to save with the extension *.xlsx
>>> wb.save('new_document.xlsm')
>>> # MS Excel can't open the document
>>>
>>> # or
>>>
>>> # Need specify attribute keep_vba=True
>>> wb = load_workbook('document.xlsm')
>>> wb.save('new_document.xlsm')
>>> # MS Excel will not open the document
>>>
>>> # or
>>>
>>> wb = load_workbook('document.xltm', keep_vba=True)
>>> # If we need a template document, then we must specify extension as *.xltm.
>>> wb.save('new_document.xlsm')
>>> # MS Excel will not open the document
Loading from a file
You can use the openpyxl.load_workbook() to open an existing workbook:
>>> from openpyxl import load_workbook
>>> wb = load_workbook(filename = 'empty_book.xlsx')
>>> sheet_ranges = wb['range names']
>>> print(sheet_ranges['D18'].value)
3
Note
There are several flags that can be used in load_workbook.
- data_only controls whether cells with formulae have either the
formula (default) or the value stored the last time Excel read the sheet.
- keep_vba controls whether any Visual Basic elements are preserved or
not (default). If they are preserved they are still not editable.
- read-only opens workbooks in a read-only mode. This uses much less
memory and is faster but not all features are available (charts, images,
etc.)
- rich_text controls whether any rich-text formatting in cells is
preserved. The default is False.
- keep_links controls whether data cached from external workbooks is
preserved.
Warning
openpyxl does currently not read all possible items in an Excel file so
shapes will be lost from existing files if they are opened and saved with
the same name.
Errors loading workbooks
Sometimes openpyxl will fail to open a workbook. This is usually because there is something wrong with the file.
If this is the case then openpyxl will try and provide some more information. Openpyxl follows the OOXML specification closely and will reject files that do not because they are invalid. When this happens you can use the exception from openpyxl to inform the developers of whichever application or library produced the file. As the OOXML specification is publicly available it is important that developers follow it.
You can find the spec by searching for ECMA-376, most of the implementation specifics are in Part 4.
This ends the tutorial for now, you can proceed to the Simple usage section
I wrote code which opens an excel file and iterates through each row and passes the value to another function.
import openpyxl
wb = load_workbook(filename='C:Usersxxxxx')
for ws in wb.worksheets:
    for row in ws.rows:
        print row
        x1=ucr(row[0].value)
        row[1].value=x1  #  i am having error at this point
I am getting the following error when I tried to run the file.
TypeError: IndexError: tuple index out of range
Can I write the returned value x1 to the row[1] column. Is it possible to write to excel (i.e using row[1]) instead of accessing single cells like ws.['c1']=x1
![]()
ballade4op52
2,2374 gold badges25 silver badges41 bronze badges
asked Jul 13, 2015 at 23:15
![]()
1
Try this:
import openpyxl
wb = load_workbook(filename='xxxx.xlsx')
ws = wb.worksheets[0]
ws['A1'] = 1
ws.cell(row=2, column=2).value = 2
This will set Cells A1 and B2 to 1 and 2 respectively (two different ways of setting cell values in a worksheet).
The second method (specifying row and column) is most useful for your situation:
import openpyxl
wb = load_workbook(filename='xxxxx.xlsx')
for ws in wb.worksheets:
    for index, row in enumerate(ws.rows, start=1):
        print row
        x1 = ucr(row[0].value)
        ws.cell(row=index, column=2).value = x1
answered Jul 13, 2015 at 23:22
![]()
Jake GriffinJake Griffin
1,95412 silver badges15 bronze badges
6