

Visual Basic for Applications (VBA) is a form of the Visual Basic programming language integrated into all Microsoft Office products. You can create add-on components within your basic Excel 2019 spreadsheet to create additional functionality. VBA can get complicated, but knowing how to create basic code and functionality can improve your spreadsheet’s usefulness and automate certain activity that would take hours of time.
Enabling the Developer Tab in Excel 2019
To use VBA, you need the «Developer» tab enabled. The «Developer» tab has several buttons and features that enhance the way you create spreadsheets. If you don’t have the «Developer» tab enabled, follow these next steps to enable it.
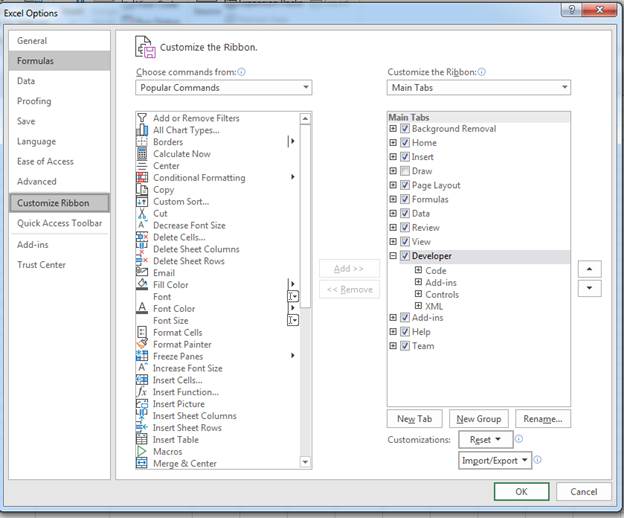
Click the «File» ribbon tab, and then click the «Options» link that shows in the bottom-left section of the Excel window. This opens a new configuration window where you can set preference for different elements of Excel. Click the «Customize Ribbon» option in the left panel.
(Excel options and configuration window)
In the image above, notice that the developer option is checked in the far right panel. This check box enables the «Developer» tab in your Excel view. Click «OK» to enable the tab and return to your Excel 2019 interface.
(VBA button location)
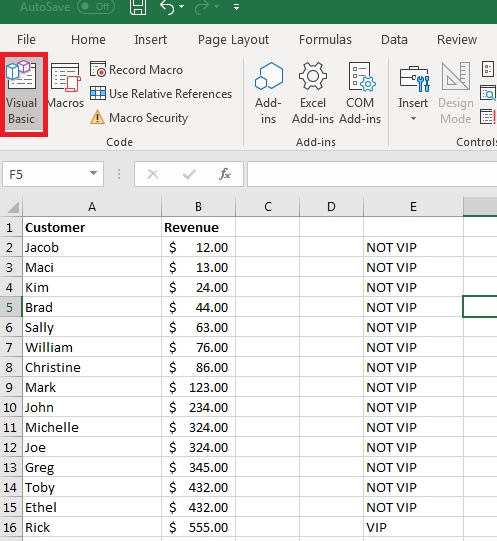
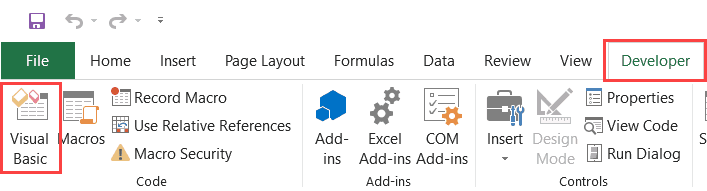
You should now see an additional tab marked «Developer» in the list of Excel 2019 menu options. Click this tab, and you’ll see the VBA button available on the left side.
Creating a Button on Your Spreadsheet
When you want to use VBA on your spreadsheet, buttons are one of the most common elements that you add to your document. With a button, you can trigger an event and use it to perform an action.
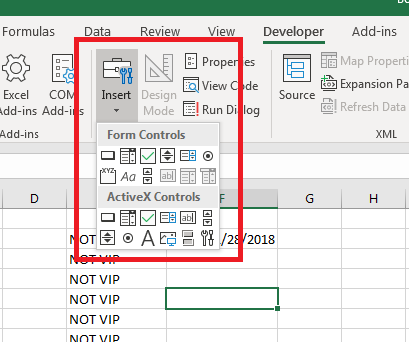
Components for VBA actions are found in the «Developer» tab in the «Insert» button dropdown.
(Form and ActiveX components for VBA)
When you click the «Insert» button, a dropdown displays all of the available components that you can add to your spreadsheets. The top-left control in the «Form Controls» section has the button control. You can hover your mouse over each of the components in the list to see what you can add to a spreadsheet. If you are familiar with HTML web page components, then you will recognize most of the available components in the dropdown.
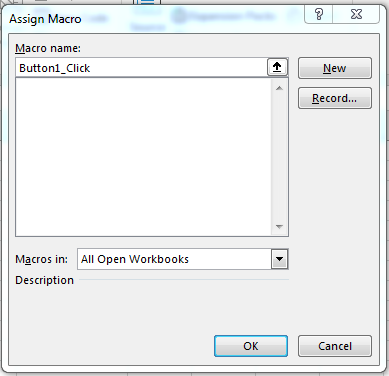
Click the button control and then you can draw the button on your spreadsheet. Drawing a button lets you make it as large as small as you want. After you draw the button, a window opens where you can assign a macro.
(Assign macro window)
Click «OK» and the window closes. Now you see a button on your spreadsheet with the label «Button 1.» You can change the label on the newly created button by right-clicking the button and selecting «Edit Text.» This action prompts you for the new button name. Type a new name for your button. In this example, we’ve used the text «My Button» for the button text.
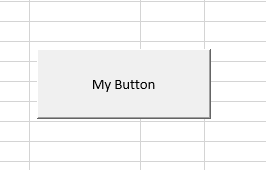
(A new button with custom text)
You can click the button if you want, and an error message with display telling you that you haven’t created a macro for it yet. This is because you haven’t created the code that will run when the button is clicked. The button serves no purpose, but you can create the macro that runs when it’s pushed, which then removes the error when you click the button.
Right click the button and choose «Assign Macro.» This action opens a Visual Basic for Applications workspace. The workspace is tied to the workbook that you have open, but you can make full applications that tie with your spreadsheet using VBA. In this workspace, you can create, test, and run any code that you assign to components in your application.
Working in the VBA Workspace
The VBA workspace looks the same whether you program macros in Word or Excel. It’s a workspace where you can program the macro and view all other code that you’ve previously created.
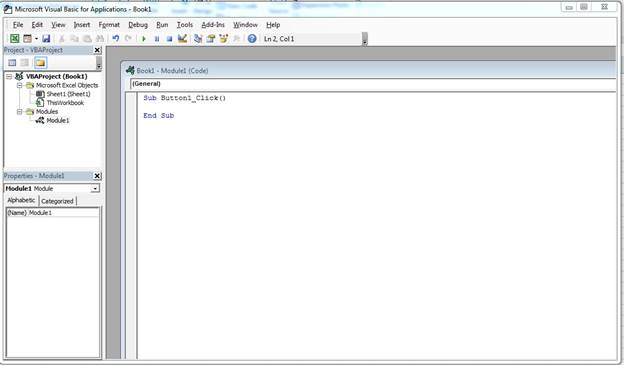
(VBA workspace)
The image above shows the VBA workspace. When you right click a component such as a button and choose «Edit Code,» VBA opens to the location where code is triggered when you click the button. VBA gives names to these functions that help you identify what happens should you perform an activity on it. Since a button is usually triggered by a click event, the function is given the original name of the button, an underscore, and then the word «Click.» For your first button created in your spreadsheet, the name for a click event is «Button1_Click()» and you add any code between the «Sub» and «End Sub» phrases.
The «Sub» keyword indicates that you are starting an event. The next part is the name of the event, and the last statement in a trigger event is the «End Sub» statement.
In the left panel of the workspace, you can see other objects in a tree view. The top object is always the workbook. If you recall, a workbook contains worksheet. Under the «Book1» main project header, you see «ThisWorkbook» which represents the workbook that you have opened, and the «Sheet1» represents the worksheet in the workbook. You can write VBA that works directly on a workbook or a worksheet activity such as when you open the workbook, a macro automatically runs.
The «Modules» section holds the files that you store containing VBA code. You can have several of these in your VBA code, or you can just have one file that contains all of the functions used to run macros.
Writing Some Simple VBA Code
With the VBA editor open, you now have a function ready to edit for your button. Anything you type in the «Sub» and «End Sub» statements will run when you click the Button1 component. When you start working with VBA, you want to create easy function statements so that you can follow what is going on as the code runs. In this example, we’ll add some text to a cell within the current spreadsheet.
Within the sub start and end phrases, type the following code:
Sub Button1_Click()
Range(«A1»).Value = «My Test»
End Sub
The code above tells Excel 2019 that you want to change the value contained in the cell «A1» in the current sheet to «My Test.» The «Range» indicates that you want to apply changes to a cell range set in the functions parameters. You can assign any value to a range, but in this example we apply text. Any formatting already set on the cell will also still apply, so if you have a cell set to bold text, then this value will have the bold format applied.
At the top of the VBA workspace, notice that there are three start, pause and stop buttons. You can use these buttons to test your new code. The «start» button will run the current function and apply changes to the spreadsheet, which in this example is changing content to «My Test.»
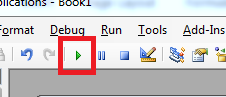
(The start button in the VBA workspace)
Click the start button and watch the text in the A1 cell change to «My Test.» Should you have a long list of statements within your function, you might want to pause the procedure. The stop button stops execution, so should you resume it then execution will start where it left off. With the pause button, execution resumes where the last statement left off.
The «MsgBox» function is extremely common in any application. The MsgBox function displays a warning or a message to the user. In any software application, you’ve seen pop-up windows that display a message that provides information. Even web applications display messages as pop-ups and warnings. The MsgBox function in VBA is the equivalent of all of these pop-ups that you’ve seen across different applications.
Suppose that you want to show a confirmation to the user that the button’s function completed execution. In this example, only one statement executes, but you might have hundreds of lines of code that must execute and you want to show the user that it’s completed. You might have a procedure that takes an unusual amount of time to complete, so users must wait for it to complete and then you display the message to confirm when the procedure is over.
Add the next line of code to the same VBA function Button1_Click():
Sub Button1_Click()
Range(«A1»).Value = «My Test»
MsgBox «Cell value change finished»
End Sub
In the code above, the cell A1 has its value changed to «My Test.» After the text is changed in the A1 cell, a message box opens and displays the text «Cell value change finished.» This is just a small example of how you can use the MsgBox function. After you finished changing your VBA code, click the play button again. You will see the two statements run, and the program will stop.
After you are finished writing your code, you still need to save it and test it within the spreadsheet. Your users won’t open the VBA workspace, so you need to make sure that the code executes outside of the VBA workspace.
Close the VBA workspace. You now need to assign the macro to the button. Right-click the button and click «Assign Macro.» Choose the Button1_Click value and click «OK.» Should you ever want to go back and change the statements executed by the macro. Use this screen to click the macro name, and then click «Edit» to again open the VBA workspace with the function code shown in the workspace window.
After the window closes, click the button. Notice that the text in cell A1 changes and then a window displays with a message that the procedure has completed. You’ve just created your first VBA macro that runs in your spreadsheet. You can create much more complex applications with VBA that run across several spreadsheets and can affect several other workbooks that aren’t even open on your desktop.
One issue to remember with VBA is that it’s a powerful tool that can do harm if it’s used the wrong way. Malware writers use VBA macros to download malicious software and install it on your computer. When you work with macros, your recipients of any spreadsheet must give your macros permission to run on their machines. Most users are trained not to open spreadsheets with macros, so they are mostly used within the same organization.
- Статьи
Как включить макросы (разрешить использование макросов) в Excel 2019:
1) На ленте нажмите пункт меню «Файл», а потом в открывшемся меню — кнопку «Параметры»:

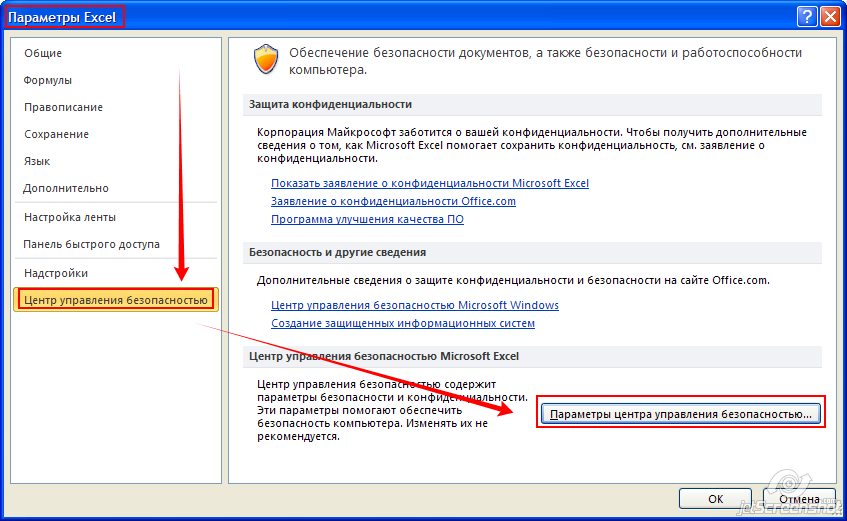
2) В открывшемся окне «Параметры Excel» в левом столбце выделите пункт «Центр управления безопасностью»,
после чего справа (в том же окне) — нажмите кнопку «Параметры центра управления безопасностью»:
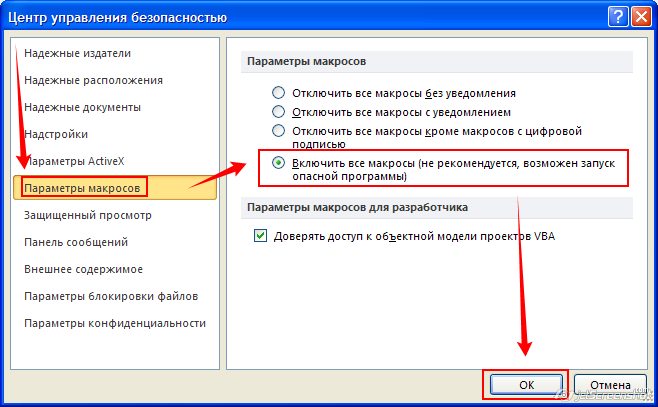
3) В открывшемся окне «Центр управления безопасностью» выделите пункт «Параметры макросов»,
и справа отметьте опцию «Включить все макросы»:
4) Перезапустите Excel (полностью его закрыв, и открыв снова), чтобы изменения настроек вступили в силу.
ВАЖНО: После того, как в настройках Excel вы включили макросы (установили низкий уровень безопасности),
необходимо полностью закрыть Excel, и запустить его заново, — только после этого настройки применятся.
- 13056 просмотров
Excel для Microsoft 365 Excel для Microsoft 365 для Mac Excel 2021 Excel 2021 для Mac Excel 2019 Excel 2019 для Mac Excel 2016 Excel 2016 для Mac Excel 2013 Excel 2010 Excel 2007 Excel Starter 2010 Еще…Меньше
Существует несколько способов запуска макроса в Microsoft Excel. Макрос — это действие или набор действий, с помощью которых можно автоматизировать различные задачи. Макрос записывется на Visual Basic для приложений программирования. Макрос всегда можно запустить, нажав кнопку Макрос на вкладке Разработчик на ленте. В зависимости от того, как макрос назначен для запуска, его также можно запустить, нажав сочетание клавиш сочетание клавиш, нажав кнопку на панели быстрого доступа или в настраиваемой группе на ленте либо щелкнув объект, рисунок или элемент управления. Кроме того, макрос можно запускать автоматически при запуске книги.
Перед запуском макроса
Перед началом работы с макросами следует включить вкладку Разработчик.
-
Чтобы Windows, перейдите в меню Параметры > >Настроить ленту.
-
Для Macперейдите на Excel > параметры… >ленты & панели инструментов.
-
Затем в разделе Настройка ленты в разделе Основныевкладки, в разделе Разработчик, нажмите кнопку ОК.
-
Откройте книгу, содержащую нужный макрос.
-
На вкладке Разработчик в группе Код нажмите кнопку Макросы.
-
В поле Имя макроса выберите макрос, который вы хотите запустить, и нажмите кнопку Выполнить.
-
У вас также есть другие варианты:
-
Параметры: добавление сочетания клавиш или описания макроса.
-
Шаг. Откроется Visual Basic редактора в первой строке макроса. Нажатие F8 позволит вам по одной строке пролиться между кодами макроса.
-
Изменить. Откроется редактор Visual Basic и вы сможете при необходимости изменить код макроса. После внесения изменений можно нажать F5, чтобы запустить макрос из редактора.
-
Вы можете добавить сочетание клавиш в макрос при его записи, а также добавить его к существующему макросу:
-
На вкладке Разработчик в группе Код нажмите кнопку Макросы.
-
В поле Имя макроса выберите макрос, который нужно назначить сочетанием клавиш.
-
Нажмите кнопку Параметры.
Откроется диалоговое окно Параметры макроса.
-
В поле Сочетания клавиш введите любую букву в нижнем или верхнем регистре, которую вы хотите использовать с сочетаниями клавиш.
Примечания:
-
Для Windowsклавиша для букв в нижнем регистре — CTRL+letter. Для букв верхнего регистра это CTRL+SHIFT+Letter.
-
Для Macдля букв в нижнем регистре есть клавиши OPTION+COMMAND+LETTER,но клавиши CTRL+letter также будут работать. Для букв верхнего регистра это CTRL+SHIFT+Letter.
-
Будьте внимательны при назначении ярлыков, так как они будут переопределять все эквивалентные стандартные Excel, пока открыта книга с макросом. Например, если назначить макрос CTRL+Z,вы потеряете возможность отменить. В связи с этим обычно лучше использовать клавиши CTRL+SHIFT+БУКВА С верхнего регистра, например CTRL+SHIFT+Z, для которых в Excel нет эквивалентных Excel.
Список сочетаний клавиш CTRL, которые уже назначены в Excel, см. в статье Excel сочетания клавиш и клавиши для работы с функцией.
-
-
Введите описание макроса в поле Описание.
-
Нажмите кнопку ОК, чтобы сохранить изменения, а затем — кнопку Отмена, чтобы закрыть диалоговое окно Макрос.
Чтобы запустить макрос нажатием кнопки на панели быстрого доступа, сначала необходимо добавить соответствующую кнопку на панель. Для этого см. назначение макроса кнопке.
Вы можете создать пользовательскую группу, которая появится на вкладке ленты, а затем назначить макрос кнопке в этой группе. Например, можно добавить настраиваемую группу «Мои макросы» на вкладку Разработчик, а затем добавить в новую группу макрос (который отображается как кнопка). Для этого см. назначение макроса кнопке.
Запуск макроса путем щелчка области графического объекта
Вы можете создать хот-спот на графическом элементе, который пользователи могут щелкнуть, чтобы запустить макрос.
-
На компьютере вставьте графический объект, например рисунок, или нарисуйте фигуру. Распространенный сценарий — нарисовать фигуру Скруглённый прямоугольник и отформатировали ее так, чтобы она выглядела как кнопка.
Чтобы узнать о вставке графического объекта, см. добавление, изменение и удаление фигур.
-
Щелкните правой кнопкой мыши созданный хот-спот и выберите пункт Назначить макрос.
-
Выполните одно из указанных ниже действий.
-
Чтобы назначить существующий макрос графическому объекту, дважды щелкните макрос или введите его имя в поле Имя макроса.
-
Чтобы записать новый макрос для назначения выбранному графическому объекту, нажмите кнопку Запись ,в диалоговом окне Запись макроса введите имя макроса и нажмите кнопку ОК, чтобы начать запись макроса. Завершив запись макроса, нажмите кнопку Остановить
 на вкладке Разработчик в группе Код.
Совет: Вы также можете нажать
в левой части панели состояния. -
Чтобы изменить существующий макрос, щелкните его имя в поле Имя макроса и выберите изменить.
-
-
Нажмите кнопку ОК.
 на вкладке Разработчик в группе Код.
На вкладке Разработчик нажмите кнопку Visual Basic, чтобы запустить редактор Visual Basic(VBE). Перейдите Project проводнике, чтобы найти модуль, содержащий макрос, который вы хотите запустить, и откройте его. Все макрос в этом модуле будут перечислены в области справа. Выберите макрос, который вы хотите запустить, разместив курсор в любом месте макроса и нажимая F5или выбрав в меню пункт Выполнить > Макрос.
Создайте Workbook_Open события.
В следующем примере событие Open используется для запуска макроса при открытии книги.
-
Откройте или создайте книгу, в которую нужно добавить макрос.
-
На вкладке Разработчик в группе Код нажмите кнопку Visual Basic.
-
В окне Project проводника щелкните правой кнопкой мыши объект ThisWorkbook и выберите просмотр кода.
Совет: Если окно Project проводника не отображается, в меню Вид выберите пункт Project проводник.
-
В списке Объект над окном Код выберите книга.
При этом автоматически создается пустая процедура для события Open, например:
Private Sub Workbook_Open()
End Sub
-
Добавьте в процедуру следующие строки кода:
Private Sub Workbook_Open()Листы даты
MsgBox(«Лист1»).
Диапазон(«A1»). Value = Date
End Sub -
Переключитесь на приложение Excel и сохраните данную книгу как книгу с поддержкой макросов (.XLSM).
-
Закройте и снова откройте книгу. При повторном запуске книги Excel выполняется процедура Workbook_Open, в которой в окне сообщения отображается сегодняшняя дата.
-
В окне сообщения нажмите кнопку ОК.
Примечание: Ячейка A1 на листе «Лист1» также содержит дату в результате Workbook_Open процедуры.
Дополнительные сведения
Вы всегда можете задать вопрос специалисту Excel Tech Community или попросить помощи в сообществе Answers community.
К началу страницы
См. также
Автоматический запуск макроса при открытии книги
Автоматизация задач с помощью средства записи макросов — Excel
Запись макроса для открытия определенных книг при запуске Excel
Создание и сохранение всех макросов в одной книге
Сохранение макроса
Нужна дополнительная помощь?
Here’s a reader question:
I have a co-worker that is using Excel VBA Macros to analyze a bunch of data. Can you explain how Macros work, and probably suggest a way for me to pick that skill up? Any simple tips for beginners are very much appreciated.
Introduction to Excel 365 Macros
Mastering Macro development is probably one of the most important skills required to become a power Excel user. In essence, we use VBA Macros in order to automate tasks in Excel (also in Word, Macros are pretty useful) that would have been otherwise mundane, boring and very time consuming.
Here are a few examples of tasks which we are able to automate with Macros in Excel:
- Creating and manipulating workbooks and worksheets.
- Creating and manipulating charts
- Import data from files or other systems.
- Analyze data and create/refresh charts and dashboards
- Customize forms to capture feedback
- Send emails
- And much more…
Due to the fact that Excel ships with a built in Macro recorder (unlike Outlook and PowerPoint), there are two main options for adding a macro to an Excel workbook:
1) Record a sequence of user actions which is probably easy to get started with, but doesn’t scale up for complex tasks which might involve interaction with another Office applications or manipulating bigger data subsets.
2) Write your Macros by leveraging Visual Basic for Applications (VBA). This is a relatively simple procedural language that allows you to quickly develop more complex automation.
In this post, we’ll be covering both cases. We’ll start by showing you how to record your macro and continue by providing a detailed procedure for inserting VBA macros to spreadsheets.
We’ll demo both options using a very simple task:
- We’ll automate the addition a worksheet name “DEMO” to an existing workbook.
- Then, we will then copy a table range from Worksheet Sheet1 into the DEMO worksheet.
Record Excel 365 / 2019 Macros
Proceed as following to record a macro in Excel:
- In Excel, open an existing workbook or create a brand new one.
- Navigate to the View tab in the upper Ribbon.
- In the Right hand side, you’ll notice the Macro section.
- Hit View and select Record Macro.
- The form below will open up. Now provide a name to your Macro and store its content into the existing workbook. You might notice that here you can easily assign a key shortcut so you can more easily run the Macro.
Tip: Make sure to enter a detailed description to your Macro.

- Now, hit OK.
- At this point, go ahead and manually perform the steps you would like to record – in our case i will go ahead and manually create the new spreadsheet, rename it and then copy the table from Sheet1.
- Once done, hit Macros again and select Stop Recording.
- If you now hit Macros and then select View Macros, you’ll see a list of all Macros stored in all open workbooks (or specific ones)
- If you hit the Edit button, the Microsoft VBA Editor will open.
- The VBA editor shows the code that Excel has just generated for you in the background. In the next section of this tutorial i will show you how you can write a similar piece of code on your own.

- Close the VBA Editor.
Saving your Macro enabled file
Now we’ll need to save the workbook. As it contains a Macro, we should save it as a XSLM file (Macro Enabled Excel File)
- Hit File, then Save
- Select a location in your Computer or OneDrive in which you’ll save your file.
- Provide it a descriptive name
- Select .xslm as the File Type.
- Hit OK.
- Nice job, you have just recorded a simple macro!
Create Excel VBA Macros
As we previously mentioned, in many instances, the Excel Macro recorder will fall short and won’t meet all your needs. In these cases, you’ll need to write your own code.
Tip: There are cases that you might want to use an hybrid approach to Macro creation. You could start by recording your Macro and then just make manual adjustments to the auto-generated code with VBA.
Setting up the Excel development environment
This one sounds pretty fancy, but is actually quite simple. If you don’t see a tab named Developer in your Ribbon, start by enabling the Developer tab.
After the Developer tab is made visible, your Ribbon will look as following:
Writing your VBA macro
- Open your Excel file.
- From the Ribbon, hit Developer.
- Now hit the Visual Basic button (Alternatively, hit Alt+F11).
- GO to Module1 and paste the following code:
Sub Write_Macro()
'This code creates a Macro named Write_Macro
Dim MySheet As New Worksheet
Dim MyTable As Range

' Create a worksheet programatically and call it TEST
Set MySheet = ThisWorkbook.Sheets.Add(After:=Sheets(Sheets.Count))
MySheet.Name = "TEST"

'Copy the table from Sheet1 into TEST worksheet
Set MyTable = Sheet1.Range("A1:C11")

With MyTable
.Copy Sheets("TEST").Range("A1")
End With

End Sub- Close your VBA Editor.
- Back in Excel, hit Developer.
- Now hit on Macro and look into the list of Macros in your Workbook. You’ll notice the Write_Macro entry, which we just write on our own.

- Save your spreadsheet as a .xslm (Macro enabled Excel file)
Running your Macro
Executing your macro is very simple: From the Macro Dialog shown above, highlight your Write_Macro entry and hit Run.
Enabling VBA security permissions
In Microsoft Office, Macros are disabled by default, in order to avoid running harmful code. If you would like to run your Macros you’ll need to allow that. Execute this optional step in case you have received an error message when running either of the two macros we have created above.
- Hit Developer in the Ribbon.
- Select Macro security.
- Select the Disable all Macros with notification option.
- Hit OK.
Note: Disable all Macros with notification is the recommended security setting for Excel workbooks that contains Macros. It works as following: when a user opens such a workbook, Excel posts a “MACROS has been Disabled” notification right beyond the formula bar. It is then up to the user decision to enable the macros in the workbook.
The first step to working with VBA in Excel is to get yourself familiarized with the Visual Basic Editor (also called the VBA Editor or VB Editor).
In this tutorial, I will cover all there is to know about the VBA Editor and some useful options that you should know when coding in Excel VBA.
What is Visual Basic Editor in Excel?
Visual Basic Editor is a separate application that is a part of Excel and opens whenever you open an Excel workbook. By default, it’s hidden and to access it, you need to activate it.
VB Editor is the place where you keep the VB code.
There are multiple ways you get the code in the VB Editor:
- When you record a macro, it automatically creates a new module in the VB Editor and inserts the code in that module.
- You can manually type VB code in the VB editor.
- You can copy a code from some other workbook or from the internet and paste it in the VB Editor.
Opening the VB Editor
There are various ways to open the Visual Basic Editor in Excel:
- Using a Keyboard Shortcut (easiest and fastest)
- Using the Developer Tab.
- Using the Worksheet Tabs.
Let’s go through each of these quickly.
Keyboard Shortcut to Open the Visual Basic Editor
The easiest way to open the Visual Basic editor is to use the keyboard shortcut – ALT + F11 (hold the ALT key and press the F11 key).

As soon as you do this, it will open a separate window for the Visual Basic editor.
This shortcut works as a toggle, so when you use it again, it will take you back to the Excel application (without closing the VB Editor).
The shortcut for the Mac version is Opt + F11 or Fn + Opt + F11
Using the Developer Tab
To open the Visual Basic Editor from the ribbon:
- Click the Developer tab (if you don’t see a developer tab, read this on how to get it).
- In the Code group, click on Visual Basic.
Using the Worksheet Tab
This is a less used method to open the Vb Editor.
Go to any of the worksheet tabs, right-click, and select ‘View Code’.
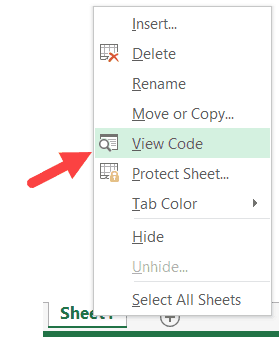
This method wouldn’t just open the VB Editor, it will also take you to the code window for that worksheet object.
This is useful when you want to write code that works only for a specific worksheet. This is usually the case with worksheet events.
Anatomy of the Visual Basic Editor in Excel
When you open the VB Editor for the first time, it may look a bit overwhelming.
There are different options and sections that may seem completely new at first.
Also, it still has an old Excel 97 days look. While Excel has improved tremendously in design and usability over the years, the VB Editor has not seen any change in the way it looks.
In this section, I will take you through the different parts of the Visual Basic Editor application.
Note: When I started using VBA years ago, I was quite overwhelmed with all these new options and windows. But as you get used to working with VBA, you would get comfortable with most of these. And most of the time, you’ll not be required to use all the options, only a hand full.
Below is an image of the different components of the VB Editor. These are then described in detail in the below sections of this tutorial.
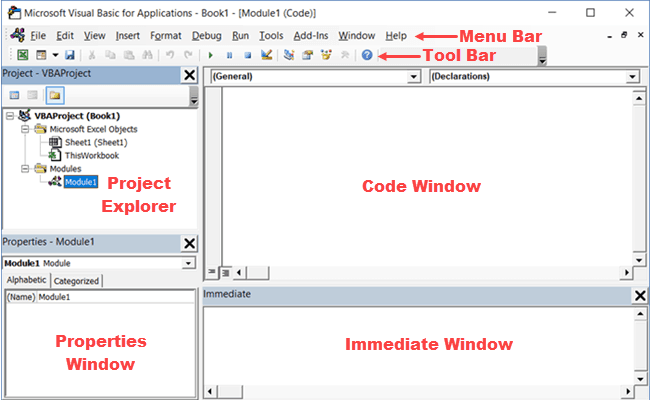
Now let’s quickly go through each of these components and understand what it does:
Menu Bar
This is where you have all the options that you can use in the VB Editor. It is similar to the Excel ribbon where you have tabs and options with each tab.
You can explore the available options by clicking on each of the menu element.
You will notice that most of the options in VB Editor have keyboard shortcuts mentioned next to it. Once you get used to a few keyboard shortcuts, working with the VB Editor becomes really easy.
Tool Bar
By default, there is a toolbar in the VB Editor which has some useful options that you’re likely to need most often. This is just like the Quick Access Toolbar in Excel. It gives you quick access to some of the useful options.
You can customize it a little by removing or adding options to it (by clicking on the small downward pointing arrow at the end of the toolbar).

In most cases, the default toolbar is all you need when working with the VB Editor.
You can move the toolbar above the menu bar by clicking on the three gray dots (at the beginning of the toolbar) and dragging it above the menu bar.
Note: There are four toolbars in the VB Editor – Standard, Debug, Edit, and User form. What you see in the image above (which is also the default) is the standard toolbar. You can access other toolbars by going to the View option and hovering the cursor on the Toolbars option. You can add one or more toolbars to the VB Editor if you want.
Project Explorer
Project Explorer is a window on the left that shows all the objects currently open in Excel.
When you’re working with Excel, every workbook or add-in that is open is a project. And each of these projects can have a collection of objects in it.
For example, in the below image, the Project Explorer shows the two workbooks that are open (Book1 and Book2) and the objects in each workbook (worksheets, ThisWorkbook, and Module in Book1).
There is a plus icon to the left of objects that you can use to collapse the list of objects or expand and see the complete list of objects.
The following objects can be a part of the Project Explorer:
- All open Workbooks – within each workbook (which is also called a project), you can have the following objects:
- Worksheet object for each worksheet in the workbook
- ThisWorkbook object which represents the workbook itself
- Chartsheet object for each chart sheet (these are not as common as worksheets)
- Modules – This is where the code that is generated with a macro recorder goes. You can also write or copy-paste VBA code here.
- All open Add-ins
Consider the Project Explorer as a place that outlines all the objects open in Excel at the given time.
The keyboard shortcut to open the Project Explorer is Control + R (hold the control key and then press R). To close it, simply click the close icon at the top right of the Project Explorer window.
Note: For every object in Project Explorer, there is a code window in which you can write the code (or copy and paste it from somewhere). The code window appears when you double click on the object.
Properties Window
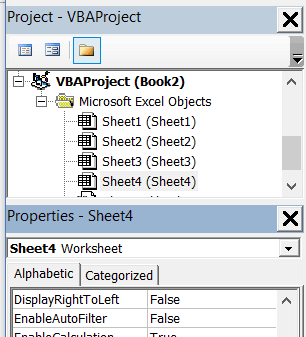
Properties window is where you get to see the properties of the select object. If you don’t have the Properties window already, you can get it by using the keyboard shortcut F4 (or go to the View tab and click Properties window).
Properties window is a floating window which you can dock in the VB Editor. In the below example, I have docked it just below the Project Explorer.
Properties window allows us to change the properties of a selected object. For example, if I want to make a worksheet hidden (or very hidden), I can do that by changing the Visible Property of the selected worksheet object.
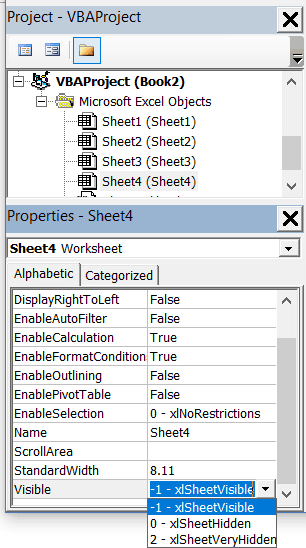
Related: Hiding a Worksheet in Excel (that can not be un-hidden easily)
Code Window
There is a code window for each object that is listed in the Project Explorer. You can open the code window for an object by double-clicking on it in the Project Explorer area.
Code window is where you’ll write your code or copy paste a code from somewhere else.
When you record a macro, the code for it goes into the code window of a module. Excel automatically inserts a module to place the code in it when recording a macro.
Related: How to Run a Macro (VBA Code) in Excel.
Immediate Window
The Immediate window is mostly used when debugging code. One way I use the Immediate window is by using a Print.Debug statement within the code and then run the code.
It helps me to debug the code and determine where my code gets stuck. If I get the result of Print.Debug in the immediate window, I know the code worked at least till that line.
If you’re new to VBA coding, it may take you some time to be able to use the immediate window for debugging.
By default, the immediate window is not visible in the VB Editor. You can get it by using the keyboard shortcut Control + G (or can go to the View tab and click on ‘Immediate Window’).
Where to Add Code in the VB Editor
I hope you now have a basic understanding of what VB Editor is and what all parts it has.
In this section of this tutorial, I will show you where to add a VBA code in the Visual Basic Editor.
There are two places where you can add the VBA code in Excel:
- The code window for an object. These objects can be a workbook, worksheet, User Form, etc.
- The code window of a module.
Module Code Window Vs Object Code Window
Let me first quickly clear the difference between adding a code in a module vs adding a code in an object code window.
When you add a code to any of the objects, it’s dependent on some action of that object that will trigger that code. For example, if you want to unhide all the worksheets in a workbook as soon as you open that workbook, then the code would go in the ThisWorkbook object (which represents the workbook).
The trigger, in this case, is opening the workbook.
Similarly, if you want to protect a worksheet as soon as some other worksheet is activated, the code for that would go in the worksheet code window.
These triggers are called events and you can associate a code to be executed when an event occurs.
Related: Learn more about Events in VBA.
On the contrary, the code in the module needs to be executed either manually (or it can be called from other subroutines as well).
When you record a macro, Excel automatically creates a module and inserts the recorded macro code in it. Now if you have to run this code, you need to manually execute the macro.
Adding VBA Code in Module
While recording a macro automatically creates a module and inserts the code in it, there are some limitations when using a macro recorder. For example, it can not use loops or If Then Else conditions.
In such cases, it’s better to either copy and paste the code manually or write the code yourself.
A module can be used to hold the following types of VBA codes:
- Declarations: You can declare variables in a module. Declaring variables allows you to specify what type of data a variable can hold. You can declare a variable for a sub-routine only or for all sub-routines in the module (or all modules)
- Subroutines (Procedures): This is the code that has the steps you want VBA to perform.
- Function Procedures: This is a code that returns a single value and you can use it to create custom functions (also called User Defined Functions or UDFs in VBA)
By default, a module is not a part of the workbook. You need to insert it first before using it.
Adding a Module in the VB Editor
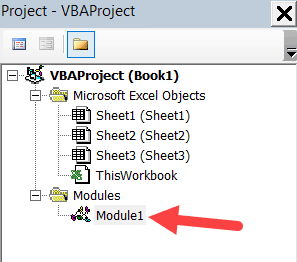
Below are the steps to add a module:
- Right-click on any object of the workbook (in which you want the module).

- Hover the cursor on the Insert option.
- Click on Module.


This would instantly create a folder called Module and insert an object called Module 1. If you already have a module inserted, the above steps would insert another module.
Once the module is inserted, you can double click on the module object in the Project Explorer and it will open the code window for it.
Now you can copy-paste the code or write it yourself.
Removing the Module
Below are the steps to remove a module in Excel VBA:
- Right-click on the module that you want to remove.
- Click on Remove Module option.

- In the dialog box that opens, click on No.


Note: You can export a module before removing it. It gets saved as a .bas file and you can import it in some other project. To export a module, right-click on the module and click on ‘Export file’.
Adding Code to the Object Code Window
To open the code window for an object, simply double-click on it.
When it opens, you can enter the code manually or copy-paste the code from other modules or from the internet.
Note that some of the objects allow you to choose the event for which you want to write the code.
For example, if you want to write a code for something to happen when selection is changed in the worksheet, you need to first select worksheets from the drop-down at the top left of the code window and then select the change event from the drop-down on the right.
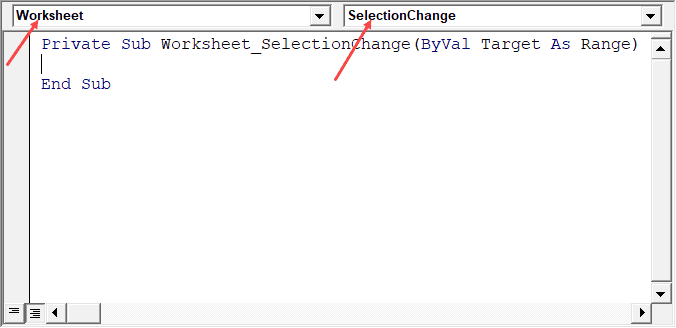
Note: These events are specific to the object. When you open the code window for a workbook, you will see the events related to the workbook object. When you open the code window for a worksheet, you will see the events related to the worksheet object.
Customizing the VB Editor
While the default settings of the Visual Basic Editor are good enough for most users, it does allow you to further customize the interface and a few functionalities.
In this section of the tutorial, I will show you all the options you have when customizing the VB Editor.
To customize the VB Editor environment, click Tools in the menu bar and then click on Options.
This would open the Options dialog box which will give you all the customization options in the VB Editor. The ‘Options’ dialog box has four tabs (as shown below) that have various customizations options for the Visual Basic Editor.
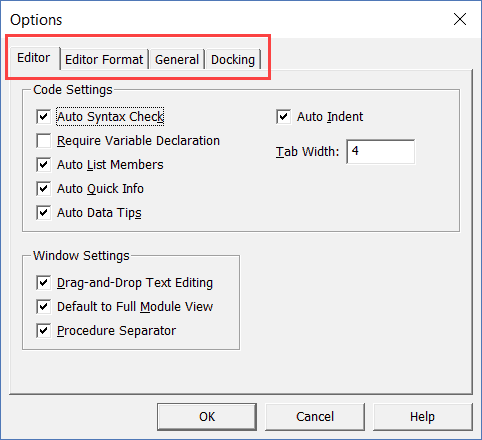
Let’s quickly go through each of these tabs and the important options in each.
Editor Tab
While the inbuilt settings work fine in most cases, let me still go through the options in this tab.
As you get more proficient working with VBA in Excel, you may want to customize the VB Editor using some of these options.
Auto Syntax Check
When working with VBA in Excel, as soon as you make a syntax error, you will be greeted by a pop-up dialog box (with some description about the error). Something as shown below:
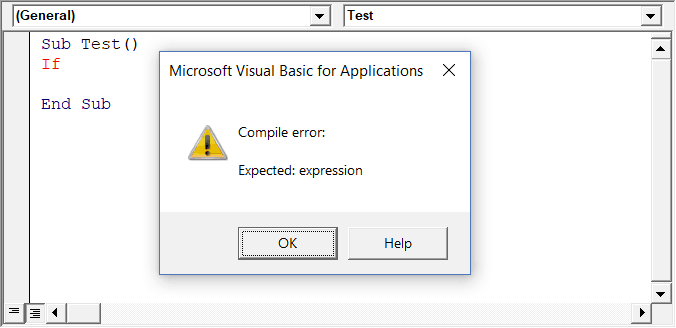
If you disable this option, this pop-up box will not appear even when you make a syntax error. However, there would be a change in color in the code text to indicate that there is an error.
If you’re a beginner, I recommend you keep this option enabled. As you get more experienced with coding, you may start finding these pop-up boxes irritating, and then you can disable this option.
Require Variable Declaration
This is one option I recommend enabling.
When you’re working with VBA, you would be using variables to hold different data types and objects.
When you enable this option, it automatically inserts the ‘Option Explicit’ statement at the top of the code window. This forces you to declare all the variables that you’re using in your code. If you don’t declare a variable and try to execute the code, it will show an error (as shown below).
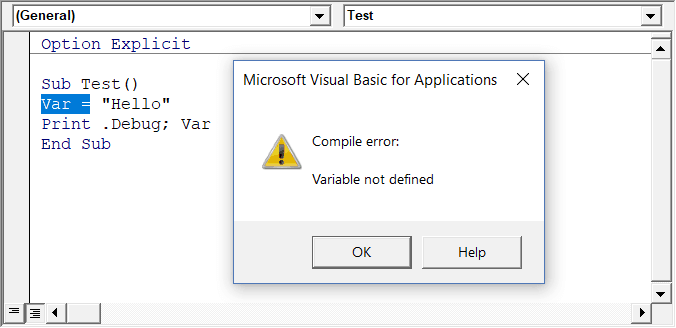
In the above case, I used the variable Var, but I didn’t declare it. So when I try to run the code, it shows an error.
This option is quite useful when you have a lot of variables. It often helps me find misspelled variables names as they are considered as undeclared and an error is shown.
Note: When you enable this option, it does not impact the existing modules.
Auto List Member
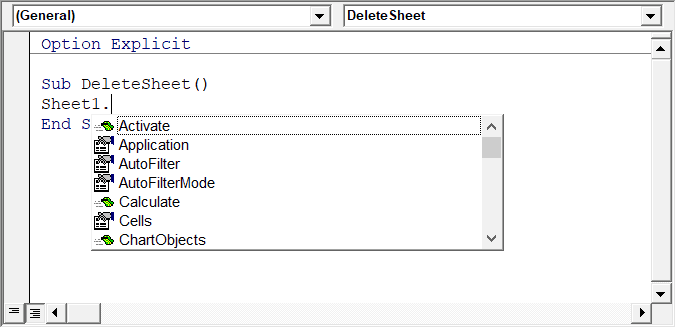
This option is quite useful as it helps you get a list of properties of methods for an object.
For example, if I want to delete a worksheet (Sheet1), I need to use the line Sheet1.Delete.
While I am typing the code, as soon as I type the dot, it will show me all the methods and properties associated with the Worksheet object (as shown below).
Auto list feature is great as it allows you to:
- Quickly select the property and method from the list and saves time
- Shows you all the properties and methods which you may not be aware of
- Avoid making spelling errors
This option is enabled by default and I recommend keeping it that way.
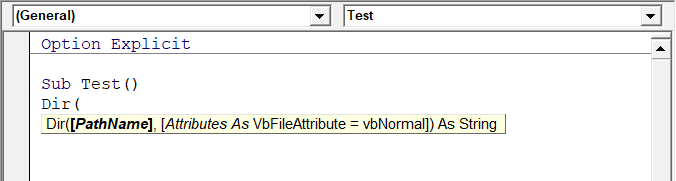
Auto Quick Info Options
When you type a function in Excel worksheet, it shows you some information about the function – such as the arguments it takes.
Similarly, when you type a function in VBA, it shows you some information (as shown below). But for that to happen, you need to make sure the Auto Quick Info option is enabled (which it is by default).
Auto Data Tips Options
When you’re going through your code line by line and place your cursor above a variable name, it will show you the value of the variable.
I find it quite useful when debugging the code or going through the code line by line which has loops in it.

In the above example, as soon as I put the cursor over the variable (var), it shows the value it holds.
This option is enabled by default and I recommend you keep it that way.
Auto Indent
Since VBA codes can get long and messy, using indentation increases the readability of the code.
When writing code, you can indent using the tab key.
This option ensures that when you are done with the indented line and hit enter, the next line doesn’t start from the very beginning, but has the same indentation as the previous line.
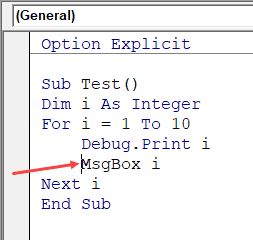
In the above example, after I write the Debug.Print line and hit enter, it will start right below it (with the same indentation level).
I find this option useful and turning this off would mean manually indenting each line in a block of code that I want indented.
You can change the indentation value if you want. I keep it at the default value.
Drag and Drop Text Editing
When this option is enabled, it allows you to select a block of code and drag and drop it.
It saves time as you don’t have to first cut and then paste it. You can simply select and drag it.
This option is enabled by default and I recommend you keep it that way.
Default to Full Module View
When this option is enabled, you will be able to see all the procedures in a module in one single scrollable list.
If you disable this option, you will only be able to see one module at a time. You will have to make a selection of the module you want to see from the drop-down at the top right of the code window.
This option is enabled by default and I recommend keeping it that way.
One reason you may want to disable it when you have multiple procedures that are huge and scrolling across these is taking time, or when you have a lot of procedures and you want to quickly find it instead of wasting time in scrolling.
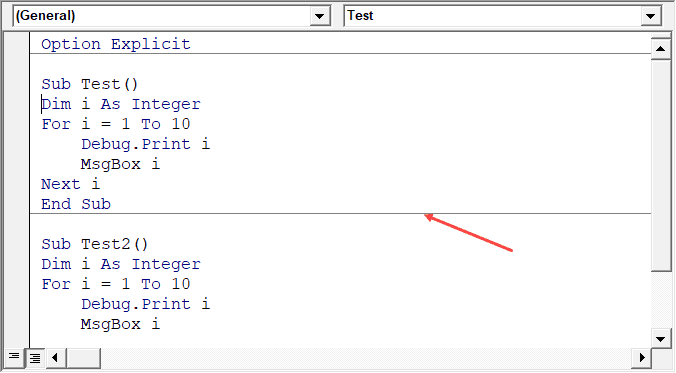
Procedure Separator
When this option is enabled, you will see a line (a kind of divider) between two procedures.
I find this useful as it visually shows when one procedure ends and the other one starts.
It’s enabled by default and I recommend keeping it that way.
Editor Format Tab
With the options in the Editor Format tab, you can customize the way your code looks in the code window.
Personally, I keep all the default options as I am fine with it. If you want, you can tweak this based on your preference.
To make a change, you need to first select an option in the Code Colors box. Once an option is selected, you can modify the foreground, background, and indicator color for it.
The font type and font size can also be set in this tab. It’s recommended to use a fixed-width font such as Courier New, as it makes the code more readable.
Note that the font type and size setting will remain the same for all code types (i.e., all the code types shown in the code color box).
Below is an image where I have selected Breakpoint, and I can change the formatting of it.
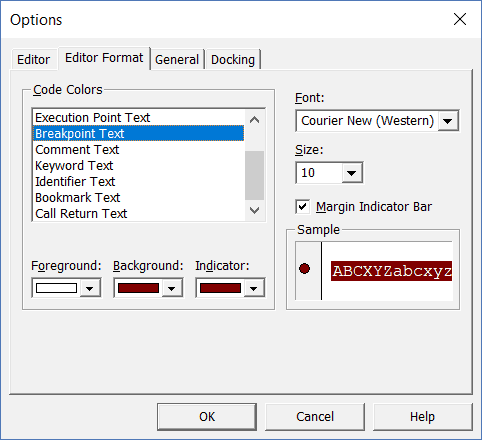
Note: The Margin Indicator Bar option when enabled shows a little margin bar to the left of the code. It’s helpful as it shows useful indicators when executing the code. In the above example, when you set a breakpoint, it will automatically show a red dot to the left of the line in the margin bar. Alternatively, to set a breakpoint, you can simply click on the margin bar on the left of the code line that you want as the breakpoint.
By default, Margin Indicator Bar is enabled and I recommend keeping it that way.
One of my VBA course students found this customization options useful and she was color blind. Using the options here, she was able to set the color and formats that made it easy for her to work with VBA.
General Tab
The General tab has many options but you don’t need to change any of it.
I recommend you keep all the options as is.
One important option to know about in this tab is Error Handling.
By default, ‘Break on Unhandled Errors’ is selected and I recommend keeping it that way.
This option means that if your code encounters an error, and you have not handled that error in your code already, then it will break and stop. But if you have addressed the error (such as by using On Error Resume Next or On Error Goto options), then it will not break (as the errors are not unhandled).
Docking Tab
In this tab, you can specify which windows you want to get docked.
Docking means that you can fix the position of a window (such as project explorer or the Properties window) so that it doesn’t float around and you can view all the different windows at the same time.
If you don’t dock, you will be able to view one window at a time in full-screen mode and will have to switch to the other one.
I recommend keeping the default settings.
Other Excel tutorials you may like:
- How to Remove Macros From an Excel Workbook
- Comments in Excel VBA (Add, Remove, Block Commenting)
- Using Active Cell in VBA in Excel (Examples)