
Создание простого тестового задания средствами VBA Excel на конкретном примере. Загрузка вопросов и ответов с помощью массивов. Выставление оценки за тест.
Описание тестового задания
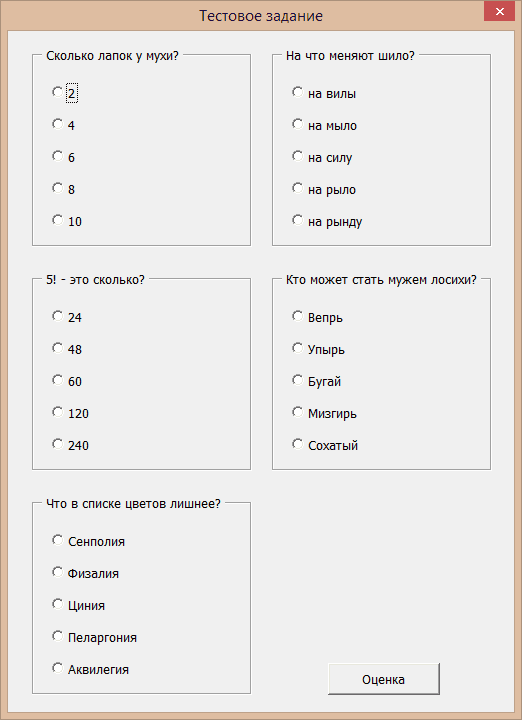
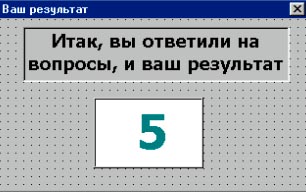
Простое тестовое задание состоит из пяти вопросов с пятью вариантами ответов на каждый. Оценивается пройденный тест от 0 до 5 баллов в зависимости от количества правильных ответов.
Пользователь выбирает на каждый вопрос один ответ из пяти предложенных и нажимает кнопку «Оценить». Результат выполнения тестового задания выводится в информационном окне MsgBox.
Форма и элементы управления
На пользовательской форме VBA Excel расположены пять элементов управления Frame (рамка) для размещения вопросов. В каждой рамке расположены по пять элементов OptionButton (переключатель) для размещения и выбора вариантов ответа.
Рамки нужны для объединения переключателей в группы, в которых только один элемент OptionButton из группы может иметь значение True. Это облегчает пользователю перевыбор ответа.
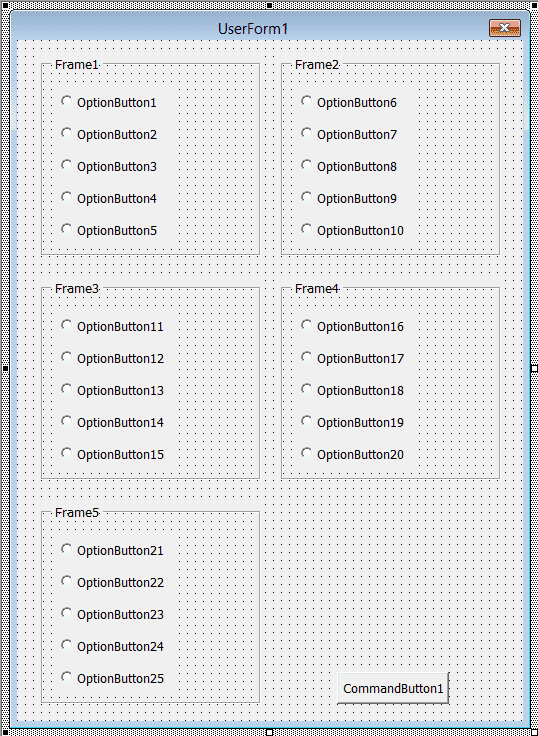
Кнопка CommandButton1 используется для запуска процедуры расчета оценки за пройденный тест.
Загрузка вопросов и ответов
Вопросы и варианты ответов присваиваются массивам непосредственно в коде VBA Excel. Из массивов информация передается на пользовательскую форму элементам управления Frame и OptionButton.
|
1 2 3 4 5 6 7 8 9 10 11 12 13 14 15 16 17 18 19 20 21 22 23 24 25 26 27 28 29 |
Private Sub UserForm_Initialize() Dim arr1 As Variant, arr2 As Variant, i As Byte ‘Присваиваем список вопросов массиву arr1 arr1 = Array(«Сколько лапок у мухи?», «На что меняют шило?», _ «5! — это сколько?», «Кто может стать мужем лосихи?», _ «Что в списке цветов лишнее?») ‘Присваиваем вопросы заголовкам рамок ‘из массива arr1 For i = 1 To 5 Controls(«Frame» & i).Caption = arr1(i — 1) Next ‘Присваиваем варианты ответов массиву arr2 arr2 = Array(«2», «4», «6», «8», «10», «на вилы», «на мыло», _ «на силу», «на рыло», «на рынду», «24», «48», «60», «120», _ «240», «Вепрь», «Упырь», «Бугай», «Мизгирь», «Сохатый», _ «Сенполия», «Физалия», «Циния», «Пеларгония», «Аквилегия») ‘Присваиваем варианты ответов надписям ‘переключателей из массива arr2 For i = 1 To 25 Controls(«OptionButton» & i).Caption = arr2(i — 1) Next CommandButton1.Caption = «Оценка» Me.Caption = «Тестовое задание» End Sub |
Выставление оценки за тест
Для расчета оценки за пройденный тест используется свойство Value элемента управления OptionButton, которое равно True, если переключатель выбран. В тексте процедуры свойство Value не указано, так как оно является для OptionButton свойством по умолчанию.
|
1 2 3 4 5 6 7 8 9 10 11 12 13 14 15 16 17 |
Private Sub CommandButton1_Click() Dim arr3 As Variant, n As Byte, i As Byte ‘Присваиваем порядковые номера правильных ‘ответов массиву arr3 arr3 = Array(«3», «7», «14», «20», «22») ‘Считаем количество правильных ответов For i = 1 To 5 If Controls(«OptionButton» & arr3(i — 1)) Then n = n + 1 End If Next ‘Выводим результат в MsgBox MsgBox «Ваша оценка: « & n End Sub |

Предложенное здесь простое тестовое задание в VBA Excel можно усовершенствовать, организовав загрузку вопросов и ответов в массивы с активного рабочего листа. Тогда на разных листах можно будет создать различные варианты тестов и запускать их одной программой, выбрав нужный лист.
Если ваши ученики освоили в Excel представление и
обработку данных, то можно переходить на
качественно новый уровень работы с Excel –
автоматизировать свою работу. Язык VBA (Visual Basic for
Application) – язык программирования, который
подходит для всех приложений Microsoft Office, это один
из самых простых в изучении и применении языков,
он является версией языка Visual Basic.
Предлагаю задания для создания проектов в виде
тестов в среде MS Excel и VBA.
Задание:
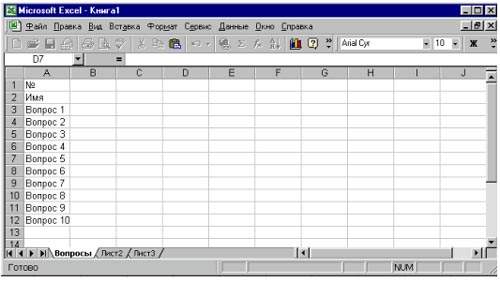
- Откройте Excel.
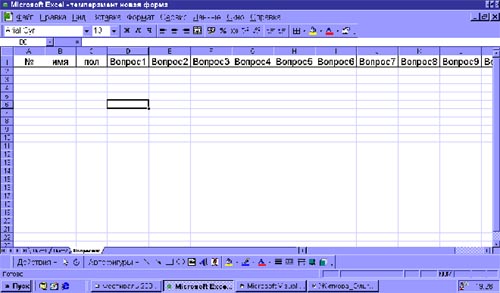
- Переименуйте Лист1 в Вопросник
и составьте таблицу.
Для каждого вопроса создайте пользовательские
формы и с помощью их заполните таблицу.
Пользовательские формы могут иметь вид:
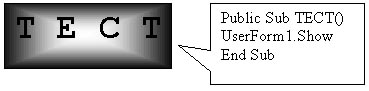
UserForm1
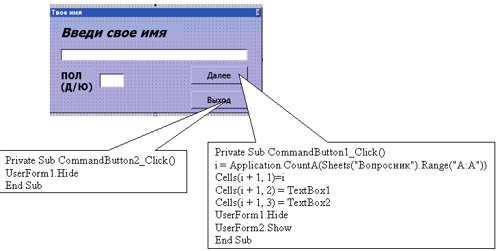
UserForm2
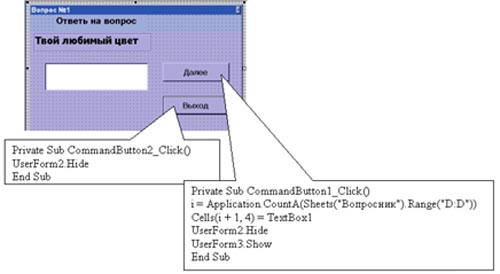
- При вызове следующего вопроса закрывается
текущая форма, записываются результаты на лист Вопросник,
и открывается форма со следующим вопросом. - В форме с последним вопросом запрограммировано
только закрытие формы и запись результатов. - Спроектируйте на листе Excel Вопросник
кнопку вызова форм:
Примечание. Подумайте, как изменится
программа, если заполнить таблицу по вертикали.
Темы проектов:
1. Подобрать тест, обработать его, результаты
показать через пользовательскую форму.
2. Вопросник по любому предмету, результаты
которого обработать в Excel и выдать через
пользовательскую форму оценку:
3. Вопросник «МОЯ ВСЕЛЕННАЯ, ПОЗНАЙ СЕБЯ»
- Создать кнопку вызова.
- Создать форму Вопрос и ответы к ним:

Вопросы:
- Мое любимое занятие…
- Мой любимый цвет…
- Мое любимое животное…
- Мой лучший друг…
- Мой любимый звук…
- Мой любимый запах…
- Моя любимая игра…
- Моя любимая одежда…
- Моя любимая музыка…
- Мое любимое время года…
- Что я больше всего на свете люблю делать…
- Место, где я больше всего люблю бывать…
- Мой любимый певец или группа…
- Мои любимые герои…
- Я чувствую в себе способности к …
- Человек, которым я больше всего восхищаюсь …
- Лучше всего я умею …
- Я знаю, что смогу …
- Я уверен в себе потому, что …
Вопросник «Мне нравится»
- Мне нравится в школе то, что …
- Мне не нравится в школе то, что …
- Я просто в восторге от того, что …
- Мне не нравится на уроке то, что …
- Вот было бы здорово, если бы на уроке можно было
бы …
Смотри Приложение 1, где
можно определить тип темперамента.
Желаю удачи!!!
1. Overview
Welcome to the world of Excel VBA unit testing! In this tutorial, I am going to introduce you to Rubberduck VBA, and its unit testing capabilities.
What you’ll learn
- How to add test modules
- How to add unit tests
- How to run unit tests
- How to interpret test results
What you’ll need
- A Windows computer with Excel 2007, or newer
- Basic knowledge of Function and Sub procedures
All the commands that are listed below are executed on a Windows 10 machine with Excel 2016.
2. Get started
This step is only needed if you have not set up your development environment. You need to install Rubberduck VBA to your Excel. You can follow these instructions to install it.
Download Rubberduck installer from this link. Once download is finished, start the installer and follow the steps in the setup wizard.
Kicking off Excel
After setup has finished installing, it’s a good idea to launch Excel, open VBA Editor, and verify Rubberduck has been properly installed:
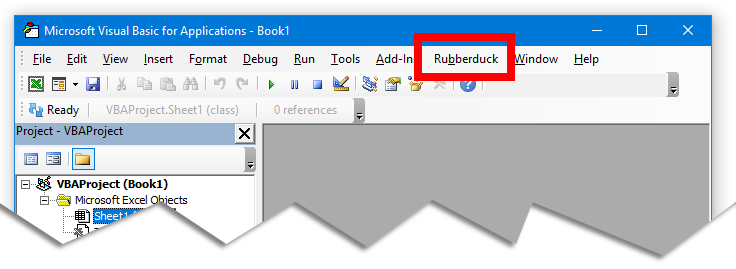
After installing the Rubberduck add-in, a new menu appears in VBA Editor.
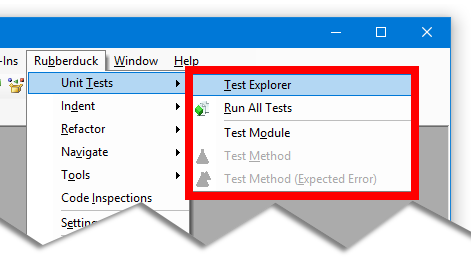
The options we’ll use in this tutorial are located unter the Rubberduck > Unit Tests menu:
3. Create a function to test
In the previous step, we started Excel and opened Visual Basic Editor. In this step, you are going to insert a new code module, and add a new Function to it.
I’ve already prepared a function that we will unit test later, so just paste it into Module1:
| Option Explicit | |
| » | |
| ‘ Validate the password length so that it’s between 8-16 characters long | |
| ‘ | |
| ‘ Returns: | |
| ‘ | |
| ‘ TRUE – Password matches the lenght requirement | |
| ‘ FALSE – Password doesn’t match the length requirement | |
| Function ValidatePasswordLength(password As String) As Boolean | |
| Dim success As Boolean: success = False | |
| ‘ Validate the password is of correct length (between 8-16 characters) | |
| Dim length As Long: length = Len(password) | |
| If (length >= 8 And length <= 16) Then | |
| success = True | |
| End If | |
| ValidatePasswordLength = success | |
| End Function |
Here, you defined a new function, called ValidatePasswordLength(). It takes a single parameter of value string, and returns a boolean.
The purpose of the function is to assure that the password length is valid. It needs to be greater or equal to 8, and less or equal to 16 characters.
In next steps, we are going to create several unit tests that will test this function.
4. Insert a Test Module
Before you can start adding unit tests, you need to first insert a test module. A test module is a container for unit tests. Each test module can have zero or more unit tests. You can have any number of test modules in a project, depending on the complexity of your requirements. In this tutorial, you are just going to use a single Test Module.
To insert a new Test Module, you need to display the Test Explorer window. You do that with the Rubberduck > Unit Tests > Test Explorer menu command:
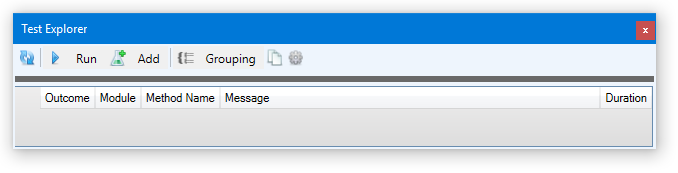
Next, select the Test Explorer > Add > Test Module command. This inserts a new Test Module called TestModule1:
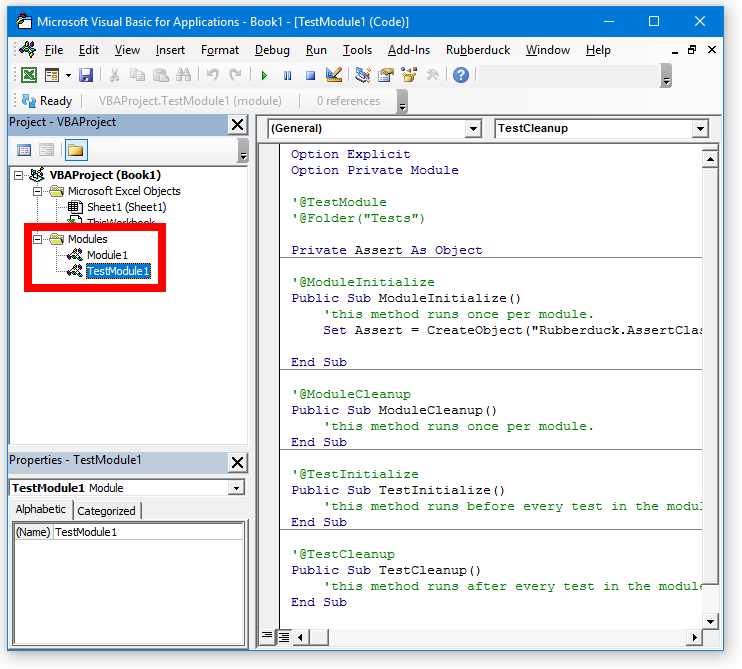
Every time you insert a new test module, it contains these procedures: ModuleInitialize(), ModuleCleanup(), TestInitialize() and TestCleanup(). They are used to perform any initialization before running the tests, as well as cleaning up after tests have finished running.
Step 5: Add unit tests
If you try running the tests now, you won’t get any output. That’s because there are no unit test methods yet. So let’s start to add some tests. Usually it’s best to add the tests at the very bottom of this module, below ModuleInitialize(), ModuleCleanup(), TestInitialize() and TestCleanup() functions.
To insert a unit tests:
- First, make sure you’re located in TestModule1, just like in the previous screen shot.
- In Test Explorer, click
Add>Test Method.
Test Explorer inserts a new test method:
| ‘@TestMethod | |
| Public Sub TestMethod1() ‘TODO Rename test | |
| On Error GoTo TestFail | |
| ‘Arrange: | |
| ‘Act: | |
| ‘Assert: | |
| Assert.Inconclusive | |
| TestExit: | |
| Exit Sub | |
| TestFail: | |
| Assert.Fail «Test raised an error: #» & Err.Number & » – « & Err.Description | |
| End Sub |
What’s happening here?
Looking at the generated code, we see the Arrange, Act and Assert comments. These help guide us in writing better tests. For the purpose of this tutorial, we can delete all three of these comments.
Notice the @TestMethod attribute right in front of the function declaration? This attribute is automatically added to every test method. It’s there so that the method can get picked up by the test runner, as well as Test Explorer. Without it, test methods wouldn’t show up in Test Explorer.
To illustrate this concept, let’s click on the Refresh button in Test Explorer, and observe how the newly added test method now shows up in the Test Explorer window.
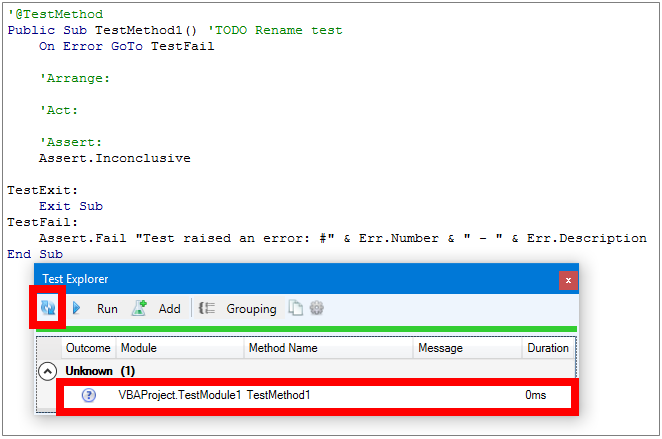
After refreshing, the test method shows up in Test Explorer
It’s a good idea to use the refresh button when you make changes to your methods, such as renaming them, deleting, or adding new ones.
Note: When you get more comfortable with writing unit tests, you can omit using the wizard — and code your test methods directly in the editor. You can do this by adding the @TestMethod attribute right in front of your test method.
Step 6: Customize the Unit Test
So far, this test method doesn’t do anything — it doesn’t test any code. So let’s customize it, by giving it a more appropriate name, and let’s add some code to it.
Let’s rename the test method from TestMethod1() to TestPasswordLenthIsTooSmall(), and delete the three “Arrange:”, “Act:” and “Assert:” comments.
Next, let’s modify the TestPasswordLenthIsTooSmall() test method, by having it invoke the ValidatePasswordLength() function we created in Step 3, by passing it the parameter “bob”.
You can do this by replacing the line:
Assert.Inconclusive
with:
Assert.IsFalse (ValidatePasswordLength("bob"))
The purpose of the ValidatePasswordLength() function, is to verify whether the password is valid, by comparing it’s length. If it’s within the range of 8-16 characters, the password is valid, and the function will return true. If it’s outside of that range, it will return false. Because we’re passing the parameter “bob”, we’re expecting to see a false result. That’s why we use Assert.IsFalse().
When you’re done, your code should look like this:
| Option Explicit | |
| Option Private Module | |
| ‘@TestModule | |
| ‘@Folder(«Tests») | |
| Private Assert As Object | |
| ‘@ModuleInitialize | |
| Public Sub ModuleInitialize() | |
| ‘this method runs once per module. | |
| Set Assert = CreateObject(«Rubberduck.AssertClass») | |
| End Sub | |
| ‘@ModuleCleanup | |
| Public Sub ModuleCleanup() | |
| ‘this method runs once per module. | |
| End Sub | |
| ‘@TestInitialize | |
| Public Sub TestInitialize() | |
| ‘this method runs before every test in the module. | |
| End Sub | |
| ‘@TestCleanup | |
| Public Sub TestCleanup() | |
| ‘this method runs after every test in the module. | |
| End Sub | |
| ‘@TestMethod | |
| Public Sub TestPasswordLengthIsTooSmall() | |
| On Error GoTo TestFail | |
| Assert.IsFalse (ValidatePasswordLength(«bob»)) | |
| TestExit: | |
| Exit Sub | |
| TestFail: | |
| Assert.Fail «Test raised an error: #» & Err.Number & » – « & Err.Description | |
| End Sub |
Assert.IsTrue and Assert.IsFalse above are methods from Rubberduck’s Assert class. Conveniently, it also provides a few other methods that we can use:
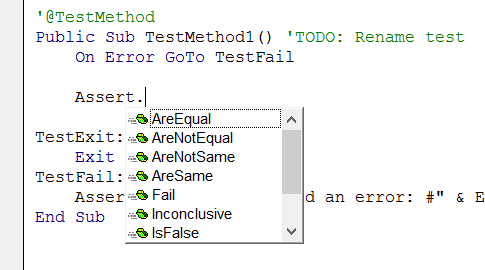
The Assert class in Rubberduck VBA provides some of the most commonly used assertions.
Believe it or not, that’s it! We’re done with creating our first test case.
Step 7: Run the test
Now starts the real fun: let’s run it. In order to run the test:
- Inside Test Explorer, click
Run>All Tests.
In Test Explorer, we can see a few things:
- Test result: failed, passed, and not run tests
- The name of the test module
- Name of the test method
- How long it took to execute the test, in ms
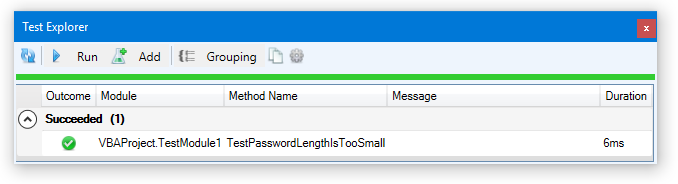
After running the unit test, the Test Explorer updates with the latest result.
That’s it! As you can see, our unit test passes. If you’d like to add the remaining test cases, you may do so. When you’re finished adding them, you just need to refresh the Test Explorer, and re-run the tests. The Test Explorer will run all of them, and show you the summary of results for each.
Once all your tests pass, you’re good to go!
Step 8: Add more test cases (optional)
So far, we’ve added one single test method, and ran it to make sure it passed.
We can use many different values to ValidatePasswordLength()‘s parameters. For example:
- “bob” –> should return FALSE
- “ASecretPassword” –> should return TRUE
- “” –> should return FALSE
- “123456” –> should return FALSE
- “IAmAVeryLongLongLongLongPassword#!{}$#.” –> should return FALSE
If we imagine running ValidatePasswordLength() with the inputs above, we should get results as indicated in the bullet points above.
Just for fun, I’ve added a few of the test cases above, and this is what I get after refreshing and running the tests:
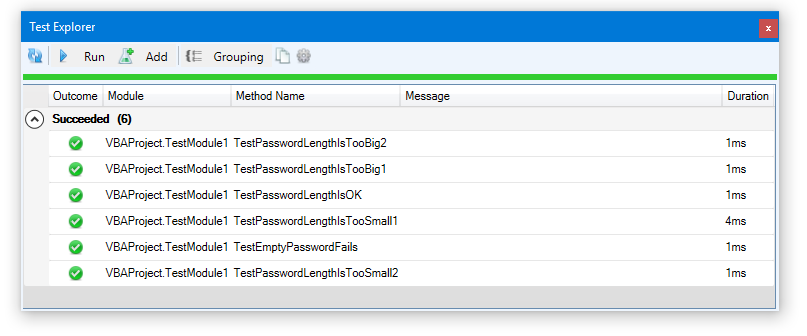
Running multiple tests using Test Explorer
All the tests pass. Pretty neat!
Summary
In this tutorial, I’ve shown you how to get started with Rubberduck VBA to create and run your very first unit test. Congratulate yourself on your success!
Obviously, a real-world scenario doesn’t include just one single test. There can be many unit tests organized in many test modules, depending on the complexity of your solution. The great thing about using Rubberduck VBA is that it provides a Test Explorer which allows you to navigate your test cases.
If your company is considering implementing unit tests, or require tailor-made solutions for complex scenarios, please don’t hesitate to get in touch.
Webxcel, the first webserver written in plain Visual Basic macros in Microsoft Excel, is getting more and more mature. Last time I blogged about getting PHP support going, this time we’ll look into increasing webxcel’s stability — through unit testing.
This is what it looks like:

Figure 1.1: Running VBA unit tests from PowerShell
Why are you still doing this?
You’re right, I didn’t invent unit testing in VBA and why should anyone even bother? Rubberduck already built tooling for people to improve their VBA workflow, however it requires you to install their add-in, and I think we can do testing in a semi-automated way without even interacting with a GUI.
Also, I decided to take a course called «Peer-To-Peer Systems and Security» at my university, which allowed students to build a predefined project in any language on any platform.
Obviously, I chose Microsoft Word, since enterprise environments need P2P systems and I take course work very seriously (I passed the course with an A+, but from what I heard, the instructors now consider limiting it to more «conservative» platforms). One of the project requirements however was (unit) testing, so I had to come up with something.
How it works
Similar to the build script introduced in the first post about automating version control for VBA projects, unit testing can be achieved by utilising Microsoft Office interop functionality.
Testing can be broken down to:
1) Identify test suites and tests
2) Setup tests (i.e. run beforeAll and beforeEach methods before all or individual tests)
3) Run tests
4) Tear down tests (i.e. run afterAll and afterEach)
Let’s look into these steps in detail.
Identifying test suites and tests
.NET supports accessing the VBA document model, so we can list all modules and modify their code (i.e. importing and exporting). For simplicity and also developer experience, let’s assume our test suites all have to start with «Test», since we can’t annotate modules or declare them «testable» without parsing VBA ourselves. For instance, inheritance like JUnit’s TestCase class would require us to understand VBA’s inheritance from our unit testing tooling; checking whether a module starts with «Test» is a lot easier:
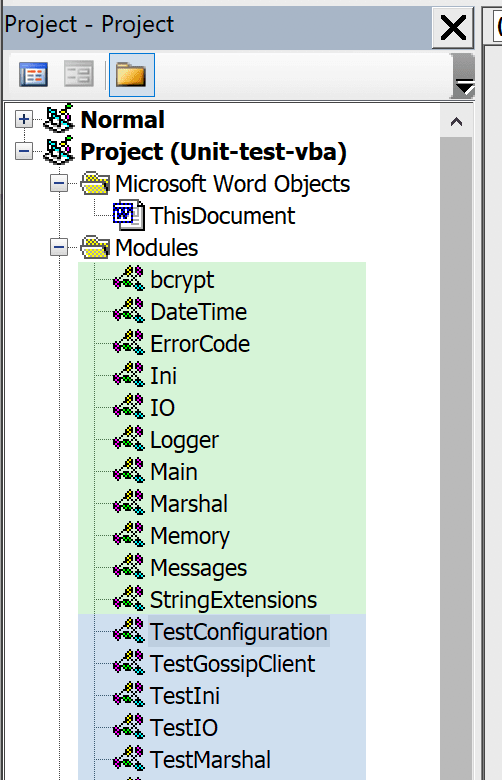
Figure 1.2: A list of modules (green background) and their corresponding test suites (blue background).
After identifying our test suites, we need to find our tests. Again we can take the naming shortcut, to only test functions starting with «Test» rather than parsing docstrings. With our test cases in place, we can start setting up and running our tests.
Fun fact: the interop code to access the individual lines of a VBA module looks a lot like Visual Basic. To access an individual module, one has to call modules.Item(index), and index starts at 1, which is typical to VB. Similarly, modules expose a module.CodeModule.Lines(fromIndex, toIndex) function, whose indices start at 1 once again. It might be a coincidence, however it looks a lot like that code has not been touched in a long time.
Setup and tear down tests
It might be helpful for tests to share some setup, e.g. when a module needs an instance of a class in all tests, it might be a good idea to create it once and share it among all tests.
To do so, we’ll also search for BeforeAll, BeforeEach, AfterEach and AfterAll functions in our test suites and call them before our actual tests.
Running tests
Running a test is rather easy: interop provides an app.Run(macroName, arg1, arg2, ...) method, which we can use to call macros. We can even pass arguments or get its return value if it’s an instance of a class. Note that VBA has something similar to structs, i.e. custom types, which can only be used inside VBA. Accessing a custom type returned via app.Run will not work.
To find out whether a test was run successfully, we’ll need to signal our result to the test script somehow. Since we can return arbitrary objects, we can create an Assert class, which has two properties:
-
AssertSuccessful: indicates whether the test assertion was ok -
AssertMessage: a helpful message to indicate test failure or success
By also providing a factory method to create such Assert objects like AreEqual, special messages like «expected ‘foo’, got ‘bar'» can be crafted in case of a failure:

Figure 1.3: A failed assertion, indicating the expected and actual value
Conclusion
VBA projects can now be unit tested without running tests from a GUI.

I’m still looking for a way to run tests on a CI server for a «Build: Passing» badge on GitHub, so if you happen to know a CI provider offering preinstalled Microsoft Office for FOSS projects, let me know.
Disclaimer: I own Rubberduck’s GitHub repository, and I’m one of the devs involved in the project.
Rubberduck is under active development. It’s much more than a unit testing tool for VBA though, but it works pretty well and lets you write VBA unit tests pretty much without any boilerplate:
'@TestModule
Private Assert As New Rubberduck.AssertClass

'@TestMethod
Public Sub TestMethod1()
    Assert.Inconclusive "Test method is not written yet."
End Sub

'@TestMethod
Public Sub AnotherTestMethod()
    Assert.IsTrue False, "Something's wrong?"
End Sub
And then you get to navigate and run your test methods in a docked toolwindow that also gives you menus for quickly adding arrange-act-assert method stubs, and the AssertClass can be late-bound, too, so you don’t have to worry about deploying Rubberduck anywhere else than on your development environment just to keep the code compilable.
The unit testing wiki page on Rubberduck’s GitHub repository explains pretty much everything there is to explain about using it.
The latest 2.1 pre-release versions includes the beginnings of a «fakes» framework that can be used to hijack a number of standard library calls that would normally interfere with unit tests, by literally turning the standard library into «test fakes» that can be setup to behave as specified when executed in the context of a Rubberduck unit test, for example MsgBox calls:
'@TestMethod
Public Sub TestMethod1()
    On Error GoTo TestFail

    Fakes.MsgBox.Returns 42 ' MsgBox function will return 42

    'here you'd invoke the procedure you want to test
    Debug.Print MsgBox("This MsgBox isn't going to pop up!", vbOkOnly, "Rubberduck") 'prints 42

    With Fakes.MsgBox.Verify ' Test will pass if MsgBox was invoked as specified
        .Parameter "prompt", "This MsgBox isn't going to pop up!"
        .Parameter "buttons", vbOkOnly
        .Parameter "title", "Rubberduck"
    End With
TestExit:
    Exit Sub
TestFail:
    Assert.Fail "Test raised an error: #" & Err.Number & " - " & Err.Description
End Sub
Contributions to expand that Fakes API to cover more functions are more than welcome. Covering FileSystemObject invocations would be particularly useful.