
Первое знакомство с редактором VBA Excel, создание процедур (подпрограмм) и написание простейшего кода, работающего с переменными и ячейками рабочего листа.
Начинаем программировать с нуля
Часть 1. Первая программа
[Часть 1] [Часть 2] [Часть 3] [Часть 4]
Эта статья предназначена для тех, кто желает научиться программировать в VBA Excel с нуля. Вы увидите, как это работает, и убедитесь, что не все так сложно, как кажется с первого взгляда. Свою первую программу вы напишите за 7 простых шагов.
- Создайте новую книгу Excel и сохраните ее как книгу с поддержкой макросов с расширением .xlsm. В старых версиях Excel по 2003 год – как обычную книгу с расширением .xls.
- Нажмите сочетание клавиш «Левая_клавиша_Alt+F11», которое откроет редактор VBA. С правой клавишей Alt такой фокус не пройдет. Также, в редактор VBA можно перейти по ссылке «Visual Basic» из панели инструментов «Разработчик» на ленте быстрого доступа. Если вкладки «Разработчик» на ленте нет, ее следует добавить в настройках параметров Excel.

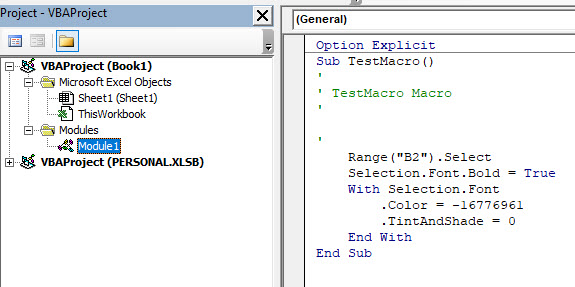
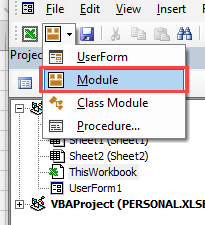
В левой части редактора VBA расположен проводник проекта, в котором отображены все открытые книги Excel. Верхней строки, как на изображении, у вас скорее всего не будет, так как это – личная книга макросов. Справа расположен модуль, в который записываются процедуры (подпрограммы) с кодом VBA. На изображении открыт модуль листа, мы же далее создадим стандартный программный модуль.
- Нажмите кнопку «Module» во вкладке «Insert» главного меню. То же подменю откроется при нажатии на вторую кнопку после значка Excel на панели инструментов.

После нажатия кнопки «Module» вы увидите ссылку на него, появившуюся в проводнике слева.
Первая программа на VBA Excel
Добавляем на стандартный модуль шаблон процедуры – строки ее начала и завершения, между которыми мы и будем писать свою первую программу (процедуру, подпрограмму).
- Откройте стандартный модуль двойным кликом по его ссылке в проводнике. Поместите в него курсор и нажмите кнопку «Procedure…» во вкладке «Insert» главного меню. Та же ссылка будет доступна при нажатии на вторую кнопку после значка Excel на панели инструментов.

В результате откроется окно добавления шаблона процедуры (Sub).

- Наберите в поле «Name» имя процедуры: «Primer1», или скопируйте его отсюда и вставьте в поле «Name». Нажмите кнопку «OK», чтобы добавить в модуль первую и последнюю строки процедуры.

Имя процедуры может быть написано как на латинице, так и на кириллице, может содержать цифры и знак подчеркивания. Оно обязательно должно начинаться с буквы и не содержать пробелы, вместо которых следует использовать знак подчеркивания.
- Вставьте внутрь шаблона процедуры следующую строку:
MsgBox "Привет".

Функция MsgBox выводит информационное сообщение с указанным текстом. В нашем примере – это «Привет».
- Проверьте, что курсор находится внутри процедуры, и запустите ее, нажав клавишу «F5». А также, запустить процедуру на выполнение можно, нажав на треугольник (на изображении под пунктом меню «Debug») или на кнопку «Run Sub/UserForm» во вкладке «Run» главного меню редактора VBA Excel.

Если вы увидели такое сообщение, как на изображении, то, поздравляю – вы написали свою первую программу!
Работа с переменными
Чтобы использовать в процедуре переменные, их необходимо объявить с помощью ключевого слова «Dim». Если при объявлении переменных не указать типы данных, они смогут принимать любые доступные в VBA Excel значения. Комментарии в тексте процедур начинаются со знака «’» (апостроф).
Пример 2
Присвоение переменным числовых значений:
|
Public Sub Primer2() ‘Объявляем переменные x, y, z Dim x, y, z ‘Присваиваем значение переменной x x = 25 ‘Присваиваем значение переменной y y = 35 ‘Присваиваем переменной z сумму ‘значений переменных x и y z = x + y ‘Выводим информационное сообщение ‘со значением переменной z MsgBox z End Sub |
Пример 3
Присвоение переменным строковых значений:
|
Public Sub Primer3() ‘Объявляем переменные x, y, z Dim x, y, z ‘Присваиваем строку переменной x x = «Добрый» ‘Присваиваем строку переменной y y = «день!» ‘Присваиваем переменной z строку, ‘состоящую из строк x и y ‘с пробелом между ними z = x & » « & y ‘Выводим информационное сообщение ‘со значением переменной z MsgBox z End Sub |
Скопируйте примеры процедур в стандартный модуль и запустите их на выполнение.
Изменение содержимого ячеек
Для обозначения диапазонов, в том числе и отдельных ячеек, в VBA Excel имеется ключевое слово «Range». Ячейке A1 на рабочем листе будет соответствовать выражение Range("A1") в коде VBA Excel.
Пример 4
|
Public Sub Primer4() ‘Объявляем переменную x Dim x ‘Присваиваем значение переменной x x = 125.61 ‘Присваиваем ячейке A1 ‘значение переменной x Range(«A1») = x ‘Присваиваем значение ячейке B1 Range(«B1») = 356.24 ‘Записываем в ячейку C1 ‘сумму ячеек A1 и B1 Range(«C1») = Range(«A1») + Range(«B1») End Sub |
Скопируйте процедуру этого примера в стандартный модуль и запустите на выполнение. Перейдите на активный рабочий лист Excel, чтобы увидеть результат.
In this Article
- Accessing the VBE Editor
- Recording a Macro
- Opening the VBE Editor directly from Excel
- The VBA Project
- Inserting a Module or Form into the VBA Project
- Adding a Reference to a VBA Project
- VBA Project Properties
- Renaming a Project
- Adding Project Security
This tutorial will explain what a VBA Project is and how to edit a VBA Project in Excel.
When we record a macro in Excel using the Macro Recorder, a VBA project file is created in the file that we are working in or in a file called the Personal Macro Workbook. The Project File stores any modules or forms that are created either by using the record macro function in Excel, or by writing the VBA code within a module directly. To view the VBA Project, we need to access the Visual Basic Editor (VBE).
Accessing the VBE Editor
There are 2 ways to access the VBE Editor in Excel. You can either record a macro and then edit the macro, or open the Editor directly from the Excel Developer Ribbon.
Recording a Macro
Excel gives us the ability to record macros, and then to edit the macros in the Visual Basic Editor (VBE) should we need to do so.
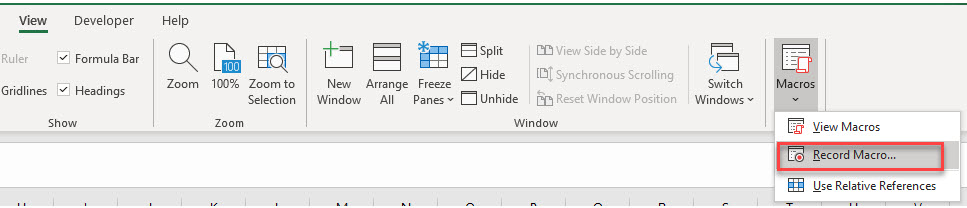
In the Ribbon, select View > Macros > Record Macro.
OR
Developer > Visual Basic > Record Macro
Note: If you don’t see the Developer Ribbon, you’ll need to enable it. You can learn how to do that here.
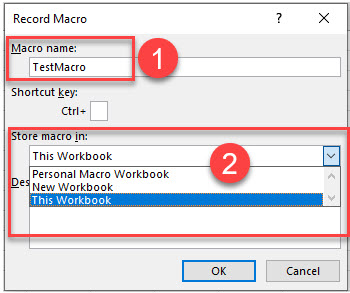
1) Type in the name for your macro, and then 2) select where to store the macro. This can be in the Personal Macro workbook, the workbook you are currently editing or a new workbook entirely.
Once you have clicked OK, you can follow the steps that you want in your macro (for example bolding a cell, changing the color of the text, etc.), and then click the stop button at the bottom of the screen to stop recording the macro.

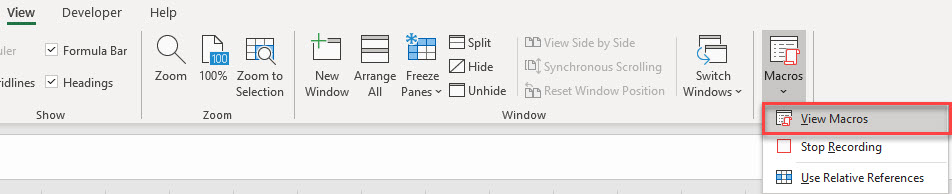
To run or view your macro, in the Ribbon, select View > Macros > View Macros.
OR
Developer > Visual Basic >Macros
Click on the Macro in the Macro name list, and then click on Edit.
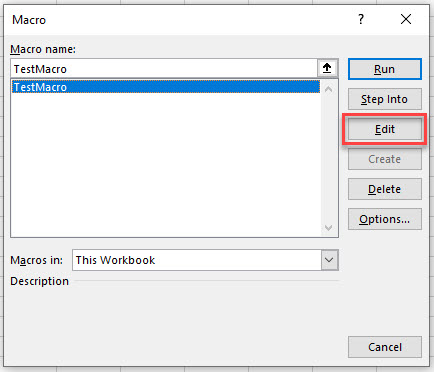
This will open the VBE and jump you into the VBA Code.
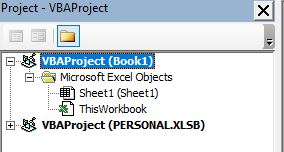
A VBA Project has now automatically been created for your workbook, and within this project, a module (Module 1) has also been created. The macro is contained within this new module on the right hand side.
Opening the VBE Editor directly from Excel
To open the VBE Editor from Excel directly, in the Ribbon, select Developer > Visual Basic.
The VBA Project
The VBA Project is where the modules and forms are stored when you write VBA code in Excel. As we recorded the above macro, a Module was automatically created for us within the VBA Project for the workbook we selected (in this case we selected This Workbook). Had we selected the Personal Macro Workbook to store the macro in, a module would have been created in the Perseonal.xlsb file.
NOTE: if you choose to save macros in the Personal Macro workbook, when you exit Excel you will get a prompt asking you to save this workbook. The Personal Macro workbook is a hidden workbook not visible in the Excel screen but visible in the VBE window.It is used to store modules and forms that can then be used across a multitude of Excel files. Modules and Forms that are stored in each individual workbook can only be used within that workbook.
If we had opened the VBE Editor directly from Excel without recording a macro, our workbook would have a blank VBA Project file that does not contain any modules or forms.
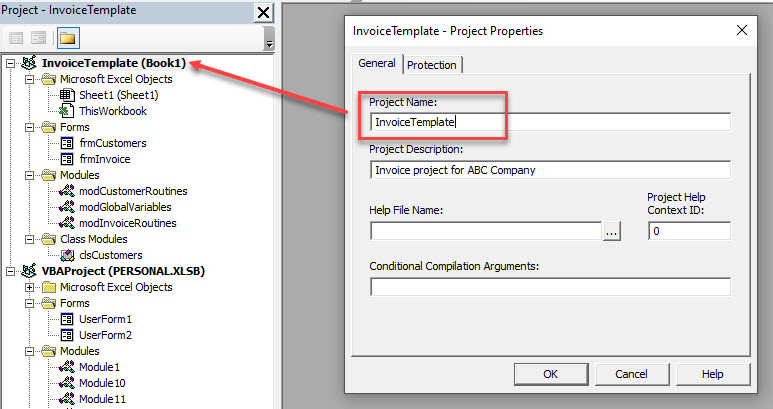
Each Excel file can only contain 1 VBA project, but can have multiple modules and forms. It is good practice when programming in VBA to group your procedures logically into relevant modules and often you will end up with a multitude of modules and forms.
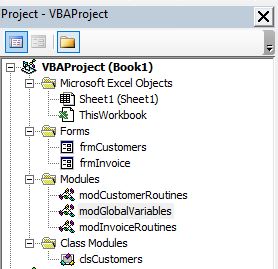
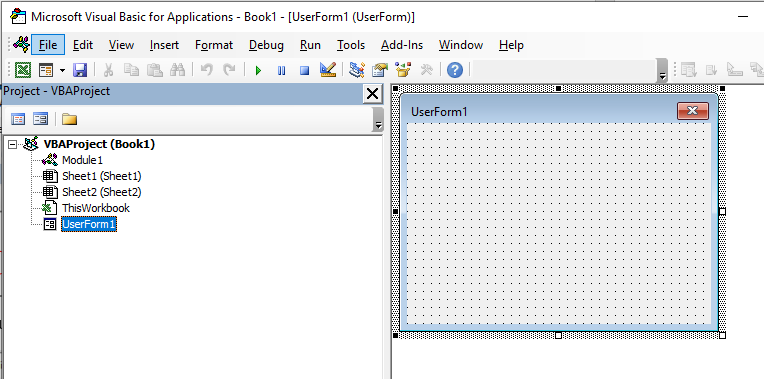
In the Book1 VBA Project in the graphic above, we have 2 forms (frmInvoice and frmCustomers), 3 Modules (modCustomerRoutines, modGlobalVariables and modInvoiceRoutines) and 1 class module (clsCustomers).
Inserting a Module or Form into the VBA Project
To insert a new module into your code, click on the Insert option on the menu bar, and click Module.
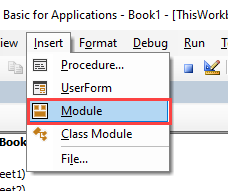
Or, click on the Insert Module button which you will find on the standard ribbon.
To insert a new user form into your code, select the UserForm option.
A new UserForm will appear in the Project Explorer and will be shown in the Code Window on the right.
You can also insert a Class Module
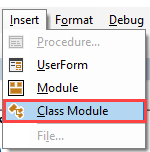
A class module is used to insert objects into your VBA project.

Adding a Reference to a VBA Project
You VBA project can also contain references to other VBA projects, or to other applications such as Word or Access. To view the references that are referred to in your VBA Project, click on the Tools menu, and then click on References.
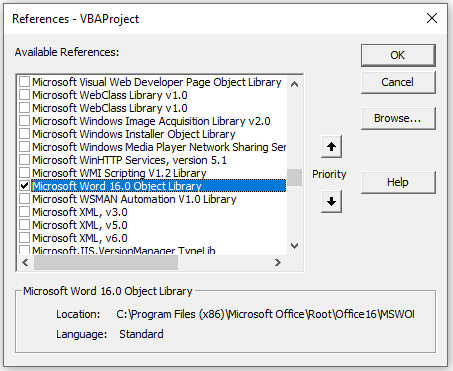
Should we need to add a new reference, we can select the object library in the References dialog box, or if the object library is not in the list, we can click the Browse button to find the relevant object library file on our PC.
VBA Coding Made Easy
Stop searching for VBA code online. Learn more about AutoMacro — A VBA Code Builder that allows beginners to code procedures from scratch with minimal coding knowledge and with many time-saving features for all users!

Learn More
VBA Project Properties
Each VBA Project has a number of properties associated with it. These can be customized to suit your needs.
In the Menu, select Tools and then select VBAProject Properties.
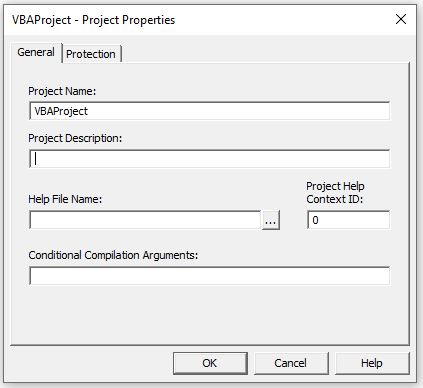
Renaming a Project
In the General Tab, change the name of the project to something more relevant than VBAProject , and add a description to describe your project. If you click the OK button, you will notice that the name of the VBA Project will change to reflect the new project name in the VBE Project Explorer.
Adding Project Security
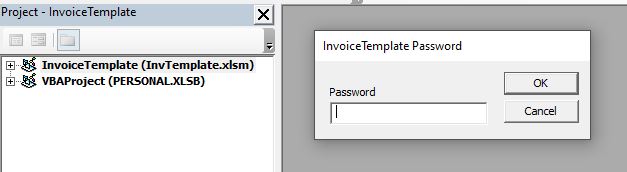
We can also password protect our VBA Project. This will prevent other users from being able to see any of your code and is most useful to protect intellectual property rights!
In the Protection tab, 1) make sure the check is on in the ‘Lock project for viewing’ and then 2) type in your password and confirm the password.
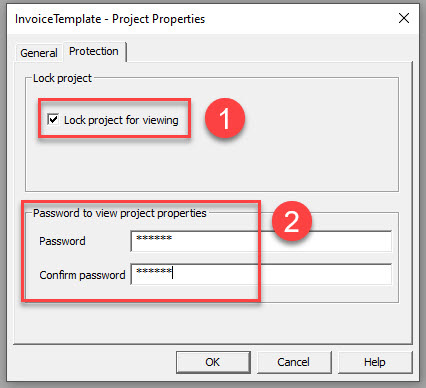
Now if you were to save your workbook, when you reopen the workbook and try to access the VBAProject, it will ask you for a password.
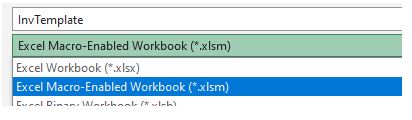
NOTE: when you save an Excel file that contains a VBA Project, it has to be saved as a macro enabled workbook (xlsm) to keep the VBA project. It cannot just be saved as an ordinary xlsx file.

Introduction
This is a tutorial about writing code in Excel spreadsheets using Visual Basic for Applications (VBA).
Excel is one of Microsoft’s most popular products. In 2016, the CEO of Microsoft said «Think about a world without Excel. That’s just impossible for me.” Well, maybe the world can’t think without Excel.
- In 1996, there were over 30 million users of Microsoft Excel (source).
- Today, there are an estimated 750 million users of Microsoft Excel. That’s a little more than the population of Europe and 25x more users than there were in 1996.
We’re one big happy family!
In this tutorial, you’ll learn about VBA and how to write code in an Excel spreadsheet using Visual Basic.
Prerequisites
You don’t need any prior programming experience to understand this tutorial. However, you will need:
- Basic to intermediate familiarity with Microsoft Excel
- If you want to follow along with the VBA examples in this article, you will need access to Microsoft Excel, preferably the latest version (2019) but Excel 2016 and Excel 2013 will work just fine.
- A willingness to try new things
Learning Objectives
Over the course of this article, you will learn:
- What VBA is
- Why you would use VBA
- How to get set up in Excel to write VBA
- How to solve some real-world problems with VBA
Important Concepts
Here are some important concepts that you should be familiar with to fully understand this tutorial.
Objects: Excel is object-oriented, which means everything is an object — the Excel window, the workbook, a sheet, a chart, a cell. VBA allows users to manipulate and perform actions with objects in Excel.
If you don’t have any experience with object-oriented programming and this is a brand new concept, take a second to let that sink in!
Procedures: a procedure is a chunk of VBA code, written in the Visual Basic Editor, that accomplishes a task. Sometimes, this is also referred to as a macro (more on macros below). There are two types of procedures:
- Subroutines: a group of VBA statements that performs one or more actions
- Functions: a group of VBA statements that performs one or more actions and returns one or more values
Note: you can have functions operating inside of subroutines. You’ll see later.
Macros: If you’ve spent any time learning more advanced Excel functionality, you’ve probably encountered the concept of a “macro.” Excel users can record macros, consisting of user commands/keystrokes/clicks, and play them back at lightning speed to accomplish repetitive tasks. Recorded macros generate VBA code, which you can then examine. It’s actually quite fun to record a simple macro and then look at the VBA code.
Please keep in mind that sometimes it may be easier and faster to record a macro rather than hand-code a VBA procedure.
For example, maybe you work in project management. Once a week, you have to turn a raw exported report from your project management system into a beautifully formatted, clean report for leadership. You need to format the names of the over-budget projects in bold red text. You could record the formatting changes as a macro and run that whenever you need to make the change.
What is VBA?
Visual Basic for Applications is a programming language developed by Microsoft. Each software program in the Microsoft Office suite is bundled with the VBA language at no extra cost. VBA allows Microsoft Office users to create small programs that operate within Microsoft Office software programs.
Think of VBA like a pizza oven within a restaurant. Excel is the restaurant. The kitchen comes with standard commercial appliances, like large refrigerators, stoves, and regular ole’ ovens — those are all of Excel’s standard features.
But what if you want to make wood-fired pizza? Can’t do that in a standard commercial baking oven. VBA is the pizza oven.

Yum.
Why use VBA in Excel?
Because wood-fired pizza is the best!
But seriously.
A lot of people spend a lot of time in Excel as a part of their jobs. Time in Excel moves differently, too. Depending on the circumstances, 10 minutes in Excel can feel like eternity if you’re not able to do what you need, or 10 hours can go by very quickly if everything is going great. Which is when you should ask yourself, why on earth am I spending 10 hours in Excel?
Sometimes, those days are inevitable. But if you’re spending 8-10 hours everyday in Excel doing repetitive tasks, repeating a lot of the same processes, trying to clean up after other users of the file, or even updating other files after changes are made to the Excel file, a VBA procedure just might be the solution for you.
You should consider using VBA if you need to:
- Automate repetitive tasks
- Create easy ways for users to interact with your spreadsheets
- Manipulate large amounts of data
Getting Set Up to Write VBA in Excel
Developer Tab
To write VBA, you’ll need to add the Developer tab to the ribbon, so you’ll see the ribbon like this.

To add the Developer tab to the ribbon:
- On the File tab, go to Options > Customize Ribbon.
- Under Customize the Ribbon and under Main Tabs, select the Developer check box.
After you show the tab, the Developer tab stays visible, unless you clear the check box or have to reinstall Excel. For more information, see Microsoft help documentation.
VBA Editor
Navigate to the Developer Tab, and click the Visual Basic button. A new window will pop up — this is the Visual Basic Editor. For the purposes of this tutorial, you just need to be familiar with the Project Explorer pane and the Property Properties pane.

Excel VBA Examples
First, let’s create a file for us to play around in.
- Open a new Excel file
- Save it as a macro-enabled workbook (. xlsm)
- Select the Developer tab
- Open the VBA Editor
Let’s rock and roll with some easy examples to get you writing code in a spreadsheet using Visual Basic.
Example #1: Display a Message when Users Open the Excel Workbook
In the VBA Editor, select Insert -> New Module
Write this code in the Module window (don’t paste!):
Sub Auto_Open()
MsgBox («Welcome to the XYZ Workbook.»)
End Sub
Save, close the workbook, and reopen the workbook. This dialog should display.
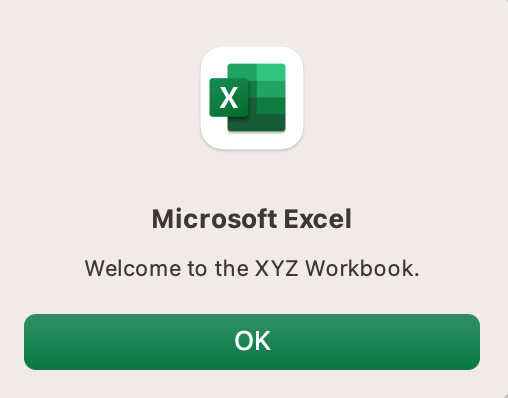
Ta da!
How is it doing that?
Depending on your familiarity with programming, you may have some guesses. It’s not particularly complex, but there’s quite a lot going on:
- Sub (short for “Subroutine): remember from the beginning, “a group of VBA statements that performs one or more actions.”
- Auto_Open: this is the specific subroutine. It automatically runs your code when the Excel file opens — this is the event that triggers the procedure. Auto_Open will only run when the workbook is opened manually; it will not run if the workbook is opened via code from another workbook (Workbook_Open will do that, learn more about the difference between the two).
- By default, a subroutine’s access is public. This means any other module can use this subroutine. All examples in this tutorial will be public subroutines. If needed, you can declare subroutines as private. This may be needed in some situations. Learn more about subroutine access modifiers.
- msgBox: this is a function — a group of VBA statements that performs one or more actions and returns a value. The returned value is the message “Welcome to the XYZ Workbook.”
In short, this is a simple subroutine that contains a function.
When could I use this?
Maybe you have a very important file that is accessed infrequently (say, once a quarter), but automatically updated daily by another VBA procedure. When it is accessed, it’s by many people in multiple departments, all across the company.
- Problem: Most of the time when users access the file, they are confused about the purpose of this file (why it exists), how it is updated so often, who maintains it, and how they should interact with it. New hires always have tons of questions, and you have to field these questions over and over and over again.
- Solution: create a user message that contains a concise answer to each of these frequently answered questions.
Real World Examples
- Use the MsgBox function to display a message when there is any event: user closes an Excel workbook, user prints, a new sheet is added to the workbook, etc.
- Use the MsgBox function to display a message when a user needs to fulfill a condition before closing an Excel workbook
- Use the InputBox function to get information from the user
Example #2: Allow User to Execute another Procedure
In the VBA Editor, select Insert -> New Module
Write this code in the Module window (don’t paste!):
Sub UserReportQuery()
Dim UserInput As Long
Dim Answer As Integer
UserInput = vbYesNo
Answer = MsgBox(«Process the XYZ Report?», UserInput)
If Answer = vbYes Then ProcessReport
End Sub
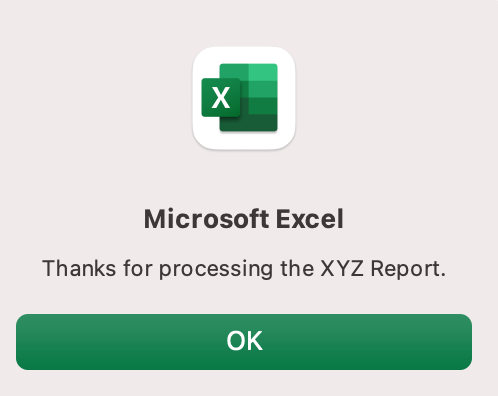
Sub ProcessReport()
MsgBox («Thanks for processing the XYZ Report.»)
End Sub
Save and navigate back to the Developer tab of Excel and select the “Button” option. Click on a cell and assign the UserReportQuery macro to the button.
Now click the button. This message should display:
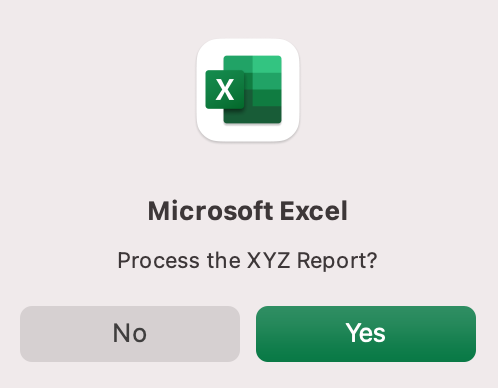
Click “yes” or hit Enter.
Once again, tada!
Please note that the secondary subroutine, ProcessReport, could be anything. I’ll demonstrate more possibilities in example #3. But first…
How is it doing that?
This example builds on the previous example and has quite a few new elements. Let’s go over the new stuff:
- Dim UserInput As Long: Dim is short for “dimension” and allows you to declare variable names. In this case, UserInput is the variable name and Long is the data type. In plain English, this line means “Here’s a variable called “UserInput”, and it’s a Long variable type.”
- Dim Answer As Integer: declares another variable called “Answer,” with a data type of Integer. Learn more about data types here.
- UserInput = vbYesNo: assigns a value to the variable. In this case, vbYesNo, which displays Yes and No buttons. There are many button types, learn more here.
- Answer = MsgBox(“Process the XYZ Report?”, UserInput): assigns the value of the variable Answer to be a MsgBox function and the UserInput variable. Yes, a variable within a variable.
- If Answer = vbYes Then ProcessReport: this is an “If statement,” a conditional statement, which allows us to say if x is true, then do y. In this case, if the user has selected “Yes,” then execute the ProcessReport subroutine.
When could I use this?
This could be used in many, many ways. The value and versatility of this functionality is more so defined by what the secondary subroutine does.
For example, maybe you have a file that is used to generate 3 different weekly reports. These reports are formatted in dramatically different ways.
- Problem: Each time one of these reports needs to be generated, a user opens the file and changes formatting and charts; so on and so forth. This file is being edited extensively at least 3 times per week, and it takes at least 30 minutes each time it’s edited.
- Solution: create 1 button per report type, which automatically reformats the necessary components of the reports and generates the necessary charts.
Real World Examples
- Create a dialog box for user to automatically populate certain information across multiple sheets
- Use the InputBox function to get information from the user, which is then populated across multiple sheets
Example #3: Add Numbers to a Range with a For-Next Loop
For loops are very useful if you need to perform repetitive tasks on a specific range of values — arrays or cell ranges. In plain English, a loop says “for each x, do y.”
In the VBA Editor, select Insert -> New Module
Write this code in the Module window (don’t paste!):
Sub LoopExample()
Dim X As Integer
For X = 1 To 100
Range(«A» & X).Value = X
Next X
End Sub
Save and navigate back to the Developer tab of Excel and select the Macros button. Run the LoopExample macro.
This should happen:
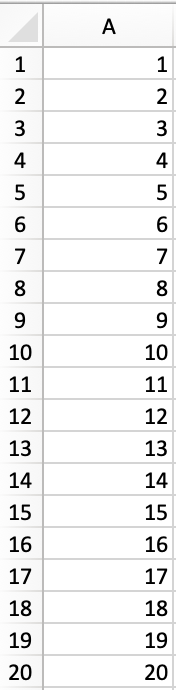
Etc, until the 100th row.
How is it doing that?
- Dim X As Integer: declares the variable X as a data type of Integer.
- For X = 1 To 100: this is the start of the For loop. Simply put, it tells the loop to keep repeating until X = 100. X is the counter. The loop will keep executing until X = 100, execute one last time, and then stop.
- Range(«A» & X).Value = X: this declares the range of the loop and what to put in that range. Since X = 1 initially, the first cell will be A1, at which point the loop will put X into that cell.
- Next X: this tells the loop to run again
When could I use this?
The For-Next loop is one of the most powerful functionalities of VBA; there are numerous potential use cases. This is a more complex example that would require multiple layers of logic, but it communicates the world of possibilities in For-Next loops.
Maybe you have a list of all products sold at your bakery in Column A, the type of product in Column B (cakes, donuts, or muffins), the cost of ingredients in Column C, and the market average cost of each product type in another sheet.
You need to figure out what should be the retail price of each product. You’re thinking it should be the cost of ingredients plus 20%, but also 1.2% under market average if possible. A For-Next loop would allow you to do this type of calculation.
Real World Examples
- Use a loop with a nested if statement to add specific values to a separate array only if they meet certain conditions
- Perform mathematical calculations on each value in a range, e.g. calculate additional charges and add them to the value
- Loop through each character in a string and extract all numbers
- Randomly select a number of values from an array
Conclusion
Now that we’ve talked about pizza and muffins and oh-yeah, how to write VBA code in Excel spreadsheets, let’s do a learning check. See if you can answer these questions.
- What is VBA?
- How do I get set up to start using VBA in Excel?
- Why and when would you use VBA?
- What are some problems I could solve with VBA?
If you have a fair idea of how to you could answer these questions, then this was successful.
Whether you’re an occasional user or a power user, I hope this tutorial provided useful information about what can be accomplished with just a bit of code in your Excel spreadsheets.
Happy coding!
Learning Resources
- Excel VBA Programming for Dummies, John Walkenbach
- Get Started with VBA, Microsoft Documentation
- Learning VBA in Excel, Lynda
A bit about me
I’m Chloe Tucker, an artist and developer in Portland, Oregon. As a former educator, I’m continuously searching for the intersection of learning and teaching, or technology and art. Reach out to me on Twitter @_chloetucker and check out my website at chloe.dev.
Learn to code for free. freeCodeCamp’s open source curriculum has helped more than 40,000 people get jobs as developers. Get started
В этой главе даётся очень краткий обзор редактора Visual Basic в Excel. Если Вы любознательный читатель и хотите узнать еще больше информации о редакторе, то при желании без проблем найдете ресурсы с более подробным описанием.
Содержание
- Запуск редактора Visual Basic
- Окна редактора Visual Basic
- Окно проекта (Project)
- Окно кода (Code)
- Окно свойств (Properties)
- Окно отладчика (Immediate)
- Окно переменных (Locals)
- Окно отслеживания (Watches)
Запуск редактора Visual Basic
Простейший способ запустить редактор Visual Basic в Excel – нажать комбинацию клавиш Alt+F11 (то есть нажать клавишу Alt и, удерживая её, нажать клавишу F11). После этого откроется окно редактора Visual Basic, как показано на картинке ниже. Имейте ввиду, что окно Excel остается открытым и находится позади окна редактора.
Окна редактора Visual Basic
В процессе работы в редакторе Visual Basic в Excel могут быть открыты различные окна. Управление окнами осуществляется в меню View, которое находится в верхней части окна редактора VBA. Ниже дано описание отдельных окон.
Окно проекта (Project)
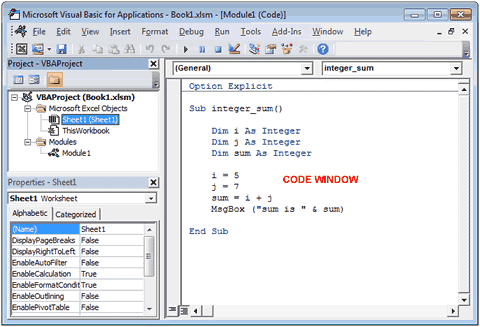
Окно Project открывается в левой части редактора VBA (показано на картинке выше). В этом окне для каждой открытой рабочей книги создаётся проект VBA (VBA Project). Проект VBA – это набор всех объектов и модулей VBA, привязанных к текущей книге. Изначально в него входят:
- Объект ЭтаКнига (ThisWorkbook), привязанный к книге Excel;
- Объекты Лист (Sheet), привязанные к каждому листу текущей рабочей книги Excel.

Самостоятельно в проект можно добавить объекты Userform, Module и Class Module. Если Вы посмотрите на картинку выше, то увидите, что в проект VBA для книги Book1.xlsm добавлен объект Module с названием Module1.
Вот как можно создать новый объект Userform, Module или Class Module:
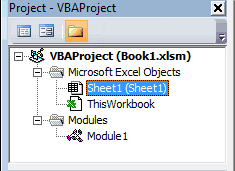
- В окне Project выберите рабочую книгу, в которую нужно добавить объект, и кликните по ней правой кнопкой мыши.
- В появившемся меню кликните Insert и в раскрывшемся меню выберите Userform, Module или Class Module.
Для каждого из описанных выше объектов предусмотрено специальное окно, в котором будет создаваться и храниться новый код VBA. Порядок при этом такой:
- Код, который относится к рабочей книге, должен быть введён в соответствующий объект ЭтаКнига (ThisWorkbook);
- Код, который относится к рабочему листу, должен быть введён в соответствующий объект Лист (Sheet);
- Код более общего характера должен быть введён в Module;
- Код для нового объекта должен быть введён в Class Module;
- Если нужно создать диалоговое окно для взаимодействия с пользователем, то можно использовать Userform.
Окно кода (Code)
Двойной щелчок мышью по любому объекту в окне Project открывает соответствующее окно Code, предназначенное для ввода кода VBA с клавиатуры. На одном из приведённых выше рисунков показано окно кода для Module1.
По мере ввода кода VBA в окно Code, редактор Visual Basic следит за правильностью ввода, ищет ошибки в коде и выделяет код, который требует исправления.
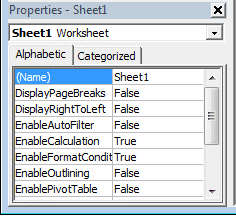
Окно свойств (Properties)
В окне Properties перечислены свойства объекта, который в момент создания (не в процессе выполнения программы) выделен в окне проекта. Эти свойства могут быть различными в зависимости от типа выделенного объекта (лист, книга, модуль и другие).
Окно отладчика (Immediate)
Окно Immediate можно отобразить в редакторе Visual Basic через меню View > Immediate Window или нажатием комбинации клавиш Ctrl+G. Это окно помогает при отладке кода. Оно выполняет роль области вывода для отладки выражений и позволяет вычислять отдельные выражения или выполнять строки кода по одной.
Например, введите выражение «?j» и нажмите Enter – в результате будет выведено текущее значение переменной j.

Окно переменных (Locals)
Чтобы открыть окно Locals, нажмите Locals Window в меню View редактора Visual Basic. В этом окне отображаются все переменные, объявленные в текущей процедуре. Окно делится на столбцы, в которых содержатся имя, значение и тип каждой переменной, и эта информация обновляется автоматически в ходе выполнения программы. Окно Locals очень полезно при отладке кода VBA.

Окно отслеживания (Watches)
Окно Watches также очень помогает при отладке кода VBA, так как в нём можно увидеть значение, тип и контекст любого отслеживаемого выражения, которое задаст пользователь. Чтобы открыть окно Watches, нажмите Watch Window в меню View редактора Visual Basic. Также окно Watches будет открыто автоматически, если задать отслеживаемое выражение.
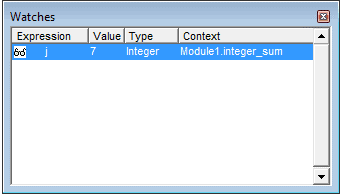
Чтобы задать отслеживаемое выражение, нужно:
- Выделить выражение в редактируемом коде VBA.
- В меню Debug редактора VBA нажать Quick Watch.
- Нажать Add.
Кроме рассмотренных, в меню редактора Visual Basic в Excel существует ещё множество параметров и команд, используемых при создании, выполнении и отладке кода VBA.
Оцените качество статьи. Нам важно ваше мнение: