
Excel Sheet in VB.net – VB.net makes it possible for the COM object model of Microsoft Excel 2010 to work with your application.
To use this interoperability in your application, you need to add the namespace Microsoft.Office.Interop.Excel to your Windows Form Application.
Today I will teach you about How to Create an Excel File Using VB.net. Create an Excel File Using Visual Basic.Net provides support for interoperability between the COM object model of Microsoft Excel and your application.
Table of contents
- What is Visual Basic’s purpose?
- What is Excel Sheet in VB.net?
- How to Create an Excel File Using VB.net
- Program Output:
- Download the Source Code:
- Summary
- Readers might read also:
- Inquiries
We have learned how to use the Regular Expression in VB.net in the previous lesson. In this lesson we shall learn How To Write a Program for Excel Sheet in VB.net.
What is Visual Basic’s purpose?
The third-generation programming language was created to aid developers in the creation of Windows applications. It has a programming environment that allows programmers to write code in.exe or executable files.
They can also utilize it to create in-house front-end solutions for interacting with huge databases. Because the language allows for continuing changes, you can keep coding and revising your work as needed.
However, there are some limits to the Microsoft Visual Basic download. If you want to make applications that take a long time to process, this software isn’t for you.
That implies you won’t be able to use VB to create games or large apps because the system’s graphic interface requires a lot of memory and space.
Furthermore, the language is limited to Microsoft and does not support other operating systems.
In Excel documents, a Worksheet is a group of cells that are set up in rows and columns. It is the part of the computer you use to enter data.
Each worksheet has 1048576 rows and 16384 columns, making it a big table that you can use to organize information.
So let’s get started:
How to Create an Excel File Using VB.net
Steps in Creating an Excel Application from VB.net.
Time needed: 5 minutes.
Creating an Excel Application from VB.net
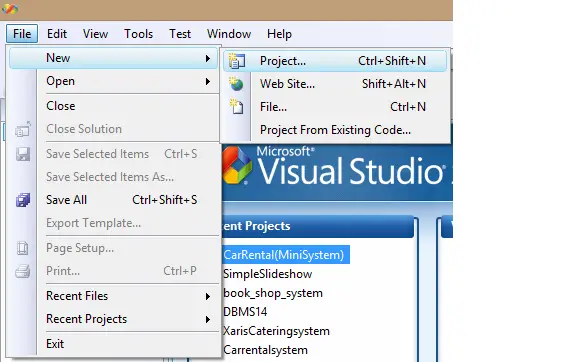
- Step 1: Create New Project
First is open the Visual Basic, Select File on the menu, then click New and create a new project.

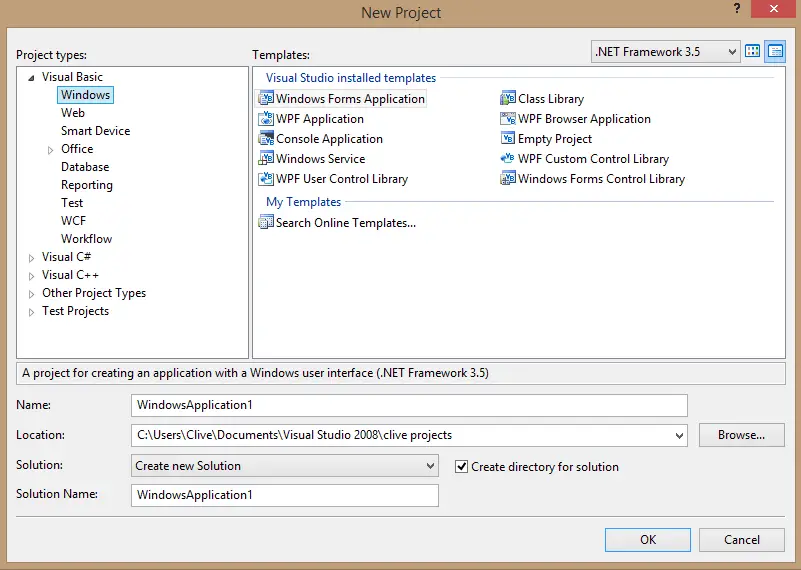
- Step 2: Name your Project
Then a New Project Dialog will appear. You can rename your project, depending on what you like to name it. After that click OK

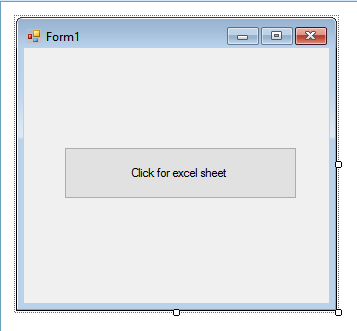
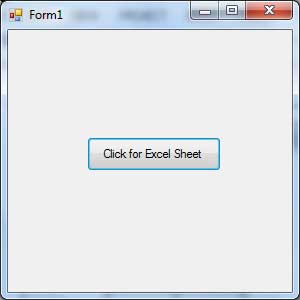
- Step 3: Design your Windows Form
Then design your form like this just like what I’ve shown you below
Add a Button from the toolbox.
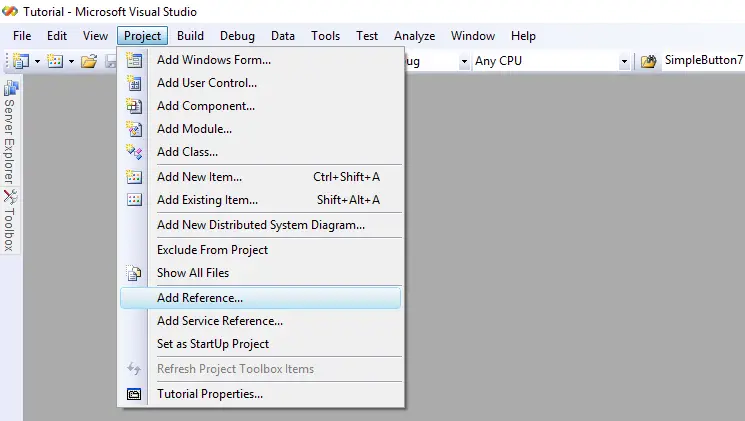
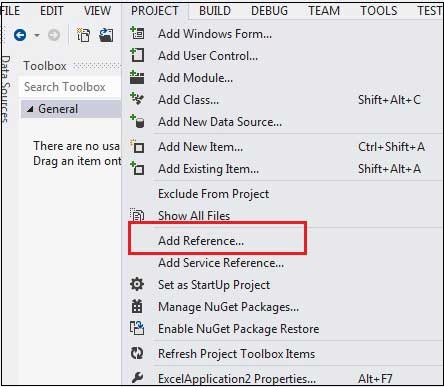
- Step 4: Add Reference
After that, Add a Reference to Microsoft Excel Object Library to your project.
To do this:
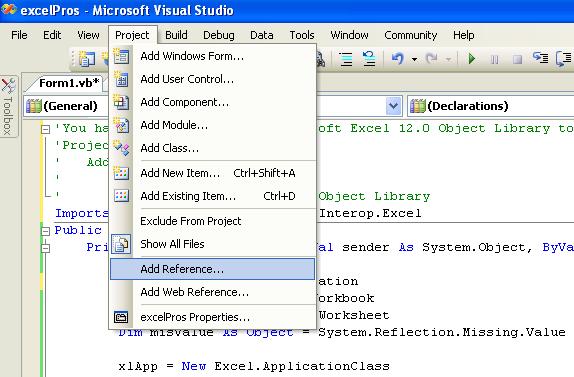
*Select add reference from the project menu.
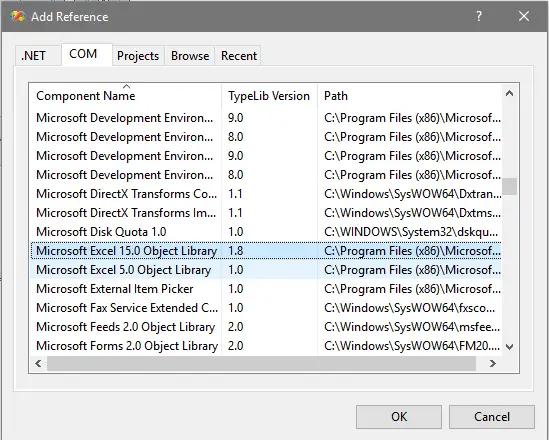
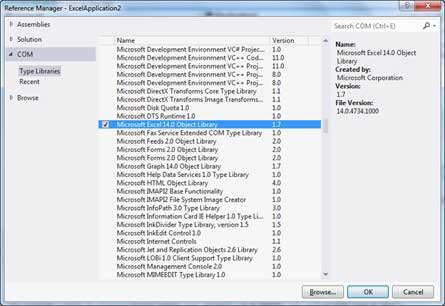
- Step 5: Locate Microsoft Excel Object Library
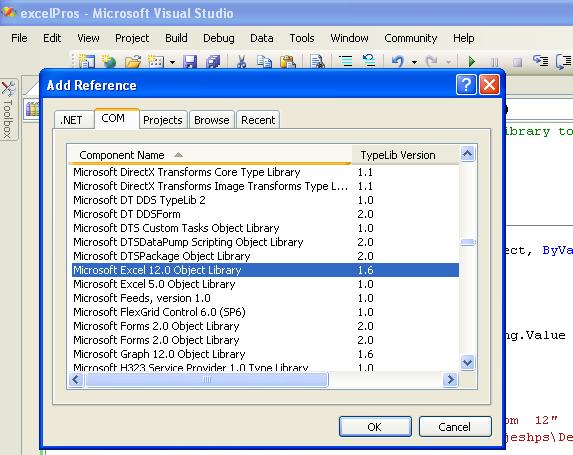
On the COM tab, Locate Microsoft Excel Object Library and then click select.

- Step 6: Add Following Code
Double click the code window and add this following code to the top of Public Class Form1.
Imports Excel = Microsoft.Office.Interop.Excel
- Step 7: Double click the Button and add this following code
Then, Go back to Design View and Double click the Button and add this following code.
Private Sub Button1_Click(ByVal sender As System.Object, ByVal e As System.EventArgs) Handles Button1.Click
Dim appXL As Excel.Application
Dim wbXl As Excel.Workbook
Dim shXL As Excel.Worksheet
Dim raXL As Excel.Range
appXL = CreateObject(“Excel.Application”)
appXL.Visible = True
wbXl = appXL.Workbooks.Add
shXL = wbXl.ActiveSheet
shXL.Cells(1, 1).Value = “FIRST NAME”
shXL.Cells(1, 2).Value = “LAST NAME”
shXL.Cells(1, 3).Value = “FULL NAME”
shXL.Cells(1, 4).Value = “SUBJECTS”
With shXL.Range(“A1”, “D1”)
.Font.Bold = True
.VerticalAlignment = Excel.XlVAlign.xlVAlignCenter
End With
Dim pupils(5, 2) As String
pupils(0, 0) = “Markfil”
pupils(0, 1) = “Baldomero”
pupils(1, 0) = “Juvy”
pupils(1, 1) = “Aral”
pupils(2, 0) = “Andrew”
pupils(2, 1) = “Braza”
pupils(3, 0) = “Carlie”
pupils(3, 1) = “Golez”
pupils(4, 0) = “Jesriel”
pupils(4, 1) = “Agita”
shXL.Range(“A2”, “B6”).Value = pupils
raXL = shXL.Range(“C2”, “C6”)
raXL.Formula = “=A2 & “” “” & B2″
With shXL
.Cells(2, 4).Value = “English”
.Cells(3, 4).Value = “Algebra”
.Cells(4, 4).Value = “Physics”
.Cells(5, 4).Value = “Trigonometry”
.Cells(6, 4).Value = “Theology”
End With
raXL = shXL.Range(“A1”, “D1”)
raXL.EntireColumn.AutoFit()
appXL.Visible = True
appXL.UserControl = True
raXL = Nothing
shXL = Nothing
wbXl = Nothing
appXL.Quit()
appXL = Nothing
Exit Sub
Err_Handler:
MsgBox(Err.Description, vbCritical, “Error: ” & Err.Number)
End Sub - Step 8: Click F5 to run the program.
Finally, Click F5 to run the program.
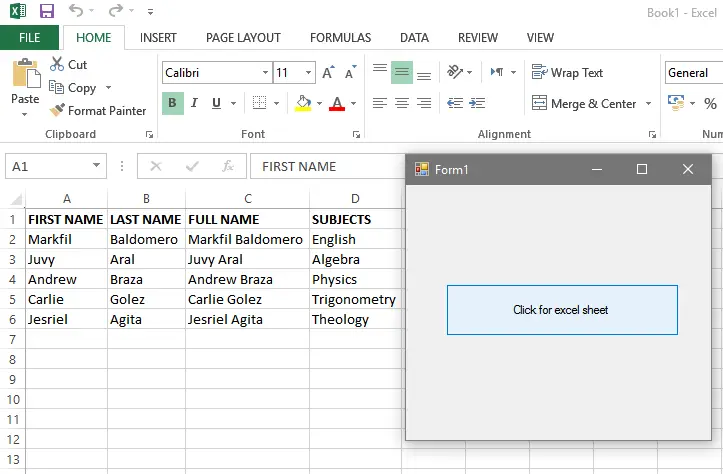
Program Output:
Download the Source Code:
Summary
This article shows how to make an Excel sheet and how to fill a range of cells with a number of different values. This article also shows how to get a range of cells as an array of cells.
Readers might read also:
- How to Get Total Value in DataGridview Using VB.Net
- How to Connect Visual Basic.Net to MS Access Database
Inquiries
If you have any questions or suggestions about this Excel Sheet in VB.NET, please let me know just drop a comment below of send me a message on our contact page.
PREVIOUS

- Remove From My Forums
-
Question
-
User-748031297 posted
VWD 2008 Express. Visual Basic.
Is it possible to build an Excel workbook from VB code behind an aspx page. What do I need to do? Can anyone provide a code sample? Thanks.
Answers
-
User-748031297 posted
I needed to use the following to get the Excel 2003 library:
Imports Microsoft.Office.Interop.Owc11
and instead of:
xlApp = New Excel.ApplicationClass (Which seems to create an Excel 2007 file)
I used:
xlApp = New Excel.Application (Which creates an Excel 2003 file)
So the whole thing is:
Imports Excel = Microsoft.Office.Interop.Owc11
Public Class Form1
    Private Sub Button1_Click(ByVal sender As System.Object,_
	 ByVal e As System.EventArgs) Handles Button1.Click

        Dim xlApp As Excel.Application
        Dim xlWorkBook As Excel.Workbook
        Dim xlWorkSheet As Excel.Worksheet
        Dim misValue As Object = System.Reflection.Missing.Value

        xlApp = New Excel.Application
        xlWorkBook = xlApp.Workbooks.Add(misValue)
        xlWorkSheet = xlWorkBook.Sheets("sheet1")
        xlWorkSheet.Cells(1, 1) = "http://vb.net-informations.com"
        xlWorkSheet.SaveAs("C:vbexcel.xlsx")

        xlWorkBook.Close()
        xlApp.Quit()

        releaseObject(xlApp)
        releaseObject(xlWorkBook)
        releaseObject(xlWorkSheet)

        MsgBox("Excel file created , you can find the file c:")
    End Sub

    Private Sub releaseObject(ByVal obj As Object)
        Try
            System.Runtime.InteropServices.Marshal.ReleaseComObject(obj)
            obj = Nothing
        Catch ex As Exception
            obj = Nothing
        Finally
            GC.Collect()
        End Try
    End Sub

End Class
-
Marked as answer by
Thursday, October 7, 2021 12:00 AM
-
Marked as answer by
|
kritjara 65 / 56 / 14 Регистрация: 22.10.2012 Сообщений: 298 |
||||
|
1 |
||||
|
29.08.2016, 10:32. Показов 5745. Ответов 13 Метки нет (Все метки)
на данный момент использую следующий код для создания xls файла и последующего его заполнения
но этот вариант плох тем что мне необходимо порой заполнять до 3000 страниц можно ли создать файл так, чтобы при первом его открытии ячейки уже были заполнены?
1 |

|
Модератор
3878 / 3200 / 482 Регистрация: 27.01.2014 Сообщений: 5,842 |
|
|
29.08.2016, 11:16 |
2 |
|
а если не создавать а хранить шаблон в ресурсах.
0 |
|
kritjara 65 / 56 / 14 Регистрация: 22.10.2012 Сообщений: 298 |
||||
|
29.08.2016, 14:26 [ТС] |
3 |
|||
|
файл — это счета к оплате я рассматривал вариант с сохранением данных в буфере обмена, разделял ячейки через табуляцию, потом вставлял в отформатированный пустой excel Добавлено через 1 час 45 минут
выдается следующаи ошибка
0 |
|
Модератор
3878 / 3200 / 482 Регистрация: 27.01.2014 Сообщений: 5,842 |
|
|
29.08.2016, 14:29 |
4 |
|
из вашего разъяснения я нн понял структуры самого файла xls… вы б показали пример. Добавлено через 2 минуты
0 |
|
65 / 56 / 14 Регистрация: 22.10.2012 Сообщений: 298 |
|
|
29.08.2016, 14:40 [ТС] |
5 |
|
честно скажу, я не профи в программировании, самоучка и неопытен
Если вы используете позднее связывание, то типы переменных не нужно ууазывать, дабы не ошибится. если можно, то в виде кода это показать и вот файл, который формируетсяКнига.xls
0 |

|
Yury Komar Модератор
3878 / 3200 / 482 Регистрация: 27.01.2014 Сообщений: 5,842 |
||||
|
29.08.2016, 16:09 |
6 |
|||
|
не объявляя переменных
0 |
|
Sklifosofsky 1001 / 857 / 203 Регистрация: 29.09.2015 Сообщений: 982 |
||||
|
29.08.2016, 20:37 |
7 |
|||
|
Вот есть некоторые нюансы по производительности при заполнении:
Попробуйте по экспериментировать с последним вариантом. Насчет стилей подсказать не могу
2 |
|
4278 / 3417 / 827 Регистрация: 02.02.2013 Сообщений: 3,307 Записей в блоге: 2 |
|||||||||||||||
|
03.09.2016, 01:02 |
8 |
||||||||||||||
|
Решил проанализировать скорость формирования документа, который представляет собой список счетов (вариант ТС). Выделяется три блока счетов, которые заполняются из таблицы с базовой информацией и копируются в окончательный документ. Рассмотрены два варианта:
Замечания:
3 |
|
65 / 56 / 14 Регистрация: 22.10.2012 Сообщений: 298 |
|
|
03.09.2016, 16:01 [ТС] |
9 |
|
интересный вариант заполнения тут же остается вопрос, каким способом вы определяли как должен выглядеть счет? и глядя на тот факт что 3000 листов формируются за 5 минут придется подстраиваться под именно этот вариант
0 |
|
4278 / 3417 / 827 Регистрация: 02.02.2013 Сообщений: 3,307 Записей в блоге: 2 |
|
|
03.09.2016, 18:11 |
10 |
|
kritjara,
0 |
|
65 / 56 / 14 Регистрация: 22.10.2012 Сообщений: 298 |
|
|
04.09.2016, 10:09 [ТС] |
11 |
|
ovva, правильно ли я вас понял? Добавлено через 9 минут
4. Не понял, о какой встроенной в VS библиотеке идет речь. Microsoft.Office.Interop.Excel не буду загадывать хуже или лучше она чем EPPlus, но ваша разница во времени заполнения xls и xlsx может быть изза разницы форматов, одни и те же табличные данные в разных форматах занимают совершенно разное место на диске какие явные плюсы об этой библиотеке вы можете привести помимо того что установка офиса не требуется?
0 |
|
Модератор
3878 / 3200 / 482 Регистрация: 27.01.2014 Сообщений: 5,842 |
|
|
04.09.2016, 10:23 |
12 |
|
kritjara, Microsoft.Office.Interop.Excel это не встроенная в студию библиотека, и она не работает с самим файлом, а работает с объектом программы Excel, а уже эксель работает с вашим файлом, тоесть вы передаете экселю команды, а он уже их выполняет, а вот EPPlus работает с самим файлом, от этого и скорость, будто вы напрямую читаете строки файла и так далее.
1 |
|
4278 / 3417 / 827 Регистрация: 02.02.2013 Сообщений: 3,307 Записей в блоге: 2 |
|
|
04.09.2016, 13:14 |
13 |
|
kritjara,
1 |
|
174 / 64 / 13 Регистрация: 22.12.2015 Сообщений: 2,648 |
|
|
04.12.2016, 13:40 |
14 |
|
kritjara, я попробовал создать xls файл указанным Вами способом, но у меня ничего не получилось.
0 |

Содержание
- How to create Excel file in VB.Net
- Excel Library
- How to use COM Interop to Create an Excel Spreadsheet
- How to create an Excel Document Programmatically
- Save Excel file (SaveAs() method)t
- How to properly clean up Excel interop objects
- VB.Net – Excel Sheet
- Создание приложения Excel из VB.Net
- Excel Sheet in VB.net – How to Create an Excel File Using VB.net
- Table of contents
- What is Visual Basic’s purpose?
- What is Excel Sheet in VB.net?
- How to Create an Excel File Using VB.net
- Program Output:
- Download the Source Code:
- Summary
- Vb net создать файл excel
- Answered by:
- Question
- Answers
- All replies
- VB.Net — Excel Sheet
- Creating an Excel Application from VB.Net
How to create Excel file in VB.Net

Automation to Excel allows you to perform actions such as creating a new workbook, adding data to the workbook, or creating charts etc. The following VB.Net code example shows how to use COM interop to create an Excel file. Before going to create new Excel file programmatically in VB.Net, you must have Excel installed on your system for this code to run properly.
Excel Library
In order to access the object model from Visual VB.NET, you have to add the Microsoft Excel 12.0 Object Library to your current project.
Create a new project and add a Command Button to your VB.Net Form.
How to use COM Interop to Create an Excel Spreadsheet
Form the following images you can find how to add Excel reference library in your VB.Net project.
Select reference dialogue from Project menu.
How to create an Excel Document Programmatically
First we have to initialize the Excel application Object in your VB.Net application.
Before creating new Excel Workbook, you should check whether Excel is installed in your system.
Then create new Workbook
After creating the new Workbook, next step is to write content to worksheet
In the above code we write the data in the Sheet1, If you want to write data in sheet 2 then you should code like this.
Save Excel file (SaveAs() method)t
After write the content to the cell, next step is to save the excel file in your system.
How to properly clean up Excel interop objects

Finally, we have to properly clean up Excel interop objects or release Excel COM objects. Here we write a function to clean up the Excel Application, Excel Workbook and Excel Worksheet Objects.
Creating an Excel Spreadsheet Programmatically
Источник
VB.Net – Excel Sheet
VB.Net обеспечивает поддержку взаимодействия между объектной моделью COM Microsoft Excel 2010 и вашим приложением.
Чтобы использовать эту совместимость в вашем приложении, вам необходимо импортировать пространство имен Microsoft.Office.Interop.Excel в ваше приложение Windows Form.
Создание приложения Excel из VB.Net
Давайте начнем с создания приложения Window Forms, выполнив следующие шаги в Microsoft Visual Studio: Файл → Новый проект → Приложения Windows Forms.
Наконец, нажмите OK, Microsoft Visual Studio создаст ваш проект и отобразит следующую форму Form1 .
Вставьте элемент управления Button1 в форму.
Добавьте ссылку на библиотеку объектов Microsoft Excel в свой проект. Для этого –
Выберите Добавить ссылку в меню проекта.
Выберите Добавить ссылку в меню проекта.
На вкладке COM найдите библиотеку объектов Microsoft Excel и нажмите «Выбрать».
На вкладке COM найдите библиотеку объектов Microsoft Excel и нажмите «Выбрать».

Дважды щелкните окно кода и заполните событие Click для Button1, как показано ниже.
Когда приведенный выше код будет выполнен и запущен с использованием кнопки « Пуск» , доступной на панели инструментов Microsoft Visual Studio, появится следующее окно:

При нажатии на кнопку отобразится следующий лист Excel. Вам будет предложено сохранить рабочую книгу.
Источник
Excel Sheet in VB.net – How to Create an Excel File Using VB.net
Excel Sheet in VB.net – VB.net makes it possible for the COM object model of Microsoft Excel 2010 to work with your application.
To use this interoperability in your application, you need to add the namespace Microsoft.Office.Interop.Excel to your Windows Form Application.
Today I will teach you about How to Create an Excel File Using VB.net. Create an Excel File Using Visual Basic.Net provides support for interoperability between the COM object model of Microsoft Excel and your application.
Table of contents
We have learned how to use the Regular Expression in VB.net in the previous lesson. In this lesson we shall learn How To Write a Program for Excel Sheet in VB.net.
What is Visual Basic’s purpose?
The third-generation programming language was created to aid developers in the creation of Windows applications. It has a programming environment that allows programmers to write code in.exe or executable files.
They can also utilize it to create in-house front-end solutions for interacting with huge databases. Because the language allows for continuing changes, you can keep coding and revising your work as needed.
However, there are some limits to the Microsoft Visual Basic download. If you want to make applications that take a long time to process, this software isn’t for you.
That implies you won’t be able to use VB to create games or large apps because the system’s graphic interface requires a lot of memory and space.
Furthermore, the language is limited to Microsoft and does not support other operating systems.
What is Excel Sheet in VB.net?
In Excel documents, a Worksheet is a group of cells that are set up in rows and columns. It is the part of the computer you use to enter data.
Each worksheet has 1048576 rows and 16384 columns, making it a big table that you can use to organize information.
So let’s get started:
How to Create an Excel File Using VB.net
Steps in Creating an Excel Application from VB.net.
Time needed: 5 minutes.
Creating an Excel Application from VB.net
- Step 1: Create New Project
First is open the Visual Basic, Select File on the menu, then click New and create a new project.
Step 2: Name your Project
Then a New Project Dialog will appear. You can rename your project, depending on what you like to name it. After that click OK
Step 3: Design your Windows Form
Then design your form like this just like what I’ve shown you below
Add a Button from the toolbox.
Step 4: Add Reference
After that, Add a Reference to Microsoft Excel Object Library to your project.
To do this:
*Select add reference from the project menu.
Step 5: Locate Microsoft Excel Object Library
On the COM tab, Locate Microsoft Excel Object Library and then click select.
Step 6: Add Following Code
Double click the code window and add this following code to the top of Public Class Form1.
Imports Excel = Microsoft.Office.Interop.Excel
Step 7: Double click the Button and add this following code
Then, Go back to Design View and Double click the Button and add this following code.
Private Sub Button1_Click(ByVal sender As System.Object, ByVal e As System.EventArgs) Handles Button1.Click
Dim appXL As Excel.Application
Dim wbXl As Excel.Workbook
Dim shXL As Excel.Worksheet
Dim raXL As Excel.Range
appXL = CreateObject(“Excel.Application”)
appXL.Visible = True
wbXl = appXL.Workbooks.Add
shXL = wbXl.ActiveSheet
shXL.Cells(1, 1).Value = “FIRST NAME”
shXL.Cells(1, 2).Value = “LAST NAME”
shXL.Cells(1, 3).Value = “FULL NAME”
shXL.Cells(1, 4).Value = “SUBJECTS”
With shXL.Range(“A1”, “D1”)
.Font.Bold = True
.VerticalAlignment = Excel.XlVAlign.xlVAlignCenter
End With
Dim pupils(5, 2) As String
pupils(0, 0) = “Markfil”
pupils(0, 1) = “Baldomero”
pupils(1, 0) = “Juvy”
pupils(1, 1) = “Aral”
pupils(2, 0) = “Andrew”
pupils(2, 1) = “Braza”
pupils(3, 0) = “Carlie”
pupils(3, 1) = “Golez”
pupils(4, 0) = “Jesriel”
pupils(4, 1) = “Agita”
shXL.Range(“A2”, “B6”).Value = pupils
raXL = shXL.Range(“C2”, “C6”)
raXL.Formula = “=A2 & “” “” & B2″
With shXL
.Cells(2, 4).Value = “English”
.Cells(3, 4).Value = “Algebra”
.Cells(4, 4).Value = “Physics”
.Cells(5, 4).Value = “Trigonometry”
.Cells(6, 4).Value = “Theology”
End With
raXL = shXL.Range(“A1”, “D1”)
raXL.EntireColumn.AutoFit()
appXL.Visible = True
appXL.UserControl = True
raXL = Nothing
shXL = Nothing
wbXl = Nothing
appXL.Quit()
appXL = Nothing
Exit Sub
Err_Handler:
MsgBox(Err.Description, vbCritical, “Error: ” & Err.Number)
End Sub
Step 8: Click F5 to run the program.
Finally, Click F5 to run the program.
Program Output:
Download the Source Code:
Summary
This article shows how to make an Excel sheet and how to fill a range of cells with a number of different values. This article also shows how to get a range of cells as an array of cells.
Источник
Vb net создать файл excel
![]()
Answered by:
![]()
Question
![]()
![]()
VWD 2008 Express. Visual Basic.
Is it possible to build an Excel workbook from VB code behind an aspx page. What do I need to do? Can anyone provide a code sample? Thanks.
Answers
![]()
![]()
I needed to use the following to get the Excel 2003 library:
xlApp = New Excel.ApplicationClass (Which seems to create an Excel 2007 file)
xlApp = New Excel.Application (Which creates an Excel 2003 file)
So the whole thing is:
![]()
![]()
Not knowing your exact needs, this code sample from ASPNet101.com shows how to export from a Gridview to an Excel file
![]()
![]()
![]()
![]()
Thanks for the reply. What I need and want to do is to build an Excel file NOT from a GridView control, but from data I am generating programmatically. I need to be able to create the Excel file, and populate some of its cells with data I have programmatically. I know how to create a regular text file (>CSV) from my VB code behind, but I really need to create a true Excel file. Any other ideas? Thnaks.
![]()
![]()
I am trying to work with the code example to which you refer. It produces an Excel worksheet, but the first row is blank and then row 2 has my headings (field names top be used in a mail merge). Why would a blank row be placed before the actual header row? How can I get rid of it? Thanks for any additional help.
![]()
![]()
There are three approaches can export to excel file, approach 2 and 3 are helpful to you.
1.One is using GridView that is bound on DataSet from database. And export GridView to Excel File. http://forums.asp.net/t/1197704/2076903.aspx .
2.Another approach is more flexible: Write an Excel file directly via the data in DataSet. http://forums.asp.net/p/1222903/2189537.aspx .
3.As to export the data to existing excel file or write data into specific cell of excel file, you can use Excel Library: http://forums.asp.net/p/1235485/2244394.aspx .
In this approach, you can define more details about the cells. For example, define the style and format of cells in excel file that is unavailable with the other two approaches.
![]()
![]()
Thanks for the link. This deals with Visual Studio.NET. I am using Visual Web Developer 2008 Express. However, I went through the steps of adding the reference to the Microsoft Excel 11.0 Object Library (Website>Add Reference), then adding the following at the top of my class module:
But I get the error mesage:
Warning 1 Namespace or type specified in the Imports ‘Microsoft.Office.Interop.Excel’ doesn’t contain any public member or cannot be found. Make sure the namespace or the type is defined and contains at least one public member. Make sure the imported element name doesn’t use any aliases.
What other steps might I need to use the example at the link you gave in my VWD 2008 application?
Источник
VB.Net — Excel Sheet
VB.Net provides support for interoperability between the COM object model of Microsoft Excel 2010 and your application.
To avail this interoperability in your application, you need to import the namespace Microsoft.Office.Interop.Excel in your Windows Form Application.
Creating an Excel Application from VB.Net
Let’s start with creating a Window Forms Application by following the following steps in Microsoft Visual Studio: File → New Project → Windows Forms Applications
Finally, select OK, Microsoft Visual Studio creates your project and displays following Form1.
Insert a Button control Button1 in the form.
Add a reference to Microsoft Excel Object Library to your project. To do this −
Select Add Reference from the Project Menu.

On the COM tab, locate Microsoft Excel Object Library and then click Select.
Double click the code window and populate the Click event of Button1, as shown below.
When the above code is executed and run using Start button available at the Microsoft Visual Studio tool bar, it will show the following window −
Clicking on the Button would display the following excel sheet. You will be asked to save the workbook.
Источник
ТРЕНИНГИ
Быстрый старт
Расширенный Excel
Мастер Формул
Прогнозирование
Визуализация
Макросы на VBA
КНИГИ
Готовые решения
Мастер Формул
Скульптор данных
ВИДЕОУРОКИ
Бизнес-анализ
Выпадающие списки
Даты и время
Диаграммы
Диапазоны
Дубликаты
Защита данных
Интернет, email
Книги, листы
Макросы
Сводные таблицы
Текст
Форматирование
Функции
Всякое
Коротко
Подробно
Версии
Вопрос-Ответ
Скачать
Купить
ПРОЕКТЫ
ОНЛАЙН-КУРСЫ
ФОРУМ
Excel
Работа
PLEX
© Николай Павлов, Planetaexcel, 2006-2022
info@planetaexcel.ru
Использование любых материалов сайта допускается строго с указанием прямой ссылки на источник, упоминанием названия сайта, имени автора и неизменности исходного текста и иллюстраций.
Техническая поддержка сайта
|
ООО «Планета Эксел» ИНН 7735603520 ОГРН 1147746834949 |
ИП Павлов Николай Владимирович ИНН 633015842586 ОГРНИП 310633031600071 |
OK this isn’t perfect but it should get you started. First of all you will want to add a reference to the version of Excel you are using. In my case it is 12.0 (2007) but this code should work with the last two or three version with a minor change or two. At the top of your page add this
Imports Microsoft.Office.Interop
Next add a function to create a datatable
Public Function CreateTable() As DataTable
    Dim cn As New SqlConnection(My.Settings.con)
    Dim cmd As New SqlCommand
    Using da As New SqlDataAdapter()
        Dim dt As New DataTable()
        cmd.CommandType = CommandType.StoredProcedure
        cmd.CommandText = "[dbo].[MyStoredProcedure]"
        cmd.CommandTimeout = 0
        cn.Open()
        cmd.Connection = cn
        da.SelectCommand = cmd
        da.Fill(dt)
        cn.Close()
        Return dt
    End Using
End Function
Next the code to take that DataTable and dump it into Excel.
Public Shared Sub PopulateSheet(ByVal dt As DataTable, ByVal File As String)
            Dim oXL As Excel.Application = CType(CreateObject("Excel.Application"), Excel.Application)
        Dim oWB As Excel.Workbook
        Dim oSheet As Excel.Worksheet
        Dim oRng As Excel.Range
        oXL.Visible = True

        oWB = oXL.Workbooks.Add
        oSheet = CType(oWB.ActiveSheet, Excel.Worksheet)

        Dim dc As DataColumn
        Dim dr As DataRow
        Dim colIndex As Integer = 0
        Dim rowIndex As Integer = 0
        For Each dc In dt.Columns
            colIndex = colIndex + 1
            oXL.Cells(1, colIndex) = dc.ColumnName
        Next
        For Each dr In dt.Rows
            rowIndex = rowIndex + 1
            colIndex = 0
            For Each dc In dt.Columns
                colIndex = colIndex + 1
                oXL.Cells(rowIndex + 1, colIndex) = dr(dc.ColumnName)
            Next
        Next

        oSheet.Cells.Select()
        oSheet.Columns.AutoFit()
        oSheet.Rows.AutoFit()

        oXL.Visible = True
        oXL.UserControl = True

        oWB.SaveAs(File)
        oRng = Nothing
        oXL.Quit()

        ExcelCleanUp(oXL, oWB, oSheet)
    End Sub
Now you can call it from a button or whatever event you choose with this
    Dim dt As New DataTable
    Try
        dt = CreateTable()
        PopulateSheet(dt, "c:testExcelFile.xlsx")
    Catch ex As Exception
        MessageBox.Show(ex.Message)
    Finally
        dt.Dispose()
    End Try
Now this is really basic but with a little work you can do cell formatting, page setup and just about anything that can be done inside Excel with the menus/options.
We should also finish this out by adding code to clean things up.
Private Shared Sub ExcelCleanUp( _
    ByVal oXL As Excel.Application, _
    ByVal oWB As Excel.Workbook, _
    ByVal oSheet As Excel.Worksheet)

    GC.Collect()
    GC.WaitForPendingFinalizers()

    Marshal.FinalReleaseComObject(oXL)
    Marshal.FinalReleaseComObject(oSheet)
    Marshal.FinalReleaseComObject(oWB)

    oSheet = Nothing
    oWB = Nothing
    oXL = Nothing

End Sub
VB.Net обеспечивает поддержку взаимодействия между объектной моделью COM Microsoft Excel 2010 и вашим приложением.
Чтобы использовать эту совместимость в вашем приложении, вам необходимо импортировать пространство имен Microsoft.Office.Interop.Excel в ваше приложение Windows Form.
Создание приложения Excel из VB.Net
Давайте начнем с создания приложения Window Forms, выполнив следующие шаги в Microsoft Visual Studio: Файл → Новый проект → Приложения Windows Forms.
Наконец, нажмите OK, Microsoft Visual Studio создаст ваш проект и отобразит следующую форму Form1 .
Вставьте элемент управления Button1 в форму.
Добавьте ссылку на библиотеку объектов Microsoft Excel в свой проект. Для этого –
-
Выберите Добавить ссылку в меню проекта.
Выберите Добавить ссылку в меню проекта.
-
На вкладке COM найдите библиотеку объектов Microsoft Excel и нажмите «Выбрать».
На вкладке COM найдите библиотеку объектов Microsoft Excel и нажмите «Выбрать».
-
Нажмите ОК.
Нажмите ОК.
Дважды щелкните окно кода и заполните событие Click для Button1, как показано ниже.
'  Add the following code snippet on top of Form1.vb
Imports Excel = Microsoft.Office.Interop.Excel
Public Class Form1
   Private Sub Button1_Click(sender As Object, e As EventArgs) Handles Button1.Click
      Dim appXL As Excel.Application
      Dim wbXl As Excel.Workbook
      Dim shXL As Excel.Worksheet
      Dim raXL As Excel.Range

      ' Start Excel and get Application object.
      appXL = CreateObject("Excel.Application")
      appXL.Visible = True

      ' Add a new workbook.
      wbXl = appXL.Workbooks.Add
      shXL = wbXl.ActiveSheet

      ' Add table headers going cell by cell.
      shXL.Cells(1, 1).Value = "First Name"
      shXL.Cells(1, 2).Value = "Last Name"
      shXL.Cells(1, 3).Value = "Full Name"
      shXL.Cells(1, 4).Value = "Specialization"

      ' Format A1:D1 as bold, vertical alignment = center.
      With shXL.Range("A1", "D1")
         .Font.Bold = True
         .VerticalAlignment = Excel.XlVAlign.xlVAlignCenter
      End With

      ' Create an array to set multiple values at once.
      Dim students(5, 2) As String
      students(0, 0) = "Zara"
      students(0, 1) = "Ali"
      students(1, 0) = "Nuha"
      students(1, 1) = "Ali"
      students(2, 0) = "Arilia"
      students(2, 1) = "RamKumar"
      students(3, 0) = "Rita"
      students(3, 1) = "Jones"
      students(4, 0) = "Umme"
      students(4, 1) = "Ayman"

      ' Fill A2:B6 with an array of values (First and Last Names).
      shXL.Range("A2", "B6").Value = students

      ' Fill C2:C6 with a relative formula (=A2 & " " & B2).
      raXL = shXL.Range("C2", "C6")
      raXL.Formula = "=A2 & "" "" & B2"

      ' Fill D2:D6 values.
      With shXL
         .Cells(2, 4).Value = "Biology"
         .Cells(3, 4).Value = "Mathmematics"
         .Cells(4, 4).Value = "Physics"
         .Cells(5, 4).Value = "Mathmematics"
         .Cells(6, 4).Value = "Arabic"
      End With

      ' AutoFit columns A:D.
      raXL = shXL.Range("A1", "D1")
      raXL.EntireColumn.AutoFit()

      ' Make sure Excel is visible and give the user control
      ' of Excel's lifetime.
      appXL.Visible = True
      appXL.UserControl = True

      ' Release object references.
      raXL = Nothing
      shXL = Nothing
      wbXl = Nothing
      appXL.Quit()
      appXL = Nothing
      Exit Sub
Err_Handler:
      MsgBox(Err.Description, vbCritical, "Error: " & Err.Number)
   End Sub
End Class
Когда приведенный выше код будет выполнен и запущен с использованием кнопки « Пуск» , доступной на панели инструментов Microsoft Visual Studio, появится следующее окно:
При нажатии на кнопку отобразится следующий лист Excel. Вам будет предложено сохранить рабочую книгу.
Содержание
- 1 Calculate Expression
- 2 Create a Spreadsheet
- 3 Create function in Excel
- 4 Import data
- 5 Sort imported data
Calculate Expression
<source lang=»vbnet»>public class Test
  public Shared Sub Main
       Dim objExcel As Excel.Application
       objExcel = New Excel.Application
       Dim strMath As String
       strMath = "cos(3.673/4)/exp(-3.333)"
       If strMath <> "" Then
           Try
               Console.WriteLine(objExcel.Evaluate(strMath).ToString)
           Catch exc As Exception
               Console.WriteLine(exc.Message)
           End Try
       End If
       objExcel.Workbooks.Close()
       objExcel.Quit()
       objExcel = Nothing
  End Sub
End class</source>
Create a Spreadsheet
<source lang=»vbnet»>public class Test
  public Shared Sub Main
       Dim objExcel As Excel.Application
       objExcel = New Excel.Application

       Dim objSheet As New Excel.Worksheet
       Dim objRange As Excel.Range
       Dim intRow, intCol As Integer
       objExcel.Visible = True
       "Add a worksheet and then add some content to it.
       objSheet = objExcel.Workbooks.Add.Worksheets.Add
       With objSheet
           .Cells(2, 1).Value = "1st Quarter"
           .Cells(2, 2).Value = "2nd Quarter"
           .Cells(2, 3).Value = "3rd Quarter"
           .Cells(2, 4).Value = "4th Quarter"
           .Cells(2, 5).Value = "Year Total"
           .Cells(3, 1).Value = 123.45
           .Cells(3, 2).Value = 435.56
           .Cells(3, 3).Value = 376.25
           .Cells(3, 4).Value = 425.75
           .Range("A2:E2").Select()
           With objExcel.Selection.Font
               .Name = "Verdana"
               .FontStyle = "Bold"
               .Size = 12
           End With
       End With
       "Set the alignment.
       objSheet.Range("A2:E2").Select()
       objExcel.Selection.Columns.AutoFit()
       objSheet.Range("A2:E2").Select()
       With objExcel.Selection
           .HorizontalAlignment = Excel.XlHAlign.xlHAlignCenter
       End With
       "Format some numbers.
       objSheet.Range("A3:E3").Select()
       With objExcel.Selection.Font
           .Name = "Verdana"
           .FontStyle = "Regular"
           .Size = 11
       End With
       "Display summary information.
       objSheet.Cells(3, 5).Value = "=Sum(A3:D3)"
       objRange = objSheet.UsedRange
       For intCol = 1 To objRange.Columns.Count
           For intRow = 1 To objRange.Rows.Count
               Console.WriteLine(objRange.Cells(intRow, intCol).value)
           Next
       Next
       objExcel.Workbooks.Close()
       objExcel.Quit()
       objExcel = Nothing
  End Sub
End class</source>
Create function in Excel
<source lang=»vbnet»>public class Test
  public Shared Sub Main
       Dim objExcel As New Excel.Application
       objExcel.Visible = True
       objExcel.Workbooks.Add()
       objExcel.Range("A1").Select()
       objExcel.ActiveCell.FormulaR1C1 = "75"
       objExcel.Range("B1").Select()
       objExcel.ActiveCell.FormulaR1C1 = "125"
       objExcel.Range("C1").Select()
       objExcel.ActiveCell.FormulaR1C1 = "255"
       objExcel.Range("D1").Select()
       objExcel.ActiveCell.FormulaR1C1 = "295"
       objExcel.Range("A1:D1").Select()
       objExcel.Range("E1").Activate()
       objExcel.ActiveCell.FormulaR1C1 = "=SUM(RC[-4]:RC[-1])"
       objExcel.Range("A1:E1").Select()
       objExcel.Selection.Font.Bold = True
       objExcel = Nothing
  End Sub
End Class</source>
Import data
<source lang=»vbnet»>public class Test
  public Shared Sub Main
       Dim objExcel As Excel.Application
       objExcel = New Excel.Application

       Dim objSheet As New Excel.Worksheet
       Dim objData As Excel.Range
       Dim intCol, intRow As Integer
       objExcel.Visible = True
       TextBox1.Clear()
       objSheet = objExcel.Workbooks.Open("C:TempTest.xls").Worksheets.Item(1)
       objExcel.Range("A2:E3").Select()
       objData = objExcel.Selection
       For intCol = 1 To 5
           For intRow = 1 To 2
               Console.WriteLine(objData(intRow, intCol).Value)
           Next
       Next
       objExcel.Workbooks.Close()
       objExcel.Quit()
       objExcel = Nothing
  End Sub
End class</source>
Sort imported data
<source lang=»vbnet»>public class Test
  public Shared Sub Main
       Dim objExcel As Excel.Application
       objExcel = New Excel.Application

       Dim objSheet As New Excel.Worksheet
       Dim objData As Excel.Range
       Dim intCol, intRow As Integer
       Call OpenExcel()
       objExcel.Visible = True
       objSheet = objExcel.Workbooks.Open("C:TempTest.xls").Worksheets.Item(1)
       objExcel.Range("A2:E3").Select()
       objData = objExcel.Selection
       objData.Sort(Key1:=objData.Range("A2"), Order1:=Excel.XlSortOrder.xlAscending)
       For intCol = 1 To 5
           For intRow = 1 To 2
               Console.WriteLine(objData(intRow, intCol).value)
           Next
       Next
       objExcel.Workbooks.Close()
       objExcel.Quit()
       objExcel = Nothing
  End Sub
End class</source>