
On a touch-enabled device, draw with your finger, a digital pen, or a mouse.
Available inking features depend on the type of device you’re using and which version of Office you’re using.
Please start by choosing your version of Office:

|
If your device is touch-enabled, the Draw tab is turned on automatically. Otherwise, turn it on by selecting File > Options > Customize Ribbon > Draw. |
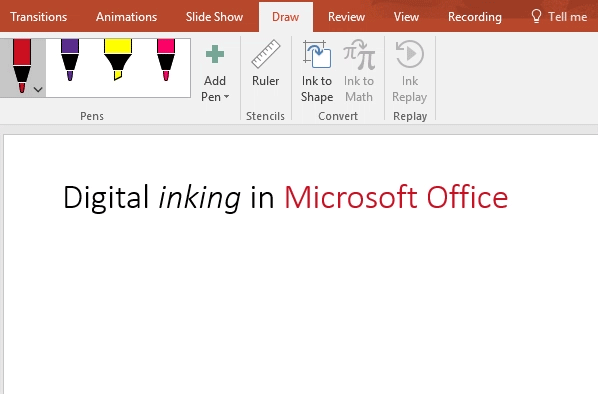
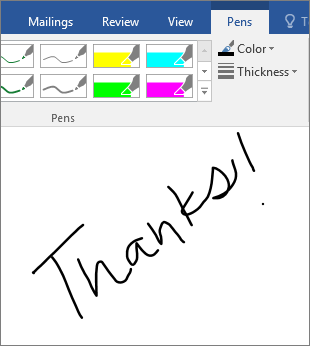
Write, draw, or highlight text
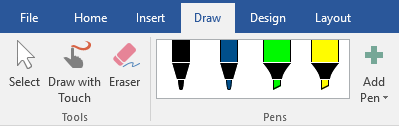
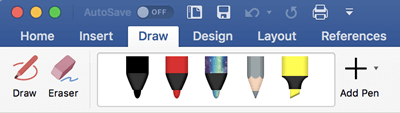
The new pen set is customizable and portable. You define the pens you want to have, and they are then available in Word, Excel, and PowerPoint.
-
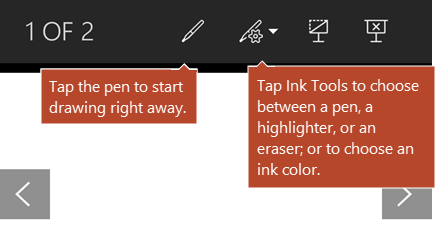
On the Draw tab of the Ribbon, tap a pen to select it.

In Word, you must be in Print layout to draw with ink. If the Draw tab is grayed out so that you can’t select a pen, go the View tab and select Print Layout.
In Outlook, first tap the body of the message and insert a drawing canvas
; then you can select a pen to draw with. -
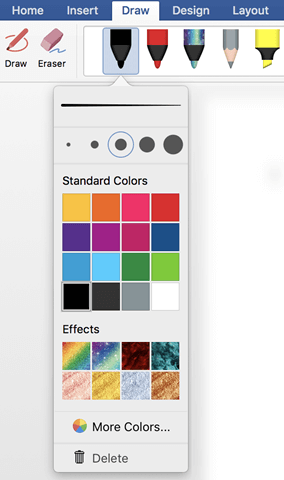
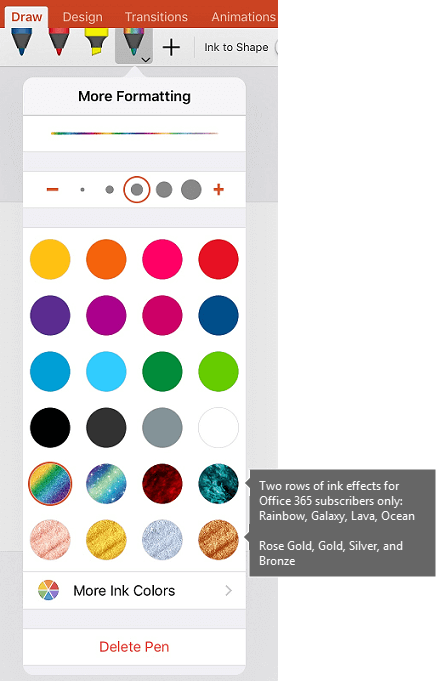
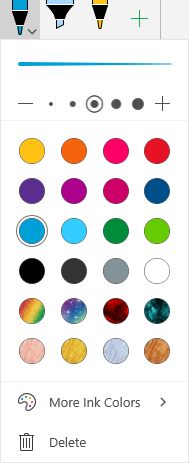
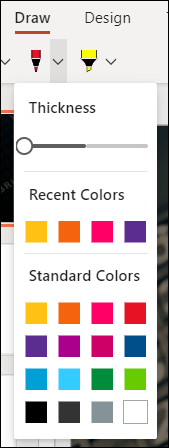
Tap again to open the menu of Thickness and Color options for the pen. Select your preferred size and color.
-
There are five pen thickness settings ranging from .25 mm to 3.5 mm. Select a thickness or use the plus or minus sign to make your pen thicker or thinner.
-
Sixteen solid colors are available on the menu, with more available when you tap More Colors.
-
Eight effects are also available: Rainbow, Galaxy, Lava, Ocean, Rose Gold, Gold, Silver, and Bronze.
-
-
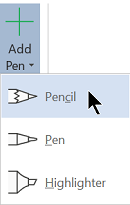
A Pencil texture is also available:
When you draw with the Pencil texture while using a supported digital stylus, you can tilt the stylus to get a «shading» effect, just like you would get with a real pencil.
-
On the touch screen, begin writing or drawing.
Once you have drawn an ink shape, it behaves like any shape that you are used to working with in Office. You can select the shape, then you can move or copy it, change its color, pivot its position, and so on.
-
To stop inking and select your annotations, press the Esc key.
 ; then you can select a pen to draw with.
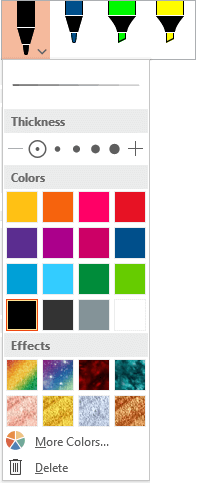
Convert ink to text or shapes
Word or Excel: See Convert ink to shapes in Office
PowerPoint: See Convert ink to text or shapes in PowerPoint for Microsoft 365.
More features
Select a heading below to open it and see the detailed instructions.
-
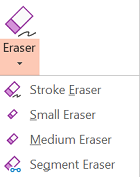
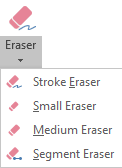
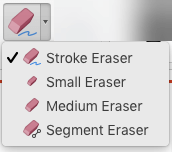
Under Draw > Tools, tap the Eraser.
(In PowerPoint for Microsoft 365, you can choose from different sizes of erasers. Word has three eraser options. Tap the down arrow on the Eraser button to pick the eraser that you want.)
-
With your pen or finger, drag the eraser over the ink you want to remove.
With the Segment Eraser in PowerPoint, you can simply tap a segment of ink or drag across it to remove it (rather than having to thoroughly wipe away the entire segment). Dragging across segments is an easy way to erase several at once.
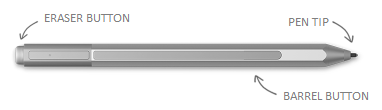
Some active pens, such as the Surface pen, have an eraser that you can also use to erase digital ink.
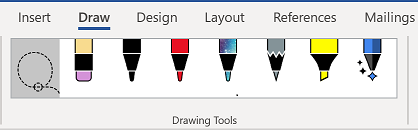
All apps include a Draw tool on the Draw tab of the Ribbon for switching between inking mode and selection mode.
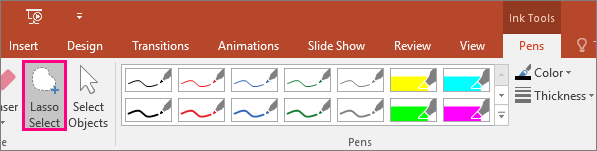
There is also an ink selection tool, Lasso Select,  or
or  for specifically for selecting objects drawn with ink. It’s most useful when you have a mixture of standard and ink objects and you only want to select an ink object.
Applies only to Word, PowerPoint, and Excel:
To select part of a drawing or words written in ink, use the Lasso Select tool. (This tool can’t select non-ink objects—that is, shapes, pictures, etc.)
-
Under Draw > Tools on the Ribbon, tap Lasso Select
or . -
With your pen or finger, drag to draw a circle around the part of the drawing or word that you want to select. A faded, dashed selection region appears around it, and when you’re done, the portion you lassoed is selected. Then you can manipulate that object as you wish: move it, change its color, and so on.

In both Excel and PowerPoint, with a digital pen, you can select an area without even tapping the selection tool on the ribbon. Use the supported digital pen button to Lasso Select ink without visiting the ribbon. Then you can use the pen to move, resize, or rotate the ink object.
-
On the File menu, select Options, and then select Advanced.
-
In the Pen section, select the box next to Use pen to select and interact with content by default.
This setting only applies to the app in which you make it, so, for example, you can have automatic inking turned on in Visio and turned off in Word.

|
If your device is touch-enabled, the Draw tab is turned on automatically. Otherwise, turn it on by selecting File > Options > Customize Ribbon > Draw. |
Write, draw, or highlight text
The new pen set is customizable and portable. You define the pens you want to have, and they are then available in Word, Excel, and PowerPoint.
-
On the Draw tab of the Ribbon, tap a pen to select it.
In Word, you must be in Print layout to draw with ink. If the Draw tab is grayed out so that you can’t select a pen, go the View tab and select Print Layout.
-
Tap again to open the menu of Thickness and Color options for the pen. Select your preferred size and color.
-
There are five pen thickness settings ranging from .25 mm to 3.5 mm. Select a thickness or use the plus or minus sign to make your pen thicker or thinner.
-
Sixteen solid colors are available on the menu, with more available when you tap More Colors.
-
-
A Pencil texture is also available:
When you draw with the Pencil texture while using a supported digital stylus, you can tilt the stylus to get a «shading» effect, just like you would get with a real pencil.
-
On the touch screen, begin writing or drawing.
Once you have drawn an ink shape, it behaves like any shape that you are used to working with in Office. You can select the shape, then you can move or copy it, change its color, pivot its position, and so on.
-
To stop inking and select your annotations, either to modify or move them, pick Select
on the Draw tab.
Convert ink to text or shapes
See Convert ink to text or shapes in PowerPoint for Microsoft 365.
More features
Select a heading below to open it and see the detailed instructions.
-
Under Draw > Tools, tap the Eraser.
(In PowerPoint for Microsoft 365, you can choose from four erasers. Tap the down arrow on the Eraser button to pick the eraser that you want.)
-
With your pen or finger, drag the eraser over the ink you want to remove.
With the Segment Eraser in PowerPoint, you can simply tap a segment of ink or drag across it to remove it (rather than having to thoroughly wipe away the entire segment). Dragging across segments is an easy way to erase several at once.
Some active pens, such as the Surface pen, have an eraser that you can also use to erase digital ink.
When you’ve been drawing with ink, you can use Stop Inking  on the Draw tab to change the mouse pointer back to a standard selection tool
  . The selection tool can select digital ink drawings and any other kind of objects.
PowerPoint and Excel also have an ink selection tool, Lasso Select,  specifically for selecting objects drawn with ink. It’s most useful when you have a mixture of standard and ink objects and you only want to select an ink object.
Applies only to PowerPoint and Excel:
To select part of a drawing or words written in ink, use the Lasso Select tool. (This tool can’t select non-ink objects—that is, shapes, pictures, etc.)
-
Under Draw > Tools on the Ribbon, tap Lasso Select
. -
With your pen or finger, drag to draw a circle around the part of the drawing or word that you want to select. A faded, dashed selection region appears around it, and when you’re done, the portion you lassoed is selected. Then you can manipulate that object as you wish: move it, change its color, and so on.
In both Excel and PowerPoint, with a digital pen, you can select an area without even tapping the selection tool on the ribbon. Use the supported digital pen button to Lasso Select ink without visiting the ribbon. Then you can use the pen to move, resize, or rotate the ink object.
-
Select File > Options > Advanced.
-
In the Pen section, select the box next to Use pen to select and interact with content by default.
This setting only applies to the app in which you make it. So, for example, you can have automatic inking turned on in Visio and turned off in Word.
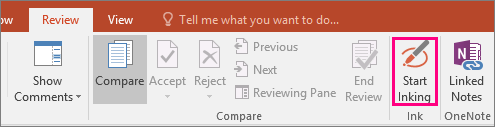
Find the drawing tools
Go to the Review tab and select Start Inking to display the Ink Tools and Pens tab.
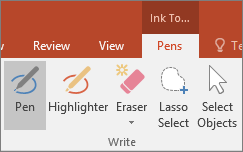
Write or draw
-
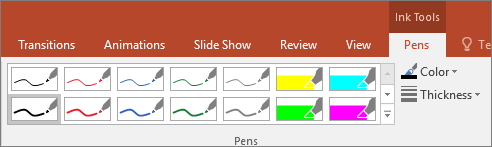
Under Ink Tools >Pens choose Pen.
-
To change the ink color and stroke width, point to the color and width (0.35mm — 0.5mm) you want.
-
On the touch screen, begin writing or drawing.
Highlight text
-
Under Ink Tools, on the Pens tab, click Highlighter, and then pick a highlight color.
-
Point and drag your pen or finger over the text that you want to highlight.
You can highlight text in Excel, Word, and Outlook, but PowerPoint doesn’t support highlighting text.

Delete whole written words or ink drawings
-
Under Ink Tools, on the Pens tab, click the arrow below Eraser, and then pick an eraser size.
-
With your pen or finger, select the word or ink drawing that you want to erase.

Drawing in OneNote
If you’re using OneNote and want to draw, see these other articles:
 OneNote for Windows 10: Write notes and draw in OneNote
 OneNote: Draw and sketch notes on a page
Extra features in PowerPoint
Select parts of an ink drawing or written words (PowerPoint only)
To select part of a drawing or some written words, use the Lasso tool. (You cannot use the Lasso tool to select non-ink objects (shapes, pictures, etc.).
-
Under Ink Tools, on the Pens tab, click Lasso Select.
-
With your pen or finger, drag to draw a circle around the part of the drawing or word that you want to select. A faded, dashed selection region appears around it, and when you’re done, the portion you lassoed will be selected.
Delete parts of an ink drawing or parts of written words (PowerPoint only)
-
Under Ink Tools, on the Pens tab, click the arrow below Eraser, and then pick an eraser size.
-
With your pen or finger, select parts of the ink drawing or text that you want to erase.
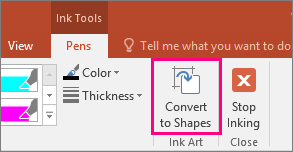
Convert ink drawings to shapes (PowerPoint only)
You can convert ink drawings on a touch screen into common shapes.
-
Under Ink Tools > Pens, select Convert to Shapes.
-
With a pen or your finger, draw a shape on the slide, and PowerPoint automatically converts your drawing to the shape that looks most like it.
To stop converting shapes, click Convert to Shapes again.
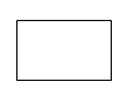
Which shapes can PowerPoint convert?
When you create an ink drawing, PowerPoint can convert it to the shape that is most like it.
|
Ink drawing |
Corresponding shape |
|---|---|
|
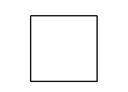
Rectangle
|
Rectangle
|
|
Square
|
Rectangle with all sides equal
|
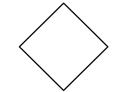
|
Diamond
|
Diamond
|
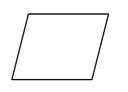
|
Parallelogram
|
Parallelogram
|
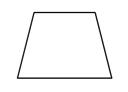
|
Trapezoid
|
Trapezoid
|
|
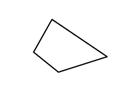
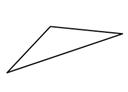
Irregular quadrilateral
|
Closed freeform shape with four sides
|
|
Regular pentagon
|
Pentagon with all sides equal
|
|
Regular hexagon
|
Hexagon with all sides equal
|
|
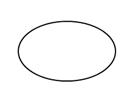
Ellipse
|
Ellipse
|
|
Circle
|
Ellipse with shape height and width equal
|
|
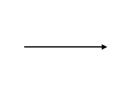
Single-headed arrow
|
Arrow
|
|
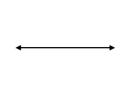
Double-headed arrow
|
Double arrow
|
|
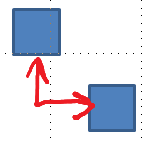
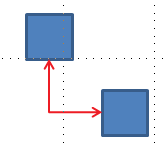
Arrows connecting two shapes
|
Arrow connectors
|
|
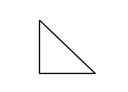
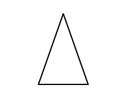
Right triangle
|
Triangle with right angle
|
|
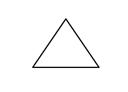
Equilateral triangle
|
Triangle with all sides equal
|
|
Isosceles triangle
|
Triangle with two equal sides
|
|
Irregular triangle
|
Closed freeform with three sides. |


For more information about using Office with Windows touch devices, see the following:
-
Office Touch Guide
-
Read documents in Word
Write, draw, or highlight text
 On the Mac, these features are only available in Microsoft 365 and Office 2019 for Mac.
-
On the Draw tab of the Ribbon, tap a pen to select it.
-
Tap again to open the menu of Thickness and Color options for the pen. Select your preferred size and color.
-
There are five pen thickness settings ranging from .25 mm to 3.5 mm. Select a thickness to make your pen thicker or thinner.
-
Sixteen solid colors are available on the menu, with more available when you tap More Colors.
-
Eight effects are also available: Rainbow, Galaxy, Lava, Ocean, Rose Gold, Gold, Silver, and Bronze.
-
-
A Pencil texture is also available:
When you draw with the Pencil texture while using a supported digital stylus, you can tilt the stylus to get a «shading» effect, just like you would get with a real pencil.
-
Once you have drawn an ink shape, it behaves like any shape that you are used to working with in Office. You can select the shape, then you can move or copy it, change its color, pivot its position, and so on.
-
To stop inking and select your annotations, press the Esc key.
Touch drawing with a trackpad
Rather than drawing ink with your mouse, you can draw on a trackpad with your finger. See Use your trackpad for «touch» drawing for more information.
Erase ink
-
Under Draw > Tools, tap the Eraser.
(In PowerPoint for Microsoft 365 for Mac, you can choose from different sizes of erasers. Word has three eraser options (version 16.28 or newer). Tap the down arrow on the Eraser button to pick the eraser that you want.)
-
With your mouse, pen, or finger, drag the eraser over the ink you want to remove.
Additional procedures
Select a heading below to open it and see the detailed instructions.
PowerPoint and Excel also have an ink selection tool, Lasso Select, specifically for selecting objects drawn with ink. It’s most useful when you have a mixture of standard and ink objects and you only want to select an ink object.
Applies only to PowerPoint and Excel:
To select part of a drawing or words written in ink, use the Lasso Select tool. (This tool can’t select non-ink objects—that is, shapes, pictures, etc.)
-
Under Draw > Tools on the Ribbon, tap Lasso Select
. -
With your mouse, pen, or finger, drag to draw a circle around the part of the drawing or word that you want to select. A faded, dashed selection region appears around it, and when you’re done, the portion you lassoed is selected. Then you can manipulate that object as you wish: move it, change its color, and so on.
-
On the PowerPoint, Word, or Excel menu, select Preferences > Authoring and Proofing Tools > General.
-
In the Pen section, clear the box next to Use pen to select and interact with content by default.
This setting only applies to the current app. So, for example, you can have automatic inking turned on in Excel and turned off in Word.
Basic inking tools
Word for iOS, Excel for iOS, and PowerPoint for iOS all come with basic inking options on the Draw tab: a selection tool, a draw-with-touch tool, a stroke eraser, pens, multiple ink colors, and ink thickness options:

 If you’re working in OneNote on your iPad, see Handwrite, draw, and sketch.
Draw or write
By default, Draw with Mouse or Touch (or «Inking mode») is turned on when you are using a mobile device. Just tap the Draw tab, select a pen  , and you can begin drawing ink on a slide.
To change the settings on a pen:
-
Tap again to open the menu of thickness and color options for the pen. Select your preferred size and color:
-
There are five pen thickness settings ranging from .25 mm to 3.5 mm. Select a thickness or use the plus or minus sign to make your pen thicker or thinner.
-
Sixteen solid colors are available on the menu, with more available when you tap More Ink Colors.
-
(For Microsoft 365 subscribers only) Eight effects are also available: Rainbow, Galaxy, Lava, Ocean, Rose Gold, Gold, Silver, and Bronze.
A Pencil texture is now available:
The Apple Pencil is sensitive to pressure, which allows you to vary line thickness. It’s also sensitive to tilt, which allows you to create shading, as you can with a tilted lead pencil.
-
-
On the touch screen, begin writing or drawing.
Once you have drawn an ink shape, it behaves like any shape that you are used to working with in Office. You can select the shape, then you can move or copy it, change its color, pivot its position, and so on.
-
To stop inking and select your annotations, either to modify or move them, turn off Draw with Touch on the Draw tab. Turning off this feature also keeps you from making accidental ink marks when your hand touches the screen.

Watch a video overview of the inking features in iPhone and iPad:

2:47
Select
On an iOS device, Inking mode is turned on when you have selected a pen or highlighter on the Draw tab. Otherwise, you are in Select mode, and you can tap to select an object.
(If you’re using an Apple Pencil on an iPad Pro device, you can make Select mode the default by going to app settings.)
PowerPoint and Excel have an ink selection tool, Lasso Select,  specifically for selecting objects drawn with ink. It’s most useful when you have a mixture of standard and ink objects on a slide and you only want to select an ink object.
To select part of a drawing or words written in ink in PowerPoint or Excel, use the Lasso Select tool:
-
On the Draw tab on the Ribbon, tap Lasso Select
. -
With your pen or finger, drag to encircle the ink that you want to select.
A faded, dashed selection region appears as you drag, and when you’re done, the portion you’ve lassoed is selected. Then you can manipulate that object as you wish: move it, copy it, delete it, and so on.
Erase
-
On the Draw tab, tap the Eraser.
Word has three erasers to choose from—a stroke eraser, a small eraser, or a medium eraser. Tap the down arrow on the Eraser button to pick the eraser that you want.
PowerPoint has those three erasers plus one more: With the Segment Eraser, you can simply tap a segment of ink or drag across it to remove it (rather than having to thoroughly wipe away the entire segment). Dragging across segments is an easy way to erase several at once.
-
Drag the eraser over the ink you want to remove.
Switch tools with the new Apple Pencil
Office for iOS supports the 2nd-generation Apple Pencil and its double-tap gesture. By default, the double-tap gesture switches from the current tool to the eraser, but the System settings on your device allow you to choose a different behavior for this gesture. This feature is available to Microsoft 365 subscribers in Word, Excel, and PowerPoint on iPad version 2.22.19020201 and later.
Turn off automatic inking
-
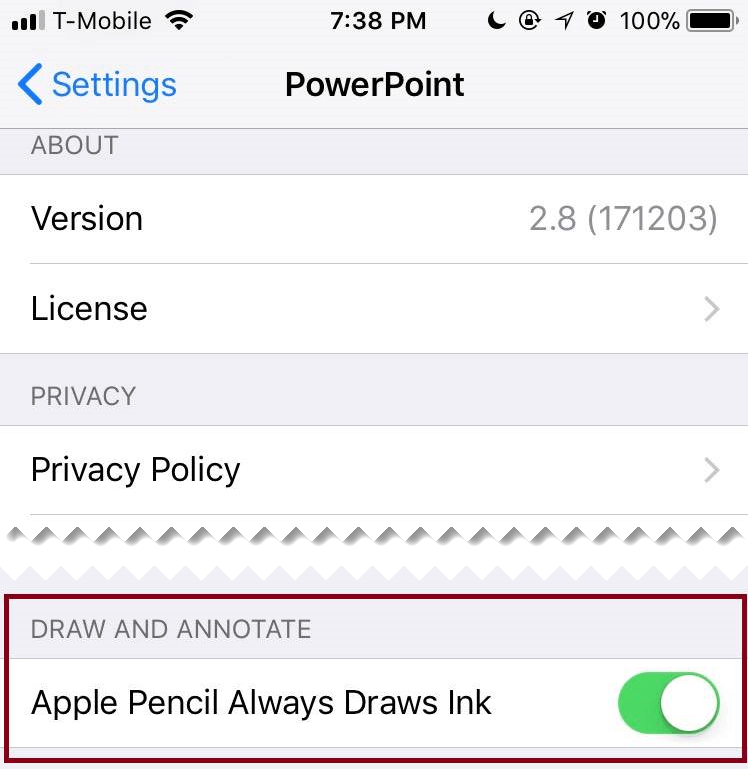
Open the Settings app from the home screen of your iOS device.
-
Scroll through the list of apps at the bottom of the Settings page to find your Microsoft 365 app, and tap to open its Settings.
-
In the app settings on the right side, at the bottom under Draw and Annotate, toggle Apple Pencil Always Draws Ink.
For more information, see Turn off automatic inking on iOS.
Convert ink drawings to standard shapes in PowerPoint
In PowerPoint, you can convert ink drawings on a touch screen into common shapes:
-
Ensure that Draw with Mouse or Touch
is turned on. -
Tap Ink to Shapes
-
With a pen or your finger, draw a shape on the slide. When you finish drawing, PowerPoint automatically converts your drawing to the shape that looks most like it.
To stop converting shapes, tap Ink to Shapes again.
 is turned on.
Basic inking tools
Word for Android, Excel for Android, and PowerPoint for Android all come with basic inking options on the Draw tab: a selection tool, a draw-with-touch tool, a stroke eraser, pens, ink colors and a color wheel, and ink thickness options:

Draw or write
By default, Draw with Mouse or Touch (or «Inking mode») is turned on when you are using a mobile device. Just tap the Draw tab, select a pen  , and you can begin drawing ink on a slide.
Select
On an Android device, Inking mode is turned on when you have selected a pen or highlighter on the Draw tab. Otherwise, you are in Select mode, and you can tap to select an object.
PowerPoint and Excel have an ink selection tool, Lasso Select, specifically for selecting ink drawings. It’s most useful when you have a mixture of standard and ink objects and you only want to select an ink object.
To select part of a drawing or words written in ink in PowerPoint or Excel, use the Lasso Select tool.
-
On the Draw tab on the Ribbon, tap Lasso Select
. -
With your pen or finger, drag to encircle the ink that you want to select.
A faded, dashed selection region appears as you drag, and when you’re done, the portion you’ve lassoed is selected. Then you can manipulate that object as you wish: move it, copy it, delete it, and so on.
Erase
-
On the Draw tab, tap the Eraser.
(In PowerPoint, you can choose from three erasers—a stroke eraser, or a small or medium eraser. Tap the down arrow on the Eraser button to pick the eraser that you want.)
-
Drag the eraser over the ink you want to remove.
Some active pens, such as the Surface pen, have an eraser that you can also use to erase digital ink without having to select an eraser from the Ribbon.
Convert ink drawings to standard shapes in PowerPoint
In PowerPoint, you can convert ink drawings on a touch screen into common shapes:
-
Ensure that Draw with Mouse or Touch
is turned on. -
Tap Ink to Shapes
-
With a pen or your finger, draw a shape on the slide. When you finish drawing, PowerPoint automatically converts your drawing to the shape that looks most like it.
To stop converting shapes, tap Ink to Shapes again.
Annotate with ink while showing a presentation
In PowerPoint, you can add ink markings to a slide while you are presenting:
Basic inking tools
Word Mobile, Excel Mobile, and PowerPoint Mobile all come with basic inking options on the Draw tab: a selection tool, a draw-with-touch tool, a stroke eraser, pens, multiple ink colors, and ink thickness options:

If you’re working in OneNote for Windows 10, see Write notes and draw in OneNote for Windows 10.
Draw or write
By default, Draw with Touch (or «Inking mode») is turned on when you are using a mobile device. Just tap the Draw tab, select a pen  , and you can begin drawing ink on a slide.
The Draw tab in Word Mobile, Excel Mobile, and PowerPoint Mobile for Windows 10 is similar to the desktop versions of each app. Before you can use the drawing features, be sure to update to the latest version of Windows 10. To do this, select the Windows button in the lower-left corner of your screen, and select Settings > Update & security > Windows Update. Click Check for updates to get the latest updates.
To change the settings on a pen:
-
Tap again to open the menu of thickness and color options for the pen. Select your preferred size and color:
-
There are five pen thickness settings ranging from .25 mm to 3.5 mm. Select a thickness or use the plus or minus sign to make your pen thicker or thinner.
-
Sixteen solid colors are available on the menu, with more available when you tap More Ink Colors.
-
Eight effects are also available: Rainbow, Galaxy, Lava, Ocean, Rose Gold, Gold, Silver, and Bronze.
-
-
On the touch screen, begin writing or drawing.
Once you have drawn an ink shape, it behaves like any shape that you are used to working with in Office. You can select the shape, then you can move or copy it, change its color, pivot its position, and so on.
-
To stop inking and select your annotations, either to modify or move them, turn off Draw with Touch on the Draw tab. Turning off this feature also keeps you from making accidental ink marks when your hand touches the screen.
Select
Inking mode is turned on when you have selected a pen or highlighter on the Draw tab. Otherwise, you are in Select mode, and you can tap to select an object.
PowerPoint Mobile and Excel Mobile also have an ink selection tool, Lasso Select, , specifically for selecting objects drawn with ink. It’s most useful when you have a mixture of standard and ink objects and you only want to select an ink object.
To select part of a drawing or words written in ink in PowerPoint or Excel:
-
On the Draw tab on the Ribbon, tap Lasso Select
. -
With your pen or finger, drag to encircle the ink that you want to select.
A faded, dashed selection region appears as you drag, and when you’re done, the portion you’ve lassoed is selected. Then you can manipulate that object as you wish: move it, copy it, delete it, and so on.
Erase
-
On the Draw tab, tap the Eraser.
(In PowerPoint, you can choose from three erasers—a stroke eraser, or a small or medium eraser. Tap the down arrow on the Eraser button to pick the eraser that you want.)
-
Drag the eraser over the ink you want to remove.
Convert ink drawings to standard shapes in PowerPoint
In PowerPoint, you can convert ink drawings on a touch screen into common shapes:
-
Ensure that Draw with Mouse or Touch
is turned on. -
Tap Ink to Shapes
-
With a pen or your finger, draw a shape on the slide. When you finish drawing, PowerPoint automatically converts your drawing to the shape that looks most like it.
To stop converting shapes, tap Ink to Shapes again.
Open the Draw tab on Windows 10 Mobile phones
Here’s how to see the Draw tab in Word, Excel, and PowerPoint on Windows 10 Mobile phones.
-
Select the More button
in the lower-right corner of the screen. -
Pick the Draw tab.
 in the lower-right corner of the screen.
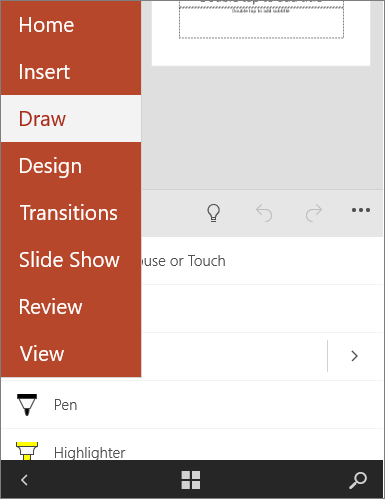
Write, draw, or highlight text in PowerPoint
-
On the Draw tab of the ribbon tap a pen to select it.
-
If you want to customize the pen tap the drop arrow next to the pen on the ribbon and select the thickness, and color, you want.
The Draw menu lets you have two separate pens available, plus a highlighter.
Stop inking
After you’ve drawn what you want, you can stop inking and return to selection mode by pressing the Esc key.
Erase ink
Select the eraser from the pens gallery on the Draw tab, then swipe your cursor across the ink you want to erase. This is a stroke eraser, which means it will erase entire ink strokes at a time.
See Also
Languages supported for ink-to-text conversion
Turn off automatic inking on Windows or iOS

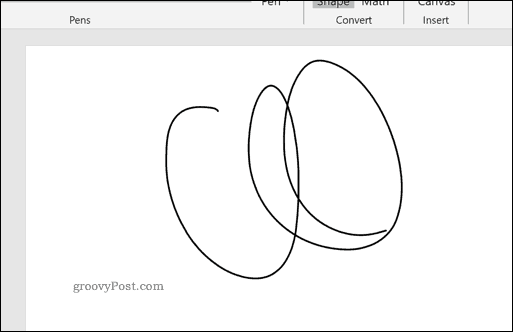
While Microsoft Word isn’t the best drawing tool, you can create basic drawings or scribbles in Word directly. Here’s how.
Microsoft Word isn’t essential software for graphics designers, and for a good reason. It’s true—Microsoft Word isn’t best suited for drawing, but it does have some built-in drawing tools you can use, should you need to.
For simple drawings, you can draw in Word directly using shapes, lines, or pen tools. If you want to draw in Microsoft Word, here’s what you’ll need to do.
These instructions have been designed with Microsoft Office 2019 in mind. Note that Microsoft 365 (formerly O365) is the Office suite with 1 TB of OneDrive per user. While the steps may work for older versions of Word, there may be some variations or missing features.
Using Microsoft Word Drawing Tools
There are two sets of drawing tools available to Microsoft Word users. If you want to draw basic, block-like images, you can insert shapes or lines into your Word document and group them together. You might want to do this if you’re creating a diagram or flow chart, for instance.
Alternatively, you can turn Word into your own personal canvas using pen drawing tools. If you have a touchscreen device or a graphics tablet, you can create freehand drawings.
To insert shapes, you’ll need to press the Insert tab on the ribbon bar. For freehand drawings, press the Draw tab instead.

Inserting Shapes into Microsoft Word
If you’re not confident of your freehand drawing ability, or you want to create diagrams in Word, you can insert shapes.
There are hundreds of pre-set shapes available. You can draw typical shapes like squares or circles or insert arrows, stars, speech bubbles, and more. To insert a shape, press the Insert tab on the ribbon bar, then press the Shapes button.
This will list the various shape options in a drop-down menu for you to choose from.

Press on one of the pre-set shapes or line options to select it—your cursor will change at this point.
Once this happens, draw onto your Word document directly to insert the shape or line you selected. This allows you to select the appropriate size for your shape.
With the shape inserted and selected, Word will switch to the Format tab on the ribbon bar. From here, you can format your shape.

For instance, add text to your shape and begin typing with the shape selected–the text will be inserted inside the shape.

You can also change the color and style of your shape, as well as the position and alignment of any inserted text, using the options listed in the Format tab.

Creating Freehand Drawings in Word
If you want to create more original Word drawings, you can use various pen drawing tools to draw onto a Word document. You can do this using a mouse or trackpad, or more precisely, using a touchscreen device or graphics tablet.
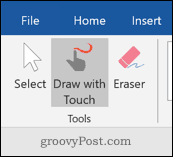
To start, press the Draw tab on the ribbon bar. This will display the pen drawing tool options for you to use.

Three drawing options are available under the Tools section. Press Draw with Touch to begin drawing with one of the pen tools, Eraser to switch to the eraser tool, or Select to select your drawings as objects to move, copy, or delete them.
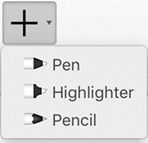
A list of available pens to draw with is shown under the Pens category. There are three drawing pens available—Pencil, Pen, and Highlighter.
As you’d expect, using the Pencil tool inserts a finer, less precise drawing line to your document. The Pen tool is the opposite—lines are clearer, thicker, and more defined. The Highlighter tool can be used for emphasis, adding color to your drawings.
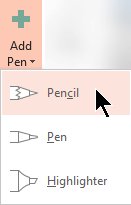
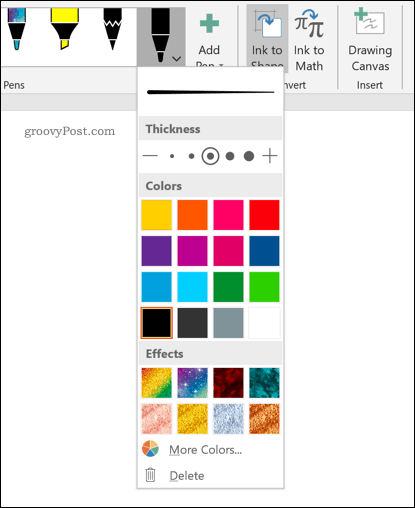
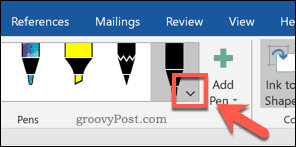
Several pre-set colors and designs are available already in the Pens category—select one of these to begin drawing. Alternatively, you can create your own by pressing the Add Pen button and selecting one of the tools listed in the drop-down menu.

This will add a new pen design to the Pens category, with a settings drop-down menu. From here, you can set the thickness and color of the pen tool, with a preview of the pen design at the top.
You can edit these in the future by hovering over a pen design and press the arrow icon in the bottom-left corner.
With your drawing pen tool selected and configured, you can begin drawing onto your Word document directly.
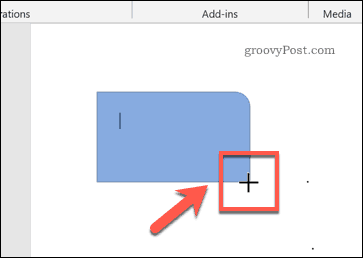
Creating a Drawing Canvas in Word
Word allows you to draw onto a Word document without constraints. If you’d prefer to draw onto a much smaller area of your Word document, however, you can insert a drawing canvas.
A drawing canvas groups your drawing into a single object which can then be moved, resized, or copied elsewhere. To do this, press the Drawing Canvas button in the Insert section of the Draw tab.

This will insert the canvas into your Word document. You will only be able to draw inside the canvas object’s borders– anything drawn outside of this will be ignored.

Designing Microsoft Word Documents
While it hasn’t been designed with drawing in mind, you can still use shapes, lines, and freehand pen drawings to create simplistic images in Microsoft Word. You can use shapes to create a flow chart or diagram or use free-hand drawings to show your artistic drawing skills.
You can insert and edit images in Microsoft Word too, but don’t forget Word’s main purpose. If you’re designing new documents, you may prefer to use building blocks to help you create them more quickly.
![]()
The Pens tab can be added to the Word 2010/2013 Ribbon. This will allow you to easily “pen” your signature to a Word document.
Below is an example of a signature line you might want to add your signature to.

The fist step in adding the Pens tab is to right click the ribbon and select “Customize the Ribbon” Then from the “Choose commands from” drop down choose the Tool Tabs. Click the Pens tab below the ink tool then click add.

Once you click OK you will have the pens tab to work with. Click the pen style you like and your cursor pointer turns into a drawing tool. To get the normal selection arrow back, click the “Select Objects” command.


About Steve Chase
I want to help you work in your business, so you can work on your business.
I want to help you achieve your goals and help you have a successful small business journey.
I understand that keeping up with the latest technology and cloud based computer trends can be difficult, when you’re running your day to day business.
But, it is crucial that you keep up with the technology and best understand your options, in order to thrive in this new era of online business. I can help you discover the right software and tools for your business, train your team on how to use them, and mentor you to best serve and delight your customers.
My certifications include: QuickBooks ProAdvisor, Microsoft Office Specialist Master, and OntraPort Certified Consultant.
Please contact me on my new website at www.sequentiasolutions.com
This entry was posted in Word and tagged Word Signatures. Bookmark the permalink.
Оборот there is/there are в английском языке употребляется, когда нужно указать на наличие какого-либо лица или явления в определенном месте. После оборота there is/there are ставится подлежащее.

There is a lamp on the table. На столе (находится) лампа.
There was a storm last night. Прошлой ночью была буря.
Перевод предложений с этим оборотом начинается обычно с обстоятельства места.
Если подлежащее выражено существительным во множественном числе, то глагол to be после there ставится также во множественном числе.
There are two lamps on the table.
На столе (находятся) дне лампы.
Если в предложении с оборотом there is/there are несколько подлежащих, то глагол to be обычно согласуется в числе с подлежащим, которое следует непосредственно за ним.
There is a pen and six pencils on the table.
На столе ручка и шесть карандашей.
There are six pencils and one pen on the table.
На столе шесть карандашей и одна ручка.
ЗАМЕТЬТЕ:
Имеется тенденция, однако, употреблять этот оборот с глаголом to be во множественном числе (there are) в случаях, если второе подлежащее стоит во множественном числе.
There are a pen and six pencils on the table.
На столе ручка и шесть карандашей.
При изменении времени изменяется форма глагола to be:
There was a lamp on this table. На этом столе была лампа.
There were three cars in the yard. Во дворе было три машины.
There will be a crystal chandelier over this table.
Над этим столом будет хрустальная люстра.
После формального подлежащего there глагол to be может употребляться с модальными глаголами или с глаголами to seem, to appear в значении «казаться».
There must be somebody in the room.
Кажется, в комнате кто-то есть.
There seemed to be a way out.
Казалось, выход (из положения) был.
Отрицательная форма образуется при помощи отрицания no, которое ставится после глагола to be перед существительным.
There is no lamp on the table.
На столе нет лампы.
Если перед существительным стоит определение, выраженное местоимениями any, much и др., то после глагола to be ставится частица not.
There is not any lamp on the table. На столе нет (никакой) лампы.
There is not much snow in the street. На улице не много снега.
Вопросительная форма при употреблении глагола to be в Present Simple или Past Simple (или Present и Past Indefinite) образуется путем постановки глагола to be на первое место — перед there.
Is there a lamp on the table? На столе есть лампа?
При наличии сложной формы глагола (т.е. при наличии вспомогательных или модальных глаголов) вспомогательный или модальный глагол ставится перед there, а глагол to be — после there.
Will there be an English lesson at 3 o’clock?
Будет ли урок английского языка в три часа?
При постановке вопроса к подлежащему с оборотом there is/there are употребляется вопросительное слово what, которое является подлежащим предложения. Глагол to be в этих случаях всегда употребляется в единственном числе, даже если вопрос ставится в отношении наличия нескольких предметов или явлений.
What is there on the table? Что на столе?
НО: В ответе на такой вопрос глагол to be употребляется во множественном числе, если констатируется факт наличия нескольких предметов или явлений (или, например, в случае перечисления их — как было отмечено ранее).
What is there on the table? Что на столе?
There are some books. Несколько книг.
Вопросы к другим членам предложения с этой конструкцией строятся по общему правилу.
Краткие ответы на вопрос, содержащий оборот there is/ there are, также строятся по общему правилу.
Are there any books on the table? —
На столе есть какие-либо книги? —
Yes, there are (some). Да, есть.
(No, there aren’t.) (Нет.)
ЗАМЕТЬТЕ:
Частица there в обороте there is/there are не имеет значения, т.е. значения наречия there — там, туда. Поэтому если в предложении с этим оборотом нужно передать значение «там» (т.е. употребить наречие there в смысловом значении), то это второе there ставится в конце предложения как обстоятельство места.
But there are no lemons there. Но там нет никаких лимонов.
Читайте также:
- Виды предложений
- Повествовательные предложения
- Случаи нарушения прямого порядка слов в английском предложении
- Вопросительные предложения
- Общие вопросы
- Краткие и полные ответы
- Специальные вопросы
- Альтернативные вопросы
- Разделительные вопросы
- Отрицательные предложения
- Восклицательные предложения
- Личные, неопределенно-личные и безличные предложения
- Сложные предложения
- Сложносочиненные предложения
- Сложноподчиненные предложения
- Типы придаточных предложений
It’s not quite that simple. The website you linked to says this:
When you’re making a list of things, sometimes there are sounds wrong:
There are a kitchen, a living room, and a bedroom in my apartment.
There are sounds bad because the noun that follows it, kitchen, is singular. Even though you’re really talking about multiple things, (a kitchen, a living room, a bedroom), it’s often better to use the singular verb is in a construction like this.
There is a kitchen, a living room, and a bedroom in my apartment.
Some language commentators still insist on using are in sentences like this despite the awkwardness, but
actual usage is extremely mixed.
Note the final paragraph, which says that not all native English speakers agree on this.
Personally, I think the reason we tend to use «there is» more than «there are» is simply that the former is easier to pronounce. That is why in speech we often say things like «There’s 50 fifty people in this room,» when grammatically it should be «there are.»