
Word for Microsoft 365 Outlook for Microsoft 365 Project Online Desktop Client Word 2021 Outlook 2021 Project Professional 2021 Project Standard 2021 Word 2019 Outlook 2019 Project Professional 2019 Project Standard 2019 Word 2016 Outlook 2016 Project Professional 2016 Project Standard 2016 Office 2016 Word 2013 Outlook 2013 Project Professional 2013 Project Standard 2013 Office 2013 Word 2010 Outlook 2010 Office 2010 Word 2007 Outlook 2007 Office 2007 InfoPath 2013 InfoPath Edit Mode 2010 InfoPath Filler 2013 Word Starter 2010 More…Less
The fastest way to create a basic hyperlink in a Microsoft 365 document is to press ENTER or the SPACEBAR after you type the address of an existing webpage, such as http://www.contoso.com. Microsoft 365 automatically converts the address into a link.
In addition to webpages, you can create links to existing or new files on your computer, to email addresses, and to specific locations in a document. You can also edit the address, display text, and font style or color of a hyperlink.
Notes:
-
If you want to remove links or stop Microsoft 365 from automatically adding hyperlinks, see Remove or turn off hyperlinks.
-
This article applies to desktop versions of Word, Excel, Outlook, and PowerPoint. A simplified set of hyperlink features is offered on Microsoft 365 Online. If you have a desktop version of Microsoft 365, you can edit your document there for more advanced hyperlink features, or you can try or buy the latest version of Microsoft 365.
-
Select the text or picture that you want to display as a hyperlink.
-
On ribbon, on the Insert tab, select Link.
You can also right-click the text or picture and click Link on the shortcut menu.
-
In the Insert Hyperlink box, type or paste your link in the Address box.
Note: If you don’t see the Address box, make sure Existing File or Web Page is selected under Link to.
Optionally, type different display text for your link in the Text to display box.
Note: If you don’t know the address for your hyperlink, click Browse the Web
 to locate the URL on the Internet and copy it.
 to locate the URL on the Internet and copy it.
Optional: To customize the ScreenTip that appears when you rest the pointer over the hyperlink, click ScreenTip in the top-right corner of the Insert Hyperlink dialog box and enter the text you want.
You can add a hyperlink to a file on your computer, or to a new file that you want to create on your computer.
-
Select the text or picture that you want to display as a hyperlink.
-
Press Ctrl+K.
-
Under Link to, do one of the following:
-
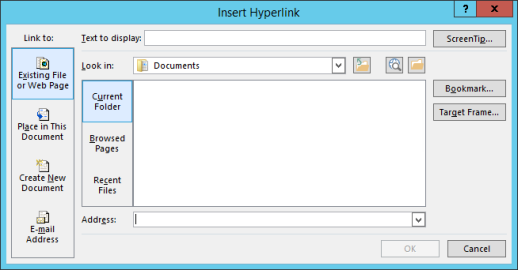
To link to an existing file, click Existing File or Web Page under Link to, and then find the file in the Look in list or the Current Folder list.
-
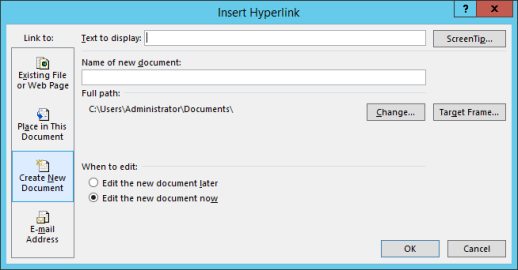
To create a new, blank file and link to it, click Create New Document under Link to, type a name for the new file, and either use the location shown under Full path or browse to a different save location by clicking Change. You can also choose whether to Edit the new document later or open and Edit the new document now.
-
Optional: To customize the ScreenTip that appears when you rest the pointer over the hyperlink, click ScreenTip in the top-right corner of the Insert Hyperlink dialog box and enter the text you want.
-
Select the text or picture that you want to display as a hyperlink.
-
Press Ctrl+K.
You can also right-click the text or picture and click Link on the shortcut menu.
-
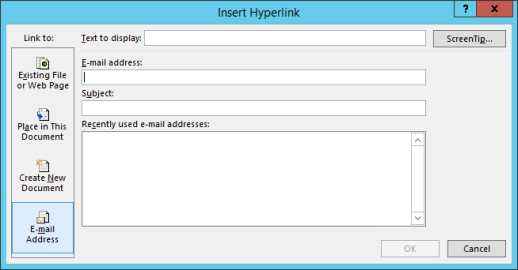
Under Link to, click E-mail Address.
-
Either type the email address that you want in the E-mail address box, or select an address in the Recently used e-mail addresses list.
-
In the Subject box, type the subject of the message.
Note: Some web browsers and email programs might not recognize the subject line.
Optional: To customize the ScreenTip that appears when you rest the pointer over the hyperlink, click ScreenTip in the top-right corner of the Insert Hyperlink dialog box and enter the text you want.
You can also create a hyperlink to a blank email message by simply typing the address in the document. For example, type someone@example.com, and Microsoft 365 creates the hyperlink for you (unless you turned off automatic formatting of hyperlinks).
You can create hyperlinks that link to a Word document or Outlook email message that includes heading styles or bookmarks. You can also link to slides or custom shows in PowerPoint presentations and specific cells and sheets in Excel spreadsheets.
Tips:
-
Learn about adding bookmarks.
-
To add a heading style, select your heading text, click the Home tab in Word or the Format Text tab in Outlook, and select a style in the Styles group.
Create a hyperlink to a location in the current document
-
Select the text or picture that you want to display as a hyperlink.
-
Press Ctrl+K.
You can also right-click the text or picture and click Link on the shortcut menu.
-
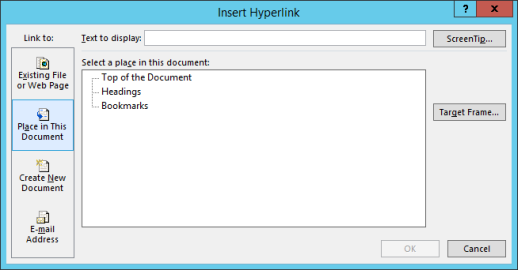
Under Link to, click Place in This Document.
-
In the list, select the heading (current document only), bookmark, slide, custom show, or cell reference that you want to link to.
Optional: To customize the ScreenTip that appears when you rest the pointer over the hyperlink, click ScreenTip in the top-right corner of the Insert Hyperlink dialog box and enter the text you want.
Create a hyperlink to a location in another document
-
Select the text or picture that you want to display as a hyperlink.
-
Press Ctrl+K.
You can also right-click the text or picture and click Link on the shortcut menu.
-
Under Link to, click Existing File or Web Page.
-
In the Look in box, click the down arrow, and find and select the file that you want to link to.
-
Click Bookmark, select the heading, bookmark, slide, custom show, or cell reference that you want, and then click OK.
Optional: To customize the ScreenTip that appears when you rest the pointer over the hyperlink, click ScreenTip in the top-right corner of the Insert Hyperlink dialog box and enter the text you want.
-
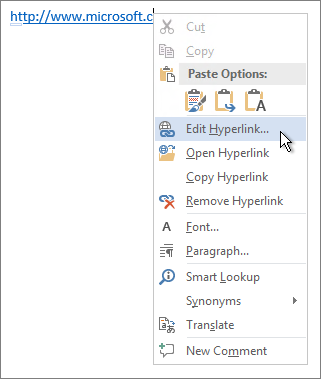
To change the address or display text of a hyperlink you added, right-click the link and click Edit Hyperlink.
-
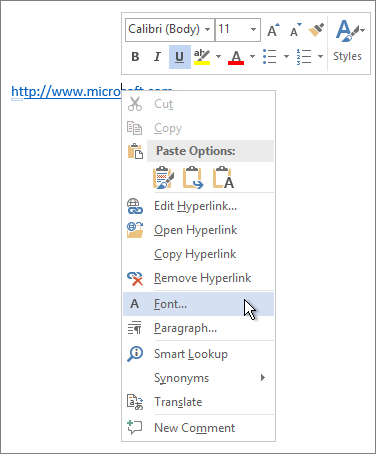
To change the appearance of a hyperlink, such as font style, size, or color, right-click the link and click Font on the shortcut menu, or click a style option on the mini toolbar that appears.
-
To customize the ScreenTip that appears when you rest the pointer over the hyperlink, right-click the link, click Edit Hyperlink, click ScreenTip in the top-right corner of the dialog box, and enter the text you want.
See also
Remove or turn off hyperlinks
Create a hyperlink in Publisher
Create a hyperlink in OneNote
Hyperlinks in Word for the web
Need more help?

Добавление ссылки в документ Ворд осуществляется с помощью стандартных инструментов программы, при этом ее (как саму запись, так и внешний вид) можно изменить в любой момент.
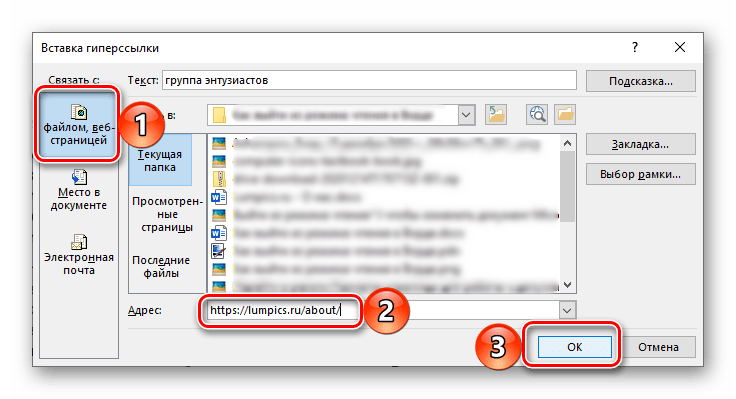
- Подготовьте, то есть скопируйте в буфер обмена ссылку, которую требуется вставить в текстовый файл.
- Выделите слово или фразу, которая в дальнейшем будет вести по указанному адресу.
Обратите внимание! Ссылкой в документе Word может быть не только обычный текст, но и рисунок, изображение, фигура, текстовое поле, WordArt, SmartArt и некоторые другие объекты. Алгоритм действий, которые требуется выполнить в подобных случаях, ничем не отличается от рассмотренного далее.

Далее можно пойти по одному из трех путей:
Читайте также: Полезные сочетания клавиш для удобной работы в Microsoft Word
- Какое бы из трех предложенных выше действий вы не выполнили, будет открыто окно «Вставка ссылки«. Вставьте в расположенную внизу строку «Адрес» скопированный на первом шаге текущей инструкции URL. Нажмите «ОК» для подтверждения и закрытия окна.

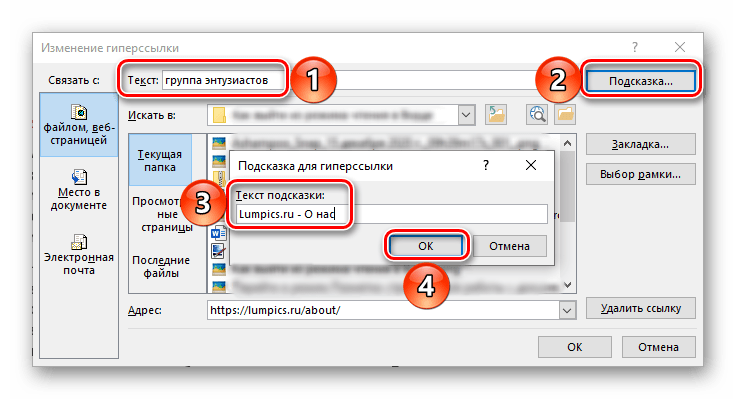
Примечание: В строке «Текст», расположенной вверху этого окна, можно задать свое название для ссылки – текст, внутри которого она будет содержаться. Это полезно в тех случаях, когда изначально адрес добавлялся в пустое место документа, что тоже возможно. Справа же расположена кнопка, нажатие на которую позволяет добавить «Подсказку» — небольшое описание, демонстрируемое при наведении указателя курсора на ссылку в тексте.
Ссылка будет добавлена в указанное вами место документа, будь то текст, изображение или какой-либо другой элемент. Для перехода по ней необходимо зажать клавишу «Ctrl» и кликнуть по объекту левой кнопкой мышки (ЛКМ).
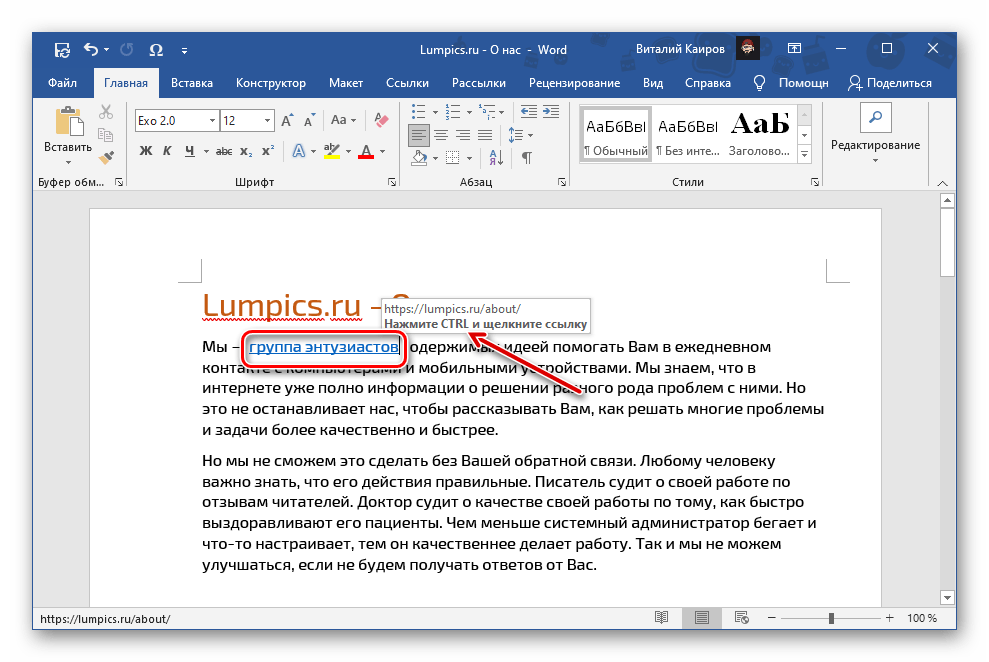
Если добавлялась подсказка, она будет показана вместо адреса во всплывающем окошке около текста-гиперссылки.
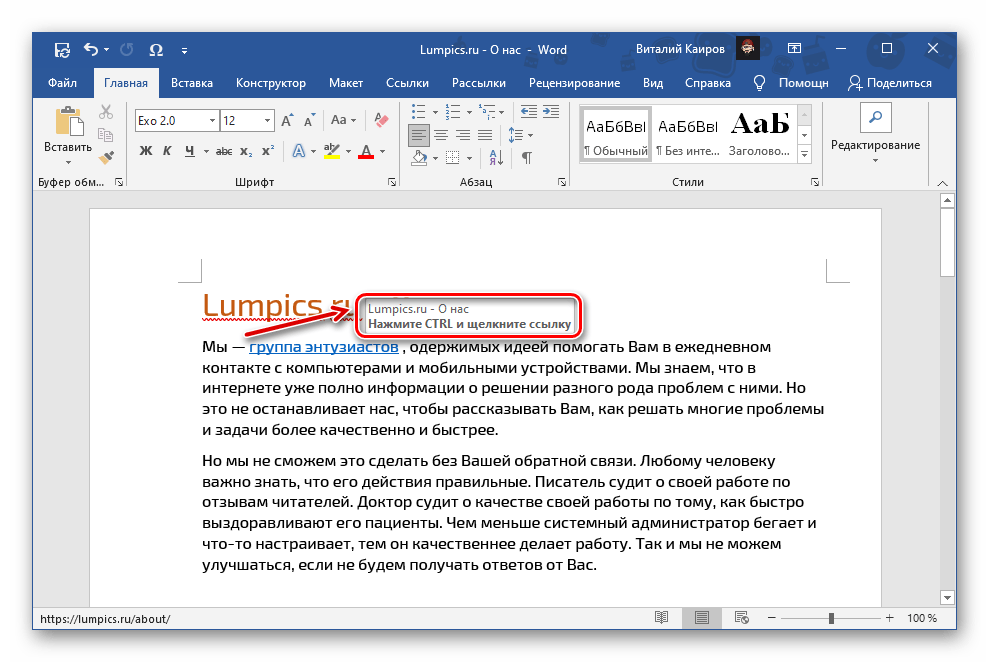
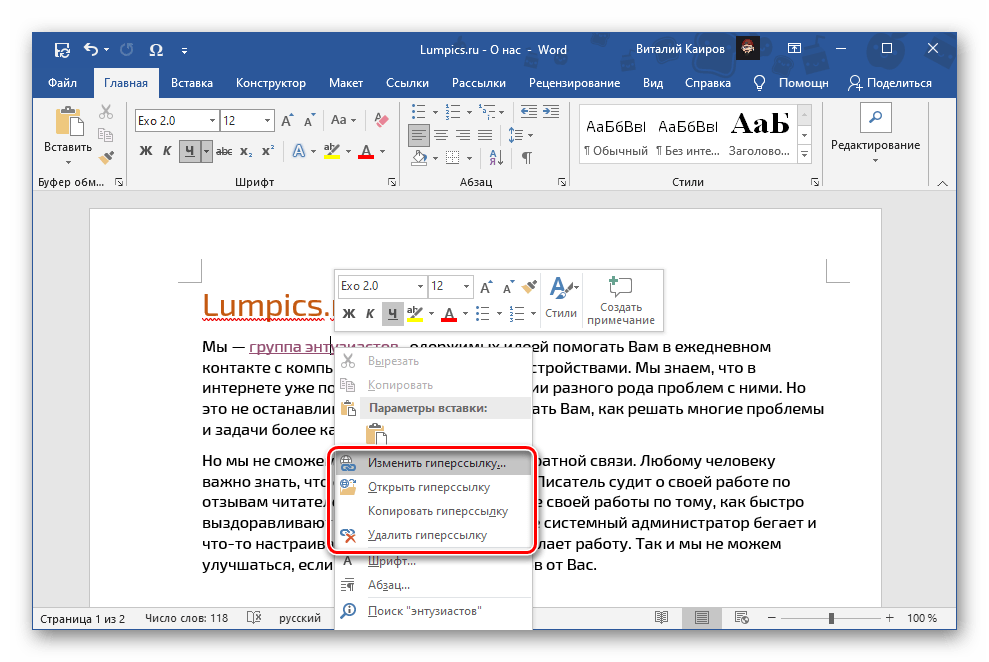
Из контекстного меню, вызываемого нажатием ПКМ по указанному месту, тоже можно открыть ссылку. Там же доступна возможность ее изменения, копирования и удаления.
Читайте также: Как удалить ссылки в документе Ворд

Еще статьи по данной теме:
Помогла ли Вам статья?
We like books. But one thing that you can’t do on paper is link to another book. On that level at least, electronic media has a distinct advantage. And with Microsoft Word, it’s easy to add a hyperlink in a document.
But how does this work? In this post, we look at how to add a link in Microsoft Word, as well as how to edit and remove hyperlinks in a document.
How to Embed a Hyperlink in a Document
Whether you’re writing website copy, where hyperlinks enable navigation, or simply adding links to useful internet resources in a document, Microsoft Word makes it simple. For instance, if you type a web address and hit space or return, MS Word will automatically format it as a link.
However, most of the time, you’ll want to embed a link in the text. To do this:
- Highlight the text you want to use as a link
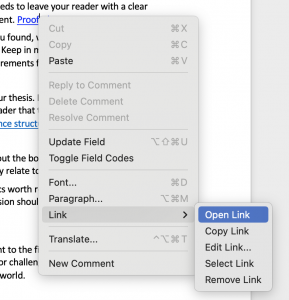
- Go to Insert > Links > Link (or right click the text and select Link)
- Type the URL for the link destination into the Address field
- Click OK to create your hyperlink
Link options in the contextual menu.
The highlighted text will then become a hyperlink.
To test the link, hold CTRL and left click (or right click and select Open Hyperlink). This will open the destination in your default web browser.
You can use this same process to link to another file on your computer.
To link to a file, simply select it via the Insert Hyperlink menu and click OK. Keep in mind, though, that this link will only work on your computer/network, since this is where the destination file is stored.
How to Edit Hyperlinks
You can edit a hyperlink in the same way as you would any text in a document: simply place the cursor in the hyperlinked text and type.
Find this useful?
Subscribe to our newsletter and get writing tips from our editors straight to your inbox.
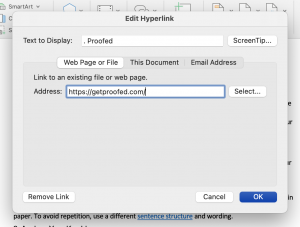
Alternatively, if you right click the link you can select Edit Hyperlink. In the window that opens, you can then change both:
- The text that will be used for the hyperlink
- The destination of the link (i.e., file path or URL)
If you then click OK when you’re done, the link will be updated automatically.
How to Format Hyperlinks
By default, Microsoft Word formats links with blue, underlined text. However, you can edit hyperlinks with the standard formatting options, so you can use these to change the appearance of any links in a document.
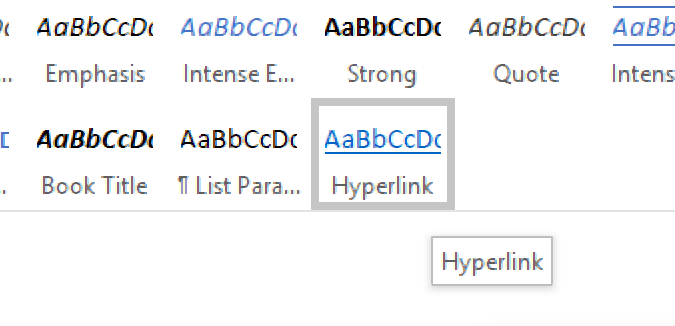
And if you want to change the default hyperlink style, simply:
- Open the Styles menu
- Find the style named “Hyperlink”
- Right click the style name and select Modify…
- Apply any formatting options as required and click OK
This will update the default hyperlink formatting, including any links you had added to the document previously. And if you then add more new links while editing, they will all use your updated hyperlink formatting.
How to Remove a Hyperlink in Microsoft Word
To remove a hyperlink from document, you can simply delete it. But this will also remove the text you’d formatted as a link.
To remove a link and keep the text, though, you have two options.
- Go to Insert > Links > Link and select Remove Link in the menu
- Right click the link and select Remove Hyperlink from the menu
MS Word will then remove the link and any formatting from the selected text.
Proofreading Hyperlinks
If you have a document containing hyperlinks, why not submit it for proofreading? As well as checking your spelling, grammar and punctuation, we can make sure your links work properly, saving you from encountering any unfortunate “404 Error – Page Not Found” messages when it counts.
TheTechieSenior.com is reader supported. We may earn a commission if you buy through links on this site. As an Amazon Associate, we earn from qualifying purchases. Learn more here.
There are times when you would like to insert working hyperlinks in Microsoft Word documents. By “working hyperlinks,” I mean links that will take you to a website when you click them. In this article I’ll show you how to add links in Word.
How to add hyperlinks in Microsoft Word documents
The following instructions apply to Microsoft Word for Windows and Macs. The settings panel is arranged differently in Windows than in Macs, but the same basic settings are available.
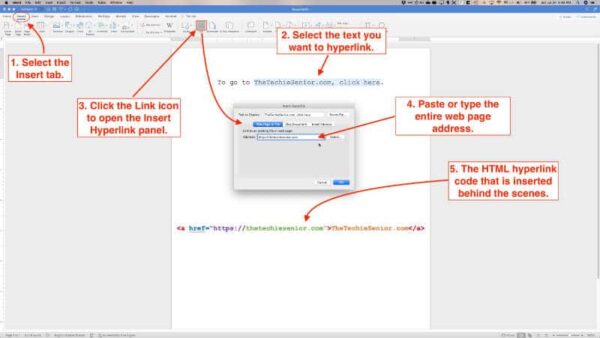
We’ll use the “Click here” example. In Microsoft Word, to add a hyperlink behind the words, select Click here in your document. Then,
- Go to the Insert tab. About half-way across the tool ribbon, look for an icon that is labeled Link. It will look like two loops interconnected.
- In the settings box that opens, select the Web page tab if you want the link to go to a page on a website. Leave that tab open.
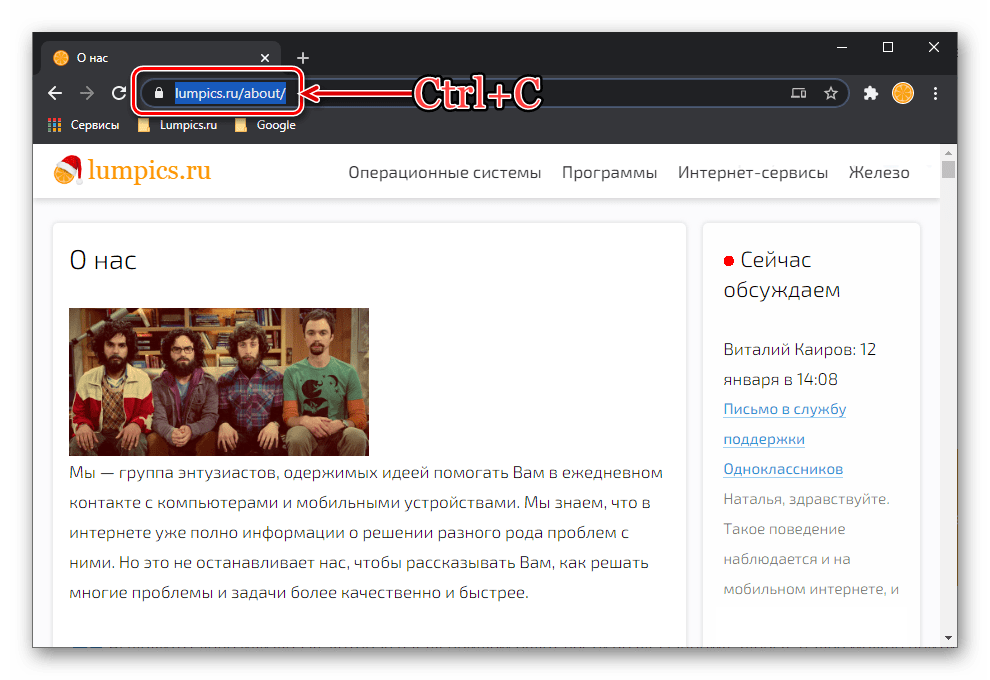
- In a web browser, go to the website page that you want to link to. Select and copy the entire website address that you typed in the browser’s address bar.
- Go back to the Link settings box in Word and paste the link into the box. Click OK to save the link.
You can also link to headings in the current document using the This Document tab in the settings box. That procedure could be used to create a table of contents in MS Word.
You can make an email address live by using the Email Address tab.
How to remove a hyperlink in Microsoft Word
You can remove a link from a word or phrase in Word by selecting the linked words, then following the above instructions. The difference will be, instead of inserting a link in the settings box, click the Remove Link button.
You can also remove a link quickly by right-clicking the link. Click Hyperlink, then Remove Link.
How to disable automatic hyperlinking in Word
Microsoft Word can automatically insert a hyperlink when it recognizes that a domain name (website address) has been typed in a document. If you’d rather not have that happen, you can disable automatic hyperlinking.
In MS Word for Windows, disable automatic hyperlinking by going to File > Options > Proofing > AutoCorrect Options. Then, under Replace, uncheck Internet and network paths with hyperlinks.
In MS Word for Macs, disable automatic hyperlinking by going to the top menu. Choose Word > Preferences > Autocorrect. Select the Autoformat as you type tab. In the second section labeled Automatically as you type, uncheck Internet and network paths with hyperlinks.
Now you know how to add hyperlinks in Microsoft Word and how to remove them if necessary.
Learn more about hyperlinks in documents.
Adding hyperlinks in LibreOffice writer is a similar process.
When you add hyperlinks in Microsoft Word, you’re actually adding a bit of HTML code behind the scenes. Learn more about hyperlinks.

This tutorial shows how to create external hyperlinks in Microsoft Word. Specifically, we will create links to separate files, websites, and email addresses. We will also look at how to edit or remove hyperlinks. Lastly, we will go through the steps to turn off automatic hyperlinking in Word.
Quick Links:
- How to Create Hyperlinks to Separate Files, Websites, and Emails
- How to Edit or Remove Hyperlinks
- How to Turn Off Automatic Hyperlinking
Do you want to add some pizzazz to your hyperlinks? Please visit “How to Change the Style of Hyperlinks in Microsoft Word.”
This tutorial is also available as a YouTube video showing all the steps in real time.
Watch more than fifty other videos about Microsoft Word and Adobe Acrobat on my YouTube channel.
The images below are from Word for Microsoft 365. The steps are the same for Word 2019, Word 2016, Word 2013, and Word 2010. However, your interface may look slightly different in those older versions of the software.
How to Create Hyperlinks to Separate Files, Websites, and Emails in Microsoft Word
The steps below show how to create hyperlinks to separate files, websites, and email addresses. These steps can be applied to text or to an image.
Important Note: There are several ways to create hyperlinks in Word. These steps represent the method I believe is the most user-friendly.
- Select the text or image you want to turn into a hyperlink.

- Right-click the selected text or image, and then select Link from the shortcut menu.

Pro Tip: You can also select Link from the Insert tab in the ribbon. In addition, PC users can use the keyboard shortcut Ctrl + K.
How to Link to a Separate File or Website
- Select the Existing File or Web Page option in the Insert Hyperlink dialog box.

- If you want to link to a separate file, locate and select the file in the Look in section. The file name will appear in the Address text box after you make your selection.
Friendly Reminder: Your readers will only be able to open the file you are linking to if it is stored in a location they can access, such as a shared server or cloud storage.

- If you want to link to a website, enter the URL (including the https:// or http://) in the Address text box.

How to Link to an Email Address
- Select the E-mail Address option.

- Enter the address in the E-mail Address text box.
Important Note: When you start typing, Word will automatically insert mailto: before the address. This term is required to open the email link.

- (Optional Step) Enter a subject into the Subject text box.

- Select the OK button to close the Insert Hyperlink dialog box.

Your text or image should now be converted to a hyperlink.

Pro Tip: To follow a hyperlink in Word, press the Ctrl key on your keyboard while selecting the link.
How to Edit or Remove Hyperlinks in Microsoft Word
- Right-click the hyperlink and select Edit Hyperlink or Remove Hyperlink from the shortcut menu.

- If you selected Edit Hyperlink, edit the link in the Edit Hyperlink dialog box.

- Select the OK button to close the Edit Hyperlink dialog box.

If you selected Remove Hyperlink, the link should be removed from the text or image immediately.
How to Turn Off Automatic Hyperlinking in Microsoft Word
Word will automatically create a hyperlink to any full web address or email address typed in your document.
To remove a hyperlink, you can right-click it and select Remove Hyperlink, as shown in figure 14, above.
However, you can stop Word from creating links by turning off automatic hyperlinking.
- Select the File tab in the ribbon.

- Select the Options tab in the Backstage view.

- Select the Proofing tab in the Word Options dialog box.

- Select the AutoCorrect Options button.

- Select the AutoFormat As You Type tab in the AutoCorrect dialog box.

- Uncheck the Internet and network paths with hyperlinks option.

- Select the OK button to close the AutoCorrect dialog box.

- Select the OK button to close the Word Options dialog box.

Word should no longer automatically create hyperlinks in your document.
Related Resources
How to Create External Links in PDFs with Adobe Acrobat
Three Ways to Insert Tables in Microsoft Word
How to Insert Citations in Microsoft Word